================================================================================================
You can send faxes from the desktop, web, and mobile apps, the Admin Portal, or your email account, or the RingCentral app. Note that you can't make phone calls using your company fax number.
Admins have to [turn on the fax feature](https://support.ringcentral.com/article-v2/Enabling-fax-features.html?brand=RingCentral&product=RingEX&language=en_US "") at the company level before users can send faxes.
Select where you want to send a fax from.
## Desktop & web
Sending a fax from the desktop and web app
------------------------------------------
You can send a fax from anywhere in the desktop or web app by clicking the **New actions (+)** button in the upper right corner, then clicking **Send new fax**.
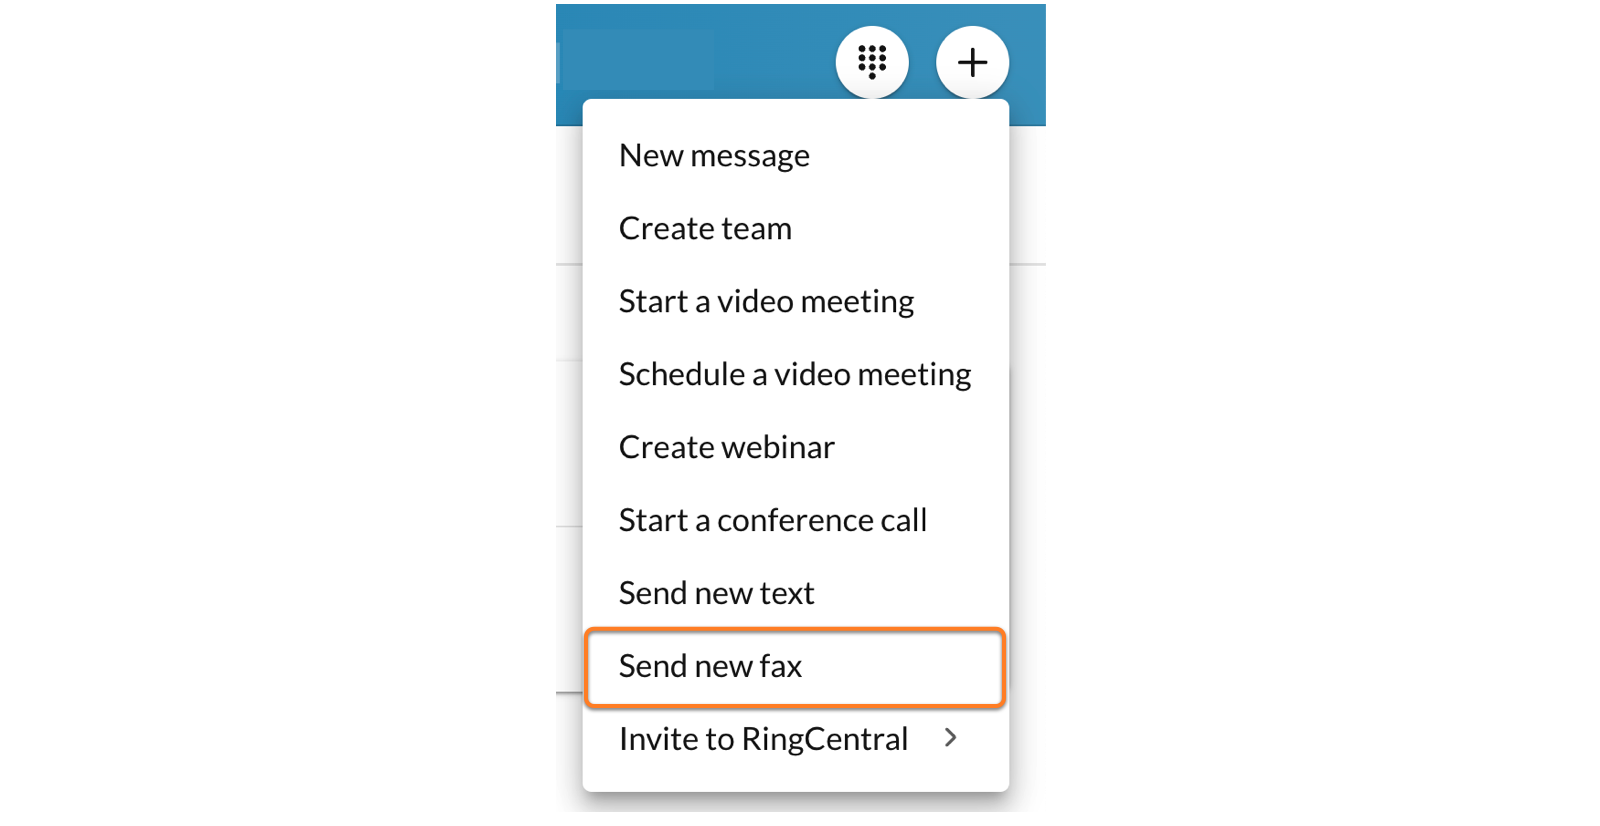
You can also:
* Click **Fax** in the navigation bar.
* Click the **Send new fax** icon in the left panel.
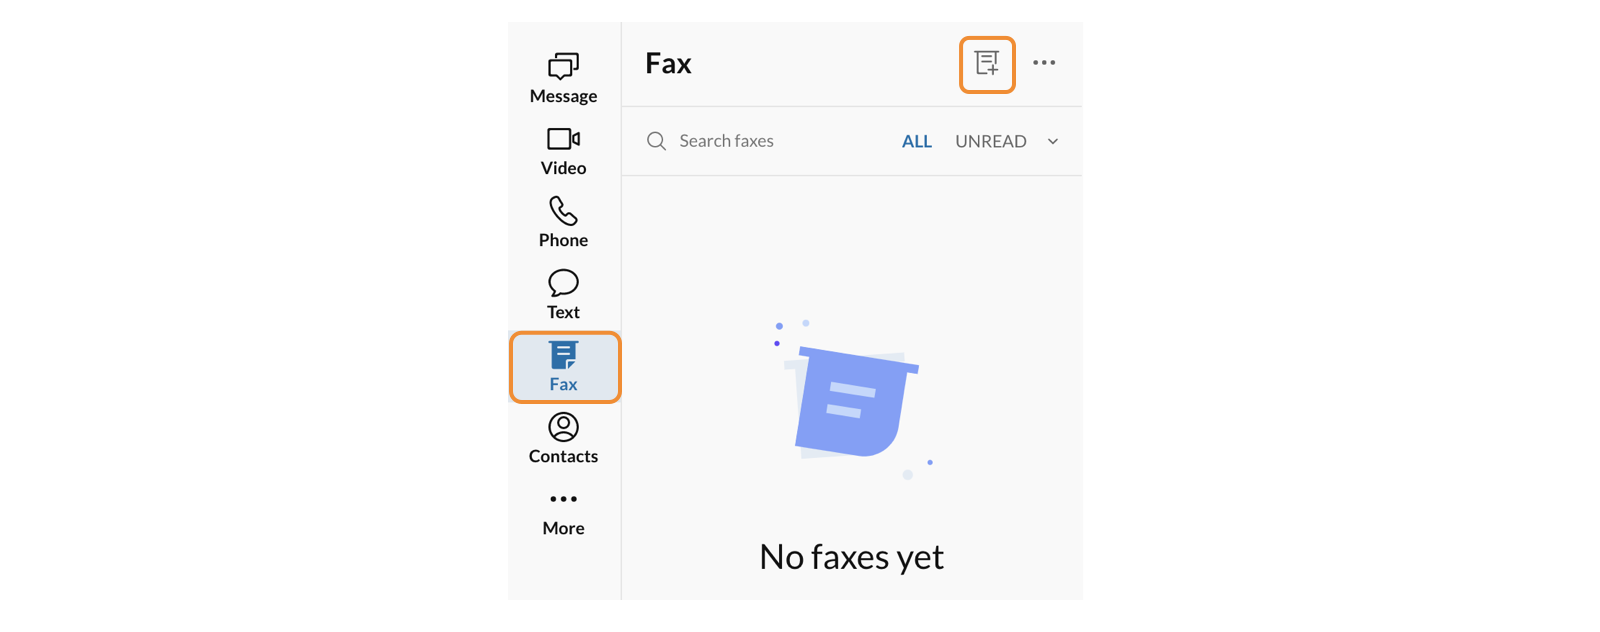
* In the popup, enter your contacts' phone numbers or names in the **To** field. You can send a fax to up to 50 recipients at a time. To add more than 50 recipients, turn on fax broadcasting.
* In the **Cover page** dropdown, select a style for your cover page or click **Add cover page** to choose a template from your computer. If you don't want to use a cover page, click **None** .
* To add a custom cover page:
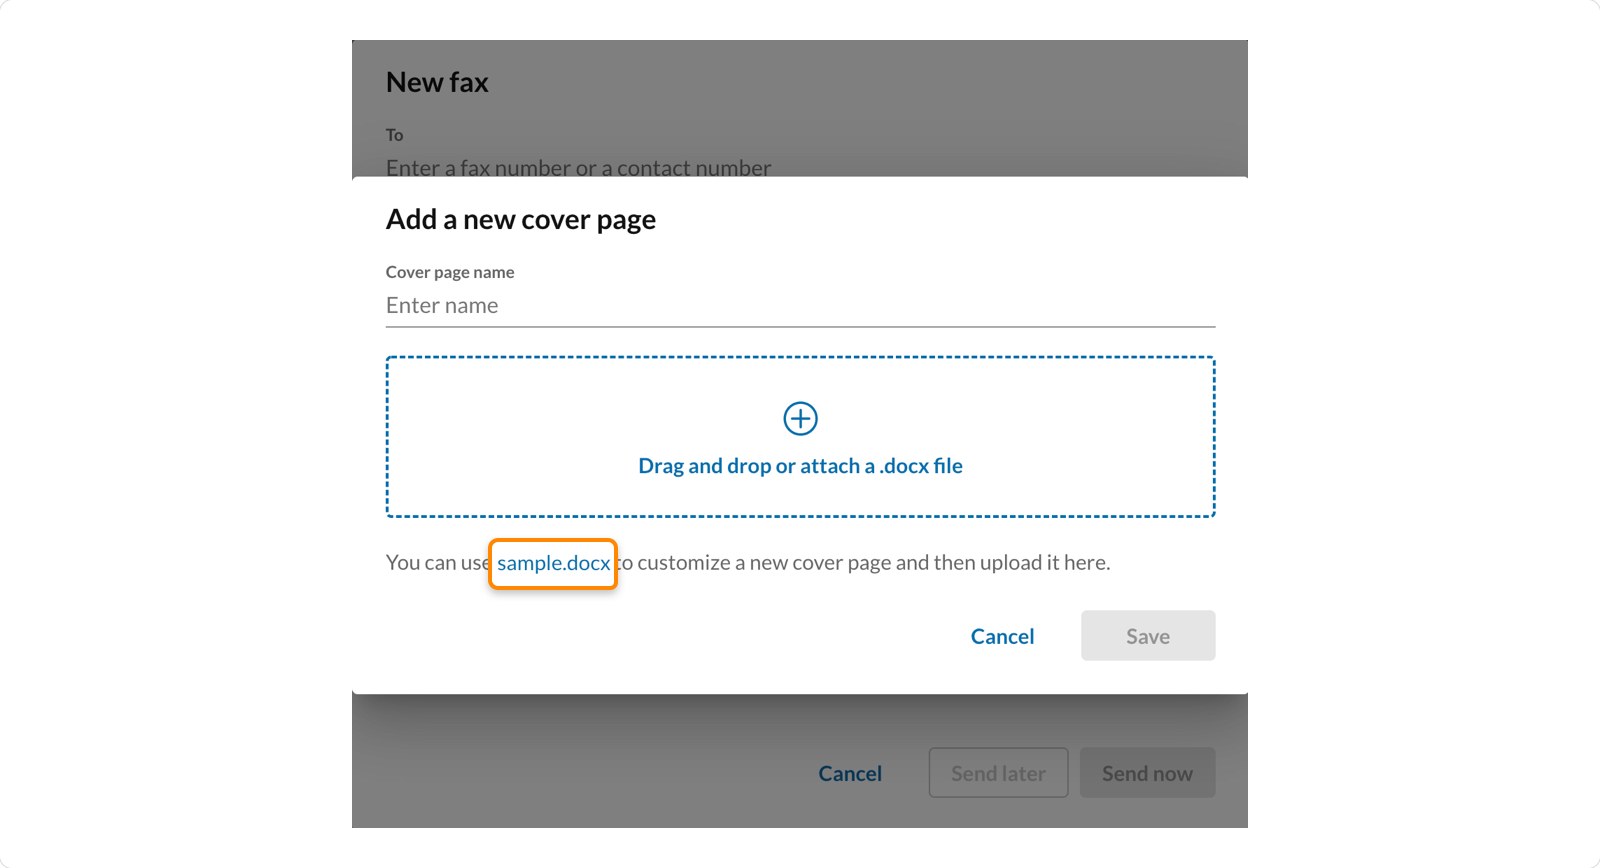
* Click **Add cover page**.
* Enter a name for your cover page in the **Cover page name** field.
* Drag and drop an existing file into the window or click anywhere in the window to locate a file on your computer, then upload it. You can also click **sample.docx** to customize and upload a new cover page.
* Click **Save**. Cover pages are saved for later use.
* If using a cover page, you can add additional information in the **Notes** field.
* To attach files to your fax, click the paper clip **Attach** icon and select the files from your computer or drag and drop them into the window.
Note
All file attachments need to be in [supported formats](https://support.ringcentral.com/article-v2/Fax-Supported-File-Attachments.html?brand=RingCentral&product=RingEX&language=en_US "") and less than 50 MB.
* To send the fax immediately, click **Send now** . To send the fax at a future time:
* Click **Send later**.
* Enter a date and time.
* Click **Schedule**.
Sending a fax from your contacts
--------------------------------
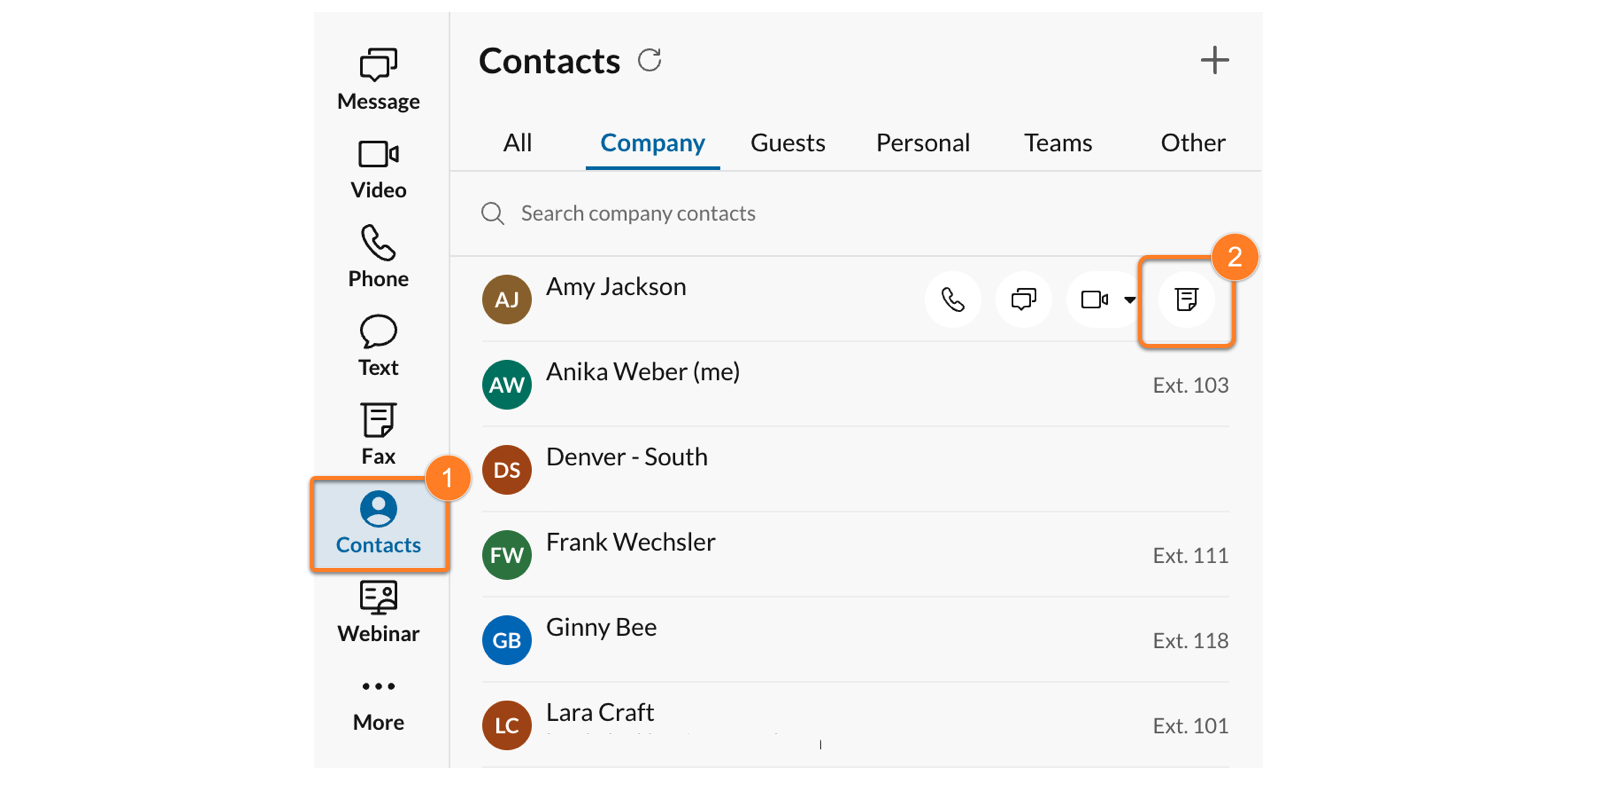
* In the navigation bar, click **Contacts**.
* Hover over a contact's name, then click the **Fax** icon. You may need to click the three-dot **More** icon first.
* In the **Cover page** dropdown, select a style for your cover page or click **Add cover page** to choose a template from your computer. If you don't want to use a cover page, click **None** .
* To add a custom cover page:
* Click **Add cover page**.
* Enter a name for your cover page in the **Cover page name** field.
* Drag and drop an existing file into the window or click anywhere in the window to locate a file on your computer, then upload it. You can also click **sample.docx** to customize and upload a new cover page.
* Click **Save**. Cover pages are saved for later use.
* If using a cover page, you can add additional information in the **Notes** field.
* To attach files to your fax, click the paper clip **Attach** icon and select the files from your computer or drag and drop them into the window.
Note
All file attachments need to be in [supported formats](https://support.ringcentral.com/article-v2/Fax-Supported-File-Attachments.html?brand=RingCentral&product=RingEX&language=en_US "") and less than 50 MB.
* To send the fax immediately, click **Send now** . To send the fax at a future time:
* Click **Send later**.
* Enter a date and time.
* Click **Schedule**.
Sending a fax from the Print screen
-----------------------------------
You can fax any document or web page directly from the Print screen by adding **
RingCentral
Fax** to your list of printers. This feature is only available for Windows PCs.
### Installing the Print-to-fax plugin
* In the navigation bar, click **Settings**.
* Click **Fax**.
* Click **Install** next to **Print to Fax**.
### Sending documents or web pages
* Open the document or web page you want to attach to a fax.
* Click **Print** or press **Ctrl + P**.
* Select **
RingCentral
Fax** from the printer dropdown in the print window.
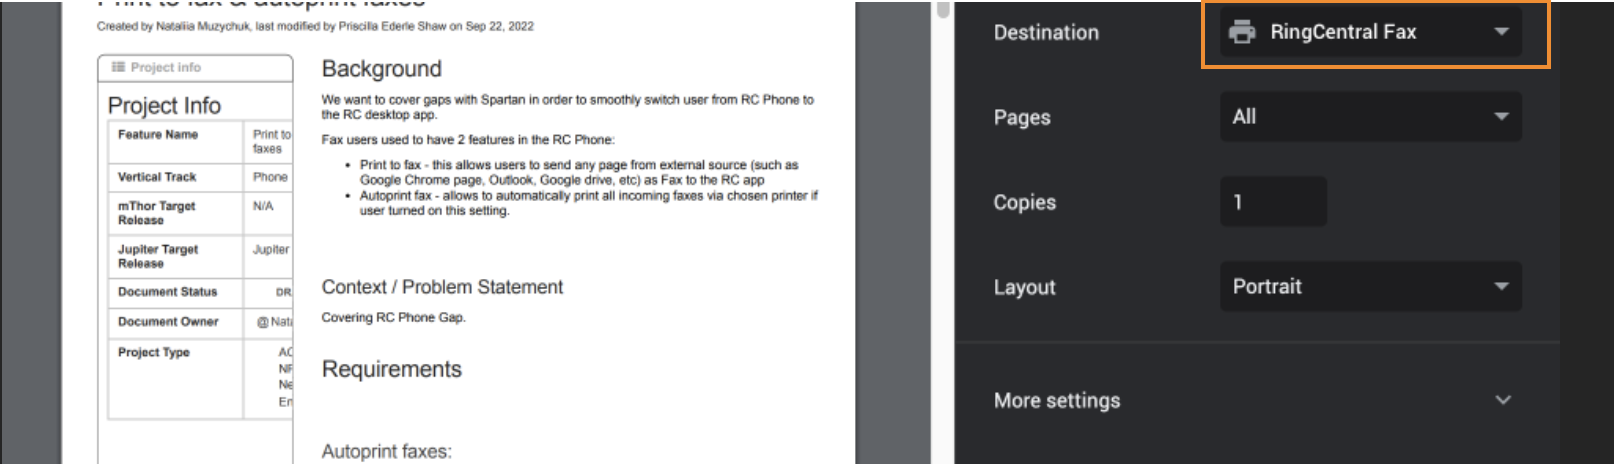
* Click **Print**. The app will open a new fax page with the document attached.
* Enter phone numbers or names from your contacts list in the **To** field.
* Select a **Cover page** style or click **Add cover page** to select a template. If you don't want to use a cover page, select **None**.
* You can also add more information in the **Notes** field.
* To send the fax immediately, click **Send now** . To send the fax at a future time:
* Click **Send later**.
* Enter a date and time.
* Click **Schedule**.
To check the status of your sent faxes, go to **Fax \> Sent** or **Fax \> All faxes** . Fax status options are *Unread* , *Sent* , *Received* , or *Failed*.
Faxing scanned documents
------------------------
The app allows you to send scanned documents by fax when you scan documents directly from the **Fax** screen.
Before using the feature, make sure your scanner has the most current driver (TWAIN-compliant for Windows) and software installed. The app will automatically detect and connect to the scanner. Refer to your scanner's manual or manufacturer's website for more information.
* Click the **New actions +** icon in the top right corner.
* Click **Send new fax** .

* Click **Scan** to scan and send attachments. If your scanner is turned off, the **Scan** button will be greyed out.

* Select the **Scanner** and **Source** from the dropdowns. Check the **Invert image** box, if needed.
* Click **Start**.
* Enter the phone numbers or names from your contacts list in the **To** field.
* Select a **Cover page** style or click **Add cover page** to select a template. If you don't want to use a cover page, select **None**.
* Add additional information in the **Notes** field.
* To send the fax immediately, click **Send now** . To send the fax at a future time:
* Click **Send later**.
* Enter a date and time.
* Click **Schedule**.
**Additional resources**
[Viewing and managing faxes](https://support.ringcentral.com/article-v2/Viewing-and-managing-a-fax.html?brand=RingCentral&product=RingEX&language=en_US "")
[Troubleshooting issues with sending or receiving faxes](https://support.ringcentral.com/article-v2/Troubleshooting-fax-via-email-send-issues.html?brand=RingCentral&product=RingEX&language=en_US&pills-nav=desktop_%26_web "")
[Configuring outbound fax settings as an admin](https://support.ringcentral.com/article-v2/4537-Fax-Configure-Outbound-Fax-Settings-Admin-RingCentral.html?brand=RC_US&product=RingEX&language=en_US "")
## Mobile
Sending a fax from the mobile app
---------------------------------
* Tap **Fax** in the bottom toolbar. You may need to click the three-dot **More** icon, depending on your tab customization.

* Tap the plus (**+** ) icon in the upper right corner for iOS or the **message** icon at the bottom right for Android.

* Enter phone numbers or names in the **To** field, then tap **Next**. You can add up to 50 recipients. To add more than 50 recipients, turn on fax broadcasting.
* The **Fax From** field shows the number your fax will be coming from. Click the dropdown if you'd like to change the number or send from a blocked number.
* Tap **Cover page** to change the default cover page.
* Tap the toggle off if you don't want to include a cover page.
* Tap any existing template to select it. Tap **Preview** if you'd like to preview it, then tap the back arrow.
* To upload your cover page, tap **Add** , then **Upload cover page** . Add a name for your cover page and upload it in DOCX format. When you're done, tap **Save**. Cover pages are saved for later use.
* Tap the back arrow when you're done with your cover letter.
* Add a cover page note (optional).
* To send files and photos with your message, tap **Add attachment** .
* **Attach files**: Share a document.
* **Attach photos**: Attach and share images.
* **Take photo** : Take a picture using your phone's camera.
Note
All file attachments need to be in [supported formats](https://support.ringcentral.com/article-v2/Fax-Supported-File-Attachments.html?brand=RingCentral&product=RingEX&language=en_US "") and less than 50 MB.
* Send the fax:
* To send the fax immediately, tap **Send** in the upper right corner.
* To send a fax at a future time, tap **Send later** , enter a date and time, then tap **Send** in the upper right corner.

Note
To save your fax as a draft, tap the **Back** icon in the upper left corner, then select **Save draft**. This will save the fax so you can edit it later.
To confirm the status of a sent fax, tap **Fax** in the bottom navigation bar. Fax status options are *Processing* , *Submitted* , *Sent* , *Failed* , or *Received*.
Sending a fax from a profile
----------------------------
* Tap **Message** in your bottom menu bar.
* Open any direct message conversation.
* Tap the arrow next to the person's name at the top of the conversation.
* Next to their phone number, tap the **Fax** icon.

* The **Fax From** field shows the number your fax will be coming from. Click the dropdown if you'd like to change the number or send from a blocked number.
* Tap **Cover page** to change the default cover page.
* Tap the toggle off if you don't want to include a cover page.
* Tap any existing template to select it. Tap **Preview** if you'd like to preview it, then tap the back arrow.
* To upload your cover page, tap **Add** , then **Upload cover page** . Add a name for your cover page and upload it in DOCX format. When you're done, tap **Save**. Cover pages are saved for later use.
* Tap the back arrow when you're done with your cover letter.
* Add a cover page note (optional).
* To send files and photos with your message, tap **Add attachment** .
* **Attach files**: Share a document.
* **Attach photos**: Attach and share images.
* **Take photo** : Take a picture using your phone's camera.
Note
All file attachments need to be in [supported formats](https://support.ringcentral.com/article-v2/Fax-Supported-File-Attachments.html?brand=RingCentral&product=RingEX&language=en_US "") and less than 50 MB.
* Send the fax:
* To send the fax immediately, tap **Send** in the upper right corner.
* To send a fax at a future time, tap **Send later** , enter a date and time, then tap **Send** in the upper right corner.
**Additional resources**
[Troubleshooting issues with sending or receiving faxes](https://support.ringcentral.com/article-v2/Troubleshooting-fax-via-email-send-issues.html?brand=RingCentral&product=RingEX&language=en_US&pills-nav=desktop_%26_web "")
[Configuring outbound fax settings as an admin](https://support.ringcentral.com/article-v2/4537-Fax-Configure-Outbound-Fax-Settings-Admin-RingCentral.html?brand=RC_US&product=RingEX&language=en_US "")
## Admin Portal
Sending a fax from the Admin Portal
-----------------------------------
* Go to the [
Admin Portal
](https://service.ringcentral.com "") and sign in.
* Click the **App Gallery** icon at the top right, then select **FaxOut** .

* In the **Send a Fax** popup window, you can add recipients in two ways:
* In the **To** field, enter your contacts' names or phone numbers.
* Click the **+** icon to the right of the **To** field, then select recipients from your contacts list.
* When you're done adding contacts, click **Insert**.
Note
You can add up to 50 recipients. To add more than 50 recipients, [you'll need to turn on fax broadcasting](https://support.ringcentral.com/article-v2/11177-Fax-Broadcasting-Overview.html?brand=RC_US&product=RingEX&language=en_US "").

* To include a cover page:
* Check the **Enable** box, then click **Select**.
* Select a cover page style from the **Cover Page** dropdown, then click **Done**.
* If you'd like, you can add more information in the **Cover Page Notes** field.
* In the **Attach Files** dropdown, select *My Computer* , *Box* , *Dropbox* , or *Google Drive* , then click **Browse** .
Note
* All your file attachments need to be in [supported formats](https://support.ringcentral.com/article-v2/Fax-Supported-File-Attachments.html?brand=RingCentral&product=RingEX&language=en_US "") with a total size of less than 50 MB.
* If you're attaching a file from cloud storage, you may have to authorize
RingCentral
to access it.
* To send your fax, click **Send Now** . To send the fax at a future time:
* Under **Schedule** , check the **Enable** box.
* Click **Send on**, then select a date and time.
* Click **Schedule**.
To check your fax's status, navigate to **My Extension \> Messages \> Sent Items** in the Admin Portal.
* Successfully sent faxes appear in the **Sent** column, along with timestamps.
* Pending faxes appear in your **Outbox**.
* Unsuccessfully sent faxes appear in the **Scheduled** column and are marked *Failed*.
**Additional resources**
[Viewing and managing faxes](https://support.ringcentral.com/article-v2/Viewing-and-managing-a-fax.html?brand=RingCentral&product=RingEX&language=en_US "")
[Troubleshooting issues with sending or receiving faxes](https://support.ringcentral.com/article-v2/Troubleshooting-fax-via-email-send-issues.html?brand=RingCentral&product=RingEX&language=en_US&pills-nav=desktop_%26_web "")
[Configuring outbound fax settings as an admin](https://support.ringcentral.com/article-v2/4537-Fax-Configure-Outbound-Fax-Settings-Admin-RingCentral.html?brand=RC_US&product=RingEX&language=en_US "")
## Email
\\\Your browser does not support the iframe element.\
Sending a fax by email
----------------------
Before you send a fax by email:
* If your company admin has turned on Email-to-fax, you can send up to 50 faxes at a time. You'll need to [turn on fax broadcasting](https://support.ringcentral.com/article-v2/11177-Fax-Broadcasting-Overview.html?brand=RC_US&product=RingEX&language=en_US "") to send a fax to more than 50 recipients.
* Before sending a fax by email, ensure you've [set up your email address](https://support.ringcentral.com/article-v2/Enabling-Email-to-Fax-in-the-Admin-Portal.html?brand=RingCentral&product=RingEX&language=en_US#GUID-609484c4-bcd0-4c07-a183-ecd291163b56 "").
### Sending a fax by email
* Sign in to your company email account.
* Compose a new email.
* To send a fax to:
* 50 or fewer recipients: In the **To** field, enter the phone number as you would dial it, followed by *@rcfax.com* (e.g., *18005551212@rcfax.com*). Use a semicolon and a space between recipients' names.
* 50 or more recipients: In the **To** field, enter the phone number as you would dial it, followed by *@rcfaxbroadcast.com* (e.g., *18005551212@rcfaxbroadcast.com*).
* To include a cover page note, enter it in the **Subject** field.
* Select attachments from your computer.
Note
All file attachments need to be in [supported formats](https://support.ringcentral.com/article-v2/Fax-Supported-File-Attachments.html?brand=RingCentral&product=RingEX&language=en_US "") and less than 50 MB.
* Leave the body of the email empty. Delete any signatures, images, and footnotes.
* Send your email.
You'll receive an email confirmation with the fax transmission results.
**Additional resources**
[Viewing and managing faxes](https://support.ringcentral.com/article-v2/Viewing-and-managing-a-fax.html?brand=RingCentral&product=RingEX&language=en_US "")
[Troubleshooting issues with sending or receiving faxes](https://support.ringcentral.com/article-v2/Troubleshooting-fax-via-email-send-issues.html?brand=RingCentral&product=RingEX&language=en_US&pills-nav=desktop_%26_web "")
[Configuring outbound fax settings as an admin](https://support.ringcentral.com/article-v2/4537-Fax-Configure-Outbound-Fax-Settings-Admin-RingCentral.html?brand=RC_US&product=RingEX&language=en_US "")
## Analog telephone adapter
If you don't have an analog telephone adapter (ATA) set up in your account, you'll first need to [follow the steps](https://support.ringcentral.com/article-v2/Fax-Set-Up-Analog-Telephone-Adapter-ATA.html?brand=RC_US&product=RingEX&language=en_US "") for setting up a new ATA.
Setting up an ATA as your fax machine
-------------------------------------
To set up the ATA as the fax machine:
* Go to the [
Admin Portal
](https://service.ringcentral.com "") and sign in.
* Click **My Extension** in the top right.
* Go to **Settings \> Phones \& Numbers**.
* Ensure the ATA fax machine is listed and enabled. You can disable other fax machines if needed.
Sending a fax using ATA
-----------------------
You'll follow the same steps for sending a fax with an ATA, utilizing the Admin Portal.
* Go to the [
Admin Portal
](https://service.ringcentral.com "") and sign in.
* Click the **App Gallery** icon at the top right, then select **FaxOut** .

* In the **Send a Fax** popup window, you can add recipients in two ways:
* In the **To** field, enter your contacts' names or phone numbers.
* Click the **+** icon to the right of the **To** field, then select recipients from your contacts list.
* When you're done adding contacts, click **Insert** .
Note
You can add up to 50 recipients. To add more than 50 recipients, [you'll need to turn on fax broadcasting](https://support.ringcentral.com/article-v2/11177-Fax-Broadcasting-Overview.html?brand=RC_US&product=RingEX&language=en_US "").

* To include a cover page:
* Check the **Enable** box, then click **Select**.
* Select a cover page style from the **Cover Page** dropdown, then click **Done**.
* If you'd like, you can add more information in the **Cover Page Notes** field.
* In the **Attach Files** dropdown, select *My Computer* , *Box* , *Dropbox* , or *Google Drive* , then click **Browse** .
Note
* All your file attachments need to be in [supported formats](https://support.ringcentral.com/article-v2/Fax-Supported-File-Attachments.html?brand=RingCentral&product=RingEX&language=en_US "") with a total size of less than 50 MB.
* If you're attaching a file from cloud storage, you may have to authorize
RingCentral
to access it.
* To send your fax, click **Send Now** . To send the fax at a future time:
* Under **Schedule** , check the **Enable** box.
* Click **Send on**, then select a date and time.
* Click **Schedule**.
To check your fax's status, navigate to **My Extension \> Messages \> Sent Items** in the Admin Portal.
* Successfully sent faxes appear in the **Sent** column, along with timestamps.
* Pending faxes appear in your **Outbox**.
* Unsuccessfully sent faxes appear in the **Scheduled** column and are marked *Failed*.
**Additional resources**
[Viewing and managing faxes](https://support.ringcentral.com/article-v2/Viewing-and-managing-a-fax.html?brand=RingCentral&product=RingEX&language=en_US "")
[Troubleshooting issues with sending or receiving faxes](https://support.ringcentral.com/article-v2/Troubleshooting-fax-via-email-send-issues.html?brand=RingCentral&product=RingEX&language=en_US&pills-nav=desktop_%26_web "")
[Configuring outbound fax settings as an admin](https://support.ringcentral.com/article-v2/4537-Fax-Configure-Outbound-Fax-Settings-Admin-RingCentral.html?brand=RC_US&product=RingEX&language=en_US "")