Creating call queues in the Admin Portal
========================================
You can create a call queue to route incoming calls to multiple users. You can create call queues individually or add them in bulk in the Admin Portal. Once you've created a call queue and added members, you can [add a direct number](#direct-number ""), [manage the greetings, hold music](https://support.ringcentral.com/article-v2/managing-greetings-and-hold-music-in-call-queues.html?brand=RingCentral&product=RingEX&language=en_US ""), [call handling settings](https://support.ringcentral.com/article-v2/10514-call-queue-set-up-call-handling-how-calls-transferred-group-members.html?brand=RingCentral&product=RingEX&language=en_US ""), pickup settings, and [set up voicemail and notifications](#voicemail-notifications "").
Creating a call queue
---------------------
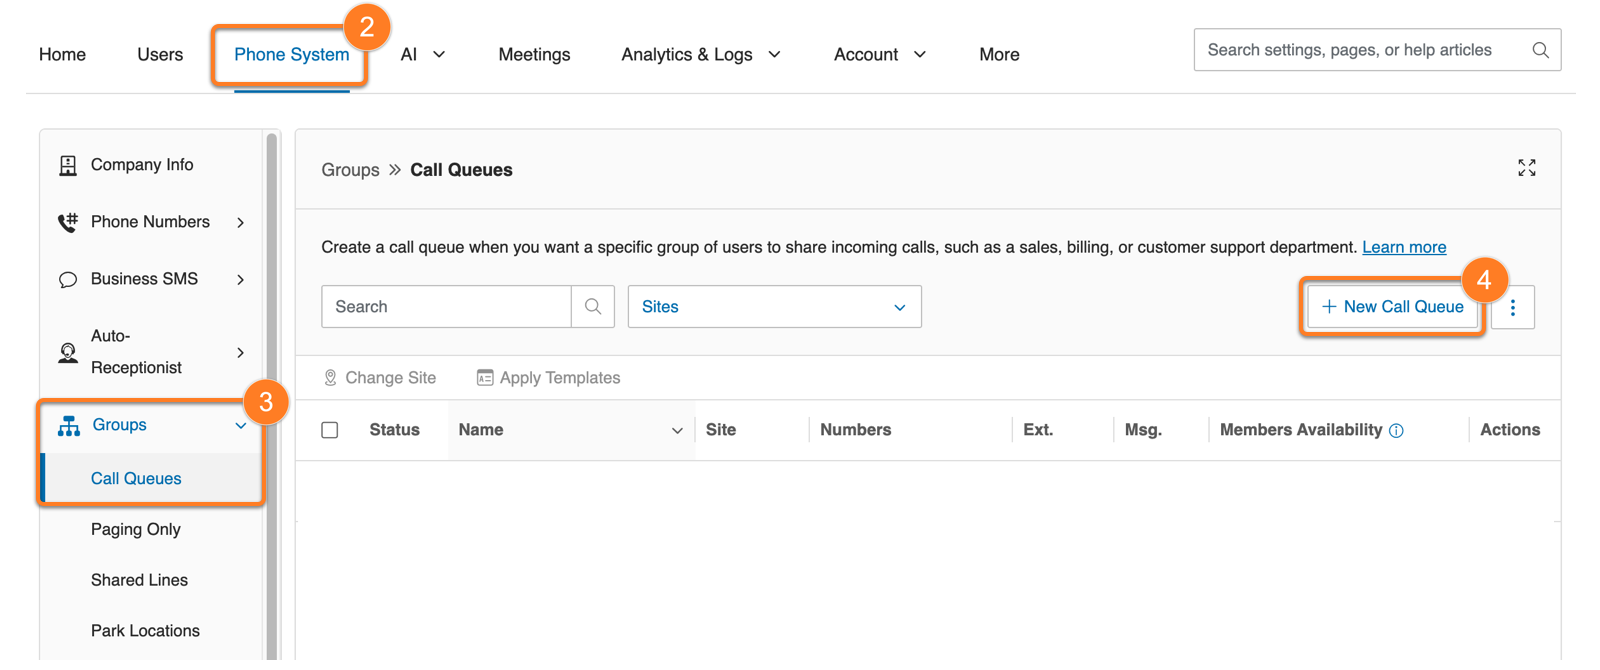
* Sign in to the [
Admin Portal
](https://service.ringcentral.com "").
* Click the **Phone System** tab.
* In the left panel, click **Groups** , then **Call Queues**.
* Click **New Call Queue** .
* In the **Add Call Queue Details** section:
* Select a **Site** from the dropdown (if applicable)
* Enter a **Group Name**
* Enter an **Extension Number**
To set up a new call queue with the same settings as an existing call queue, click **Select Call Queue** and [choose which queue to copy](https://support.ringcentral.com/article-v2/Copying-call-queue-settings.html?brand=RingCentral&product=MVP&language=en_US "").
* Check the **Inbound** and/or **Outbound** boxes if you want the queue calls to be [automatically recorded](https://support.ringcentral.com/article-v2/Turning-on-on-demand-or-automatic-call-recording-.html?brand=RingCentral&product=RingEX&language=en_US&pills-nav=automatic "").
* Click **Next** .

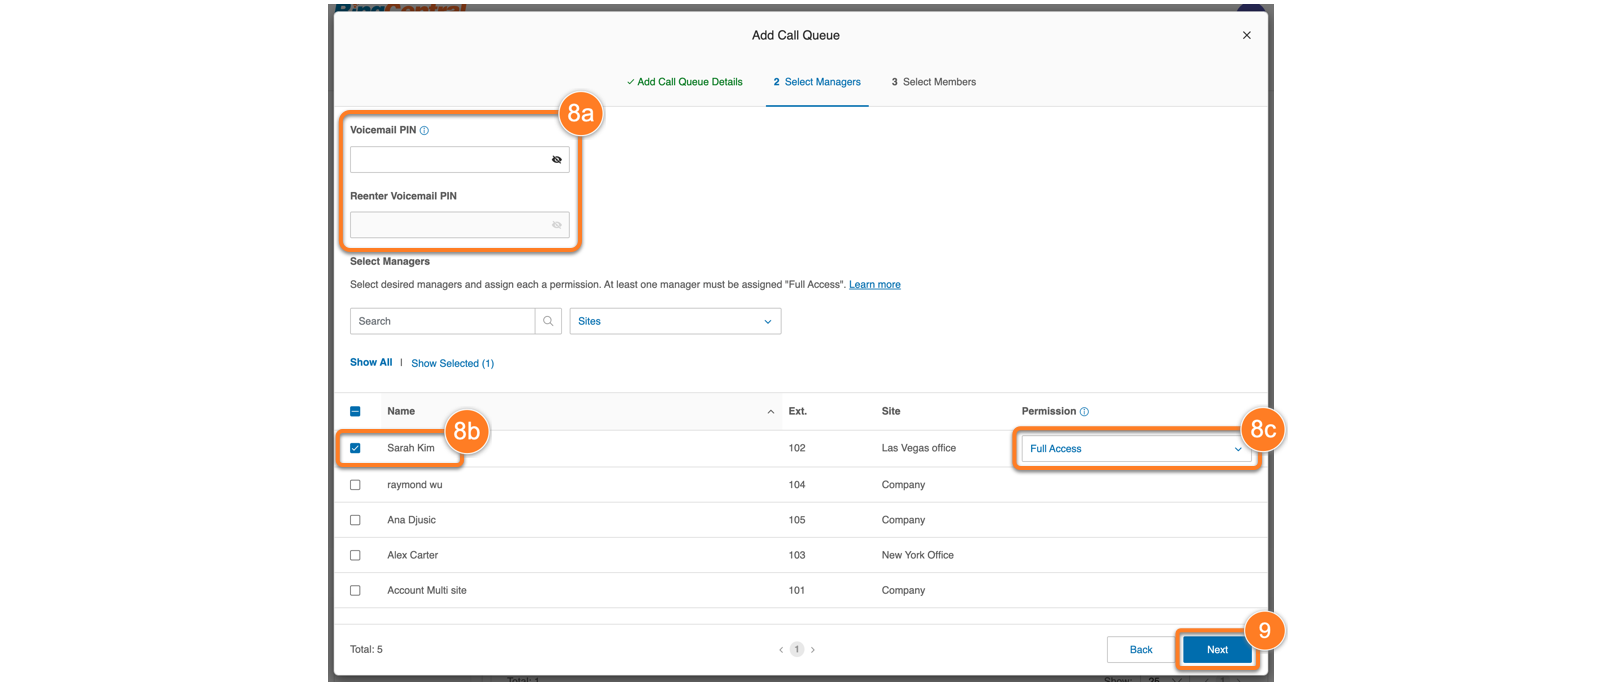
* In the **Select Managers** section.
* Enter the **Voicemail PIN** that call queue members will use to verify their identity when checking the call queue voicemail from a phone.
* Select the desired managers by checking the box next to their names.
* Click the **Permission** dropdown to set each manager's access level.
* *Full Access* managers can edit all call queue settings. The first Full Access manager that's assigned will automatically be the [SMS Recipient for the call queue](https://support.ringcentral.com/article-v2/assigning-an-sms-recipient-for-call-queues-in-the-ringcentral-app-and-admin-portal.html?brand=RingCentral&product=RingEX&language=en_US "").
* *Member Management* managers can edit group members, change member availability status, listen to voicemails, and view all other settings.
* *Messages* managers can listen to call queue voicemails and return missed calls.
* *Member Management with Forwarding* managers can edit group members, change member availability status, listen to voicemails, view all other settings, and forward calls.
* *Messages with Forwarding* managers can listen to call queue voicemails, return missed calls, and forward calls.
* *Forwarding only* managers can forward calls.
* Click **Next** .
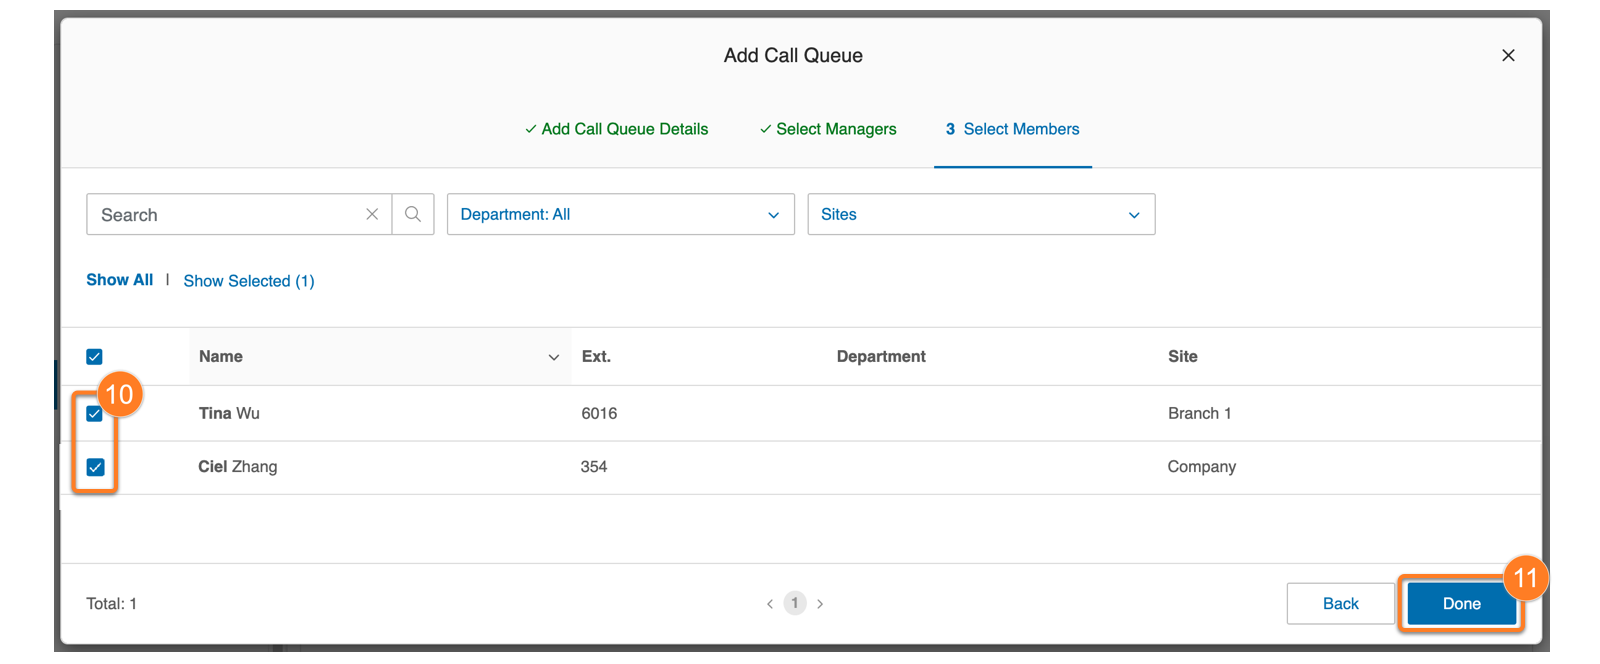
* Select the call queue members by checking the box next to their names.
* Click **Done** .
An email with the call queue details will be sent to the managers and members in the queue.
Adding call queues in bulk
--------------------------
You can add multiple call queues to your account using an Excel file.
* Sign in to the [
Admin Portal
](https://service.ringcentral.com "").
* Click the **Phone System** tab.
* In the left panel, click **Groups** , then **Call Queues**.
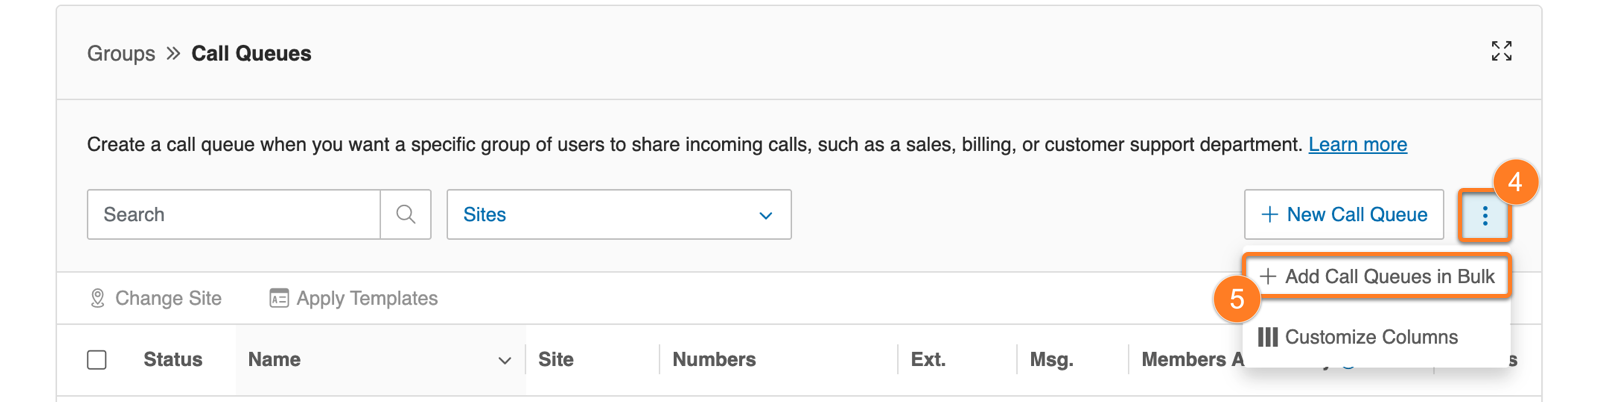
* Click the three-dot **More** icon next to **New Call Queue**.
* Click **Add Call Queues in Bulk** .
* Click **Download template file**.
* If you manage multiple sites, select one or more from the **Site** dropdown.
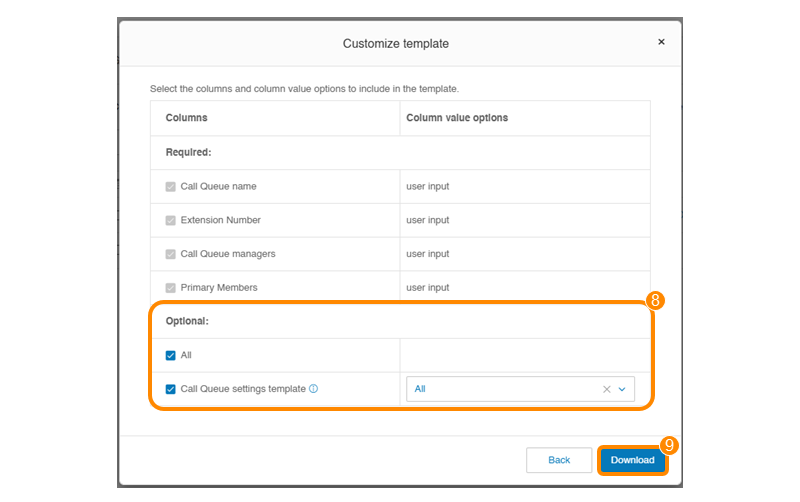
* Under **Optional** , you can add additional columns to the Excel spreadsheet:
* **All**: Check this box to include all sites and call queue settings in the template file.
* **Call Queue settings template**: Check this box to apply a call queue setting template that will override the settings specified in other columns in the bulk upload template.
* Click **Download** .
* Fill out the Excel template, then save the file with your changes on your computer.
* Click **Upload File**.
* Click **Next**.
* Enter the email addresses of any users who should receive a confirmation email with details of the upload (optional).
* Click **Save**.
After the file is processed, the system will send confirmation and notification emails. The super admin, and any other users whose email addresses were entered, will receive an email with the details of the upload. The email will also include any errors found during processing as an attachment.
Call queue members and managers will then receive a notification email.
Adding a direct number to a call queue
--------------------------------------
If you want to add a direct number to your call queue:
* Sign in to the [
Admin Portal
](https://service.ringcentral.com "").
* Click the **Phone System** tab.
* Click the **Groups** dropdown, then **Call Queues**.
* Select the call queue you want to modify.
* Click **Direct Numbers**.
* Click **Add Direct Number** .

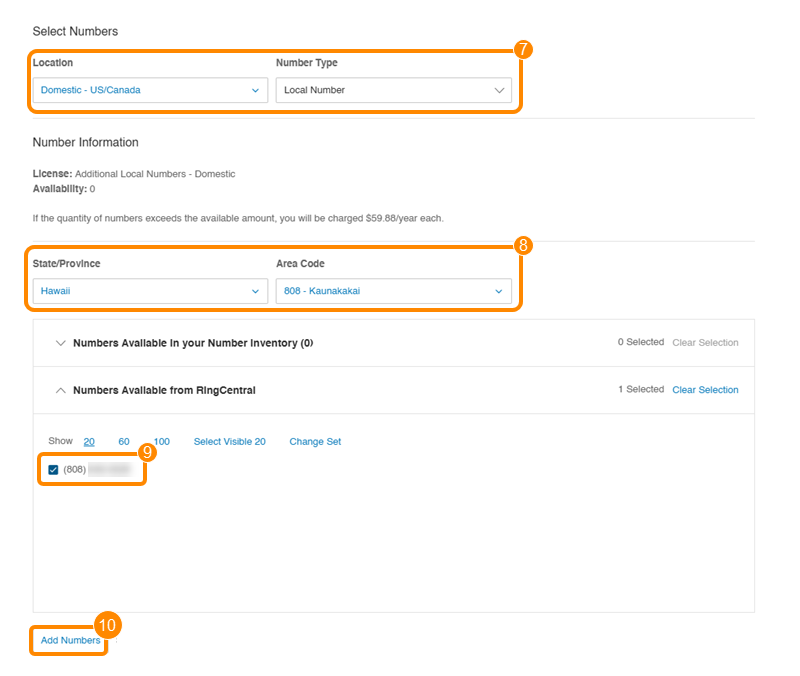
* Select the **Location** and **Number Type**.
* Select the **State/Province** and **Area Code**.
* Select a phone number.
* Click **Add Numbers** .
* Click **Next**.
* Click the acknowledgement checkbox.
* Click **Next**.
* Click **Done** to confirm.
Setting up call queue voicemail and notifications
-------------------------------------------------
* Sign in to the [
Admin Portal
](https://service.ringcentral.com "").
* Click the **Phone System** tab.
* Click the **Groups** dropdown, then **Call Queues**.
* Select the call queue you want to modify.
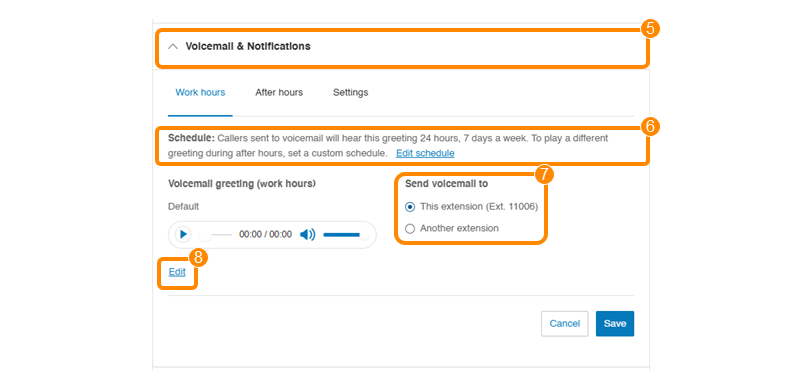
* Click **Voicemail \& Notifications**.
* Click **Edit Schedule** and specify work hours if you want a different voicemail greeting played after hours.
* Select if you want to send the queue voicemail messages to **This extension** or **Another extension**.
* Click **Edit** to update the greeting.
* In the **Set Greeting** dropdown, select *Default* or *Custom*. If you select Custom, record your greeting using a computer microphone or phone, or import a WAV or MP3 file.
* In the **View in** dropdown, select the language to display your greeting text.
* Click **Save**.
To update your voicemail and notification settings:
* Click the **Settings** tab.
* Under **Notifications** , click **Edit**.
* Update your notification preferences for voicemail messages, received faxes, missed calls, and received text messages.
* Click **Save**.
* Click the **Voicemail to text** toggle on or off.
* Click **Add Co-recipients** to specify users who can access the messages in the queue mailbox.
* Select the co-recipients.
* Click **Save** .

**Additional resources**
[Intro to Call Queues](https://support.ringcentral.com/article-v2/Call-Queue-Overview.html?brand=RC_US&product=RingEX&language=en_US "")
[Managing call handling settings for call queues](https://support.ringcentral.com/article-v2/10514-call-queue-set-up-call-handling-how-calls-transferred-group-members.html?brand=RingCentral&product=RingEX&language=en_US "")
[Creating call queue templates in the Admin Portal](https://support.ringcentral.com/article-v2/Creating-call-queue-templates-in-the-Admin-Portal.html?brand=RingCentral&product=RingEX&language=en_US "")
[Managing call queue members in the Admin Portal](https://support.ringcentral.com/article-v2/10739-Call-Queue-Admin-Add-Remove-Members.html?brand=RC_US&product=RingEX&language=en_US "")
[Restricting group extension members in the
RingCentral
Admin Portal](https://support.ringcentral.com/article-v2/Restricting-group-extension-members.html?brand=RingCentral&product=RingEX&language=en_US "")