Managing shared lines in the Admin Portal
=========================================
Shared lines let multiple users receive calls to the same number. You can also hand off calls to other devices on the shared line.
Adding a shared line
--------------------
To add a shared line group:
* Sign in to the [
Admin Portal
](https://service.ringcentral.com "").
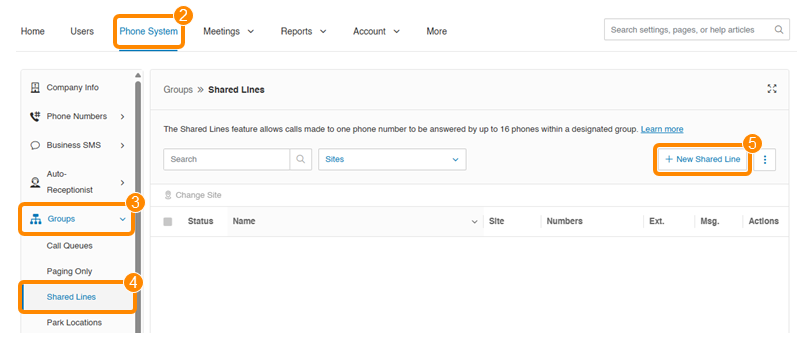
* Click **Phone System**.
* Go to **Groups** , then click **Shared Lines**.
* Click **New Shared Line** .
* Select a location.
* Enter the group details, then click **Next**.
* Select an existing number from your **Number Inventory** or click the **New Number** tab to create a new number.
* Click **Add to Group** , then click **Next**.
* Select devices to add to the group:
* **Order new phone** : Click **Recently Bought** to select a recently purchased device again or click **Desktop Phone** to choose other devices.
* **Assigned user phones**: Choose a user with an assigned deskphone.
* **Inventory phones**: Choose from your existing devices.
* Click **Next**.
* If the device doesn't have an emergency response location (ERL) assigned, select or add an ERL, then click **Next**.
* If you ordered a new phone, you'll need to enter your shipping details. Make sure the information is correct, then click **Next**.
* Check the summary of your fees, mark the checkbox to acknowledge your order, and click **Next** .
Note: If you selected existing devices, they will reboot after you confirm the group details.
* An order confirmation page will appear. Click **Print** to download a copy or **Done** to exit.
The shared lines group manager will receive a welcome email. They can click the links in the email to continue setting up the shared line.
Updating shared line extension settings
---------------------------------------
Existing shared line extension settings can be updated at any time.
* Sign in to the [
Admin Portal
](https://service.ringcentral.com "").
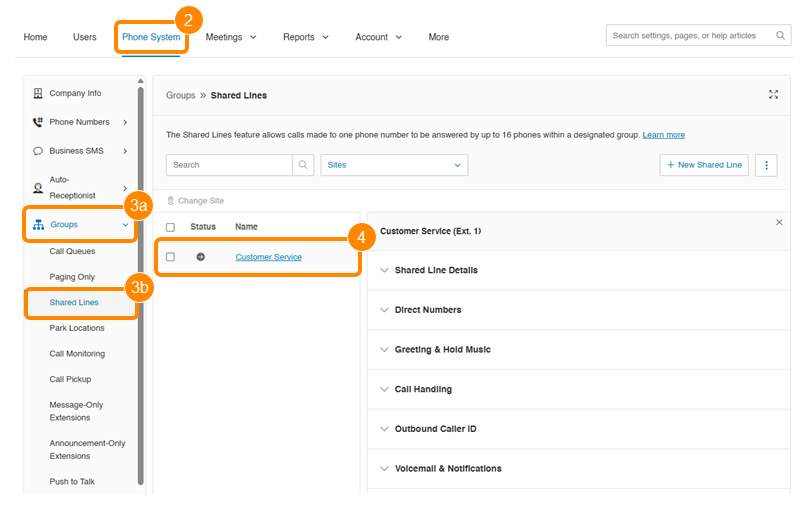
* Click **Phone System**.
* Go to **Groups** (a), then click **Shared Lines** (b).
* Click the shared line name.
### Shared line details
The following information can be updated in the **Shared Line Details** under the **General** tab:
* Extension number
* Group name
* Manager email
* Group name recording
* Welcome email invite
* Include Shared Line in Company Directory
The shared line group can also be deleted in this section.
These settings can be updated under the **Settings** tab:
* Regional settings
* Site
* Confirmation message length
* Schedule
* Shared line devices
### Direct numbers
Local, toll-free, or vanity direct numbers can be added to the shared line extension.
### Greeting and hold music
To update the shared line greeting and hold music:
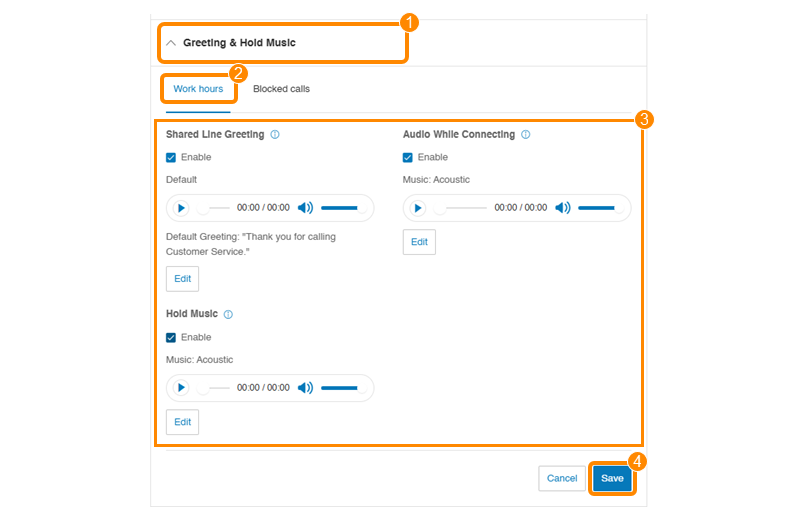
* Click the **Greeting \& Hold Music** dropdown.
* Go to **Work hours**.
* Click **Edit** under these options to set the actions to occur during business hours.
* **Shared Line Greeting**: Allow callers to hear a group-wide greeting before connecting to a shared line.
* **Hold Music**: Allow callers to hear music whenever they're put on hold.
* **Audio While Connecting**: Allow callers to hear selected music while they're connecting to the extension.
* Click **Save** .
Note: You can update blocked call settings under the **Blocked calls** tab.
### Call handling
Call handling settings can be updated during and after work hours. Custom call handling rules can also be set up for the shared line.
* Click the **Call Handling** dropdown.
* Click the **Work hours** tab.
* Set the actions to occur during business hours.
* **Incoming calls** : Specify where to route a call when all lines are busy. You can send it to voicemail, play an announcement, or forward to another extension.
* **Devices ring for**: Select a duration from the dropdown for a caller to wait before the call is forwarded.
* **Missed calls** : Set how you'd like to handle calls when all lines are busy or the caller reaches the maximum waiting time.
* *Send to voicemail* : Calls will go to your voicemail. Click **Set voicemail greeting for work hours** to create a greeting.
* *Play an announcement*: Play a message to the caller and then end the call. Set up an announcement greeting to play.
* *Forward to extension* : Calls will forward to a selected extension. Click **Select extension**.
* Click **Save** .

* Click the **After Hours** tab.
* Click the **Incoming calls** dropdown and choose an action.
* *Send to voicemail* : Calls will go to your voicemail. Click **Set voicemail greeting for work hours** to create a greeting.
* *Play an announcement*: Play a message to the caller and then end the call. Set up an announcement greeting to play.
* *Forward to extension* : Calls will forward to a selected extension. Click **Select extension**.
* Click **Save**.
### Outbound caller ID
You can specify the outbound caller ID for the shared line group or the individual lines within the group.
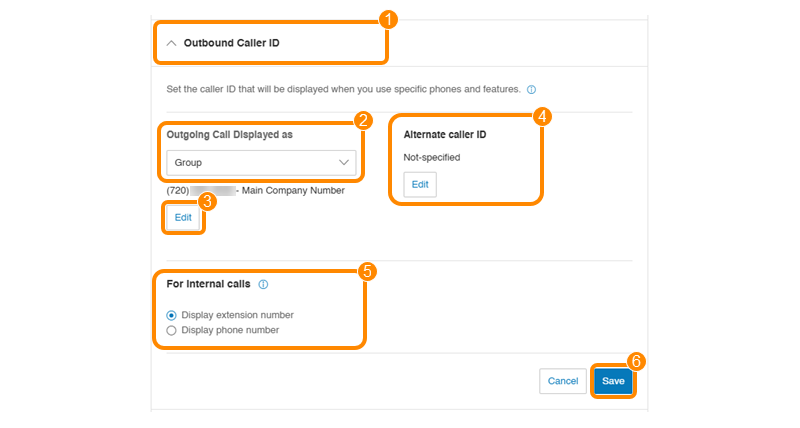
* Click the **Outbound Caller ID** dropdown.
* Click the **Outgoing Call Displayed as** dropdown, and select *Group* or *Individual Lines*.
* If you select *Group* , click **Edit** to update the phone number. Select a phone number you want to display as the shared line caller ID. Click **Done**.
* Under **Alternate Caller ID** , click **Edit** to select the phone number to display. Click **Done**.
* Select **Display extension number** or **Display phone number** to set the group's caller ID for internal calls.
* Click **Save** .
### Voicemail and notifications
The voicemail greeting and settings for the shared line can be set up during and after work hours.
* Click the **Voicemail and Notifications** dropdown.
* Under the **Work hours** and **After hours** tabs, set your preferences.
* **Schedule** : Click **Edit schedule** to change your work hours.
* **Voicemail greeting (work hours)** : Click **Edit** to change your voicemail greeting.
* **Send voicemail to**: Select where you want to send your voicemail messages. Choose between the existing extension or another extension.

* Under the **Settings** tab, select your preferences.
* **Notifications** : Click **Edit** to update the notification settings for voicemail messages, received faxes, missed calls, and received text messages.
* Turn the toggle on for **Voicemail to text** to get a text version of the voicemail.
* Click **Add Co-recipients** to specify the users who can access the group messages.