Google Dialogflow integration with Engage Digital
=================================================
The Engage Digital integration with Google Dialogflow lets you create chatbots that can resolve a high volume of simple tasks by providing concise and non-linear text dialogs, similar to Google Assistant. For example, you can help clients change passwords, book trips, create orders, get answers for certain questions, or schedule appointments in a way that mimics natural, non-linear conversation.
After setting up your Virtual Agent account and integrating with Dialogflow, you can [create a new virtual agent in Engage Digital](https://support.ringcentral.com/article-v2/Creating-a-new-virtual-agent-in-Engage-Digital.html?brand=RingCentral&product=ED&language=en_US "").
Features and benefits of Google Dialogflow integration
------------------------------------------------------
By integrating Engage Digital with Google Dialogflow, you can:
* Make an intelligent text IVR by routing clients to the right agents.
* Gather specific client information before handing a conversation to an agent.
* Expand business hours by gathering leads when no agents are available.
* Respond to customers immediately.
* Use flexible handover rules to pass a conversation to an agent or to other bots.
* Configure multiple bots for individual clients and/or channels.
* Use Dialogflow fulfillment functions to add custom business logic options, such as changing passwords, booking trips, or collecting emails.
This integration supports Google Dialogflow CX and Google Dialogflow ES. To review different types of Diaglogflow agent, go to [Editions \| Dialogflow Documentation](https://cloud.google.com/dialogflow/docs/editions "").
Supported messaging channels
----------------------------
*
RingCX Messaging
* Engage Chat
* Messenger
* RingCentral SMS/MMS
* Apple Messages for Business
* WhatsApp
* Viber
Requirements
------------
This integration requires:
* An instance of Engage Digital
* A user with administrative rights on the Engage Digital instance
* A supported channel to use with the Engage Digital instance
* A Google user account (preferably, one generic account per client)
* Optionally, a billable Google Cloud account
Configuring a Google Dialogflow Virtual agent
---------------------------------------------
You will configure Google Dialogflow by setting up a new virtual agent or using an existing virtual agent. You then define a number of intents -- these are topics and the customer questions that fall under each topic -- that the virtual agent will use to categorize messages and handle a complete conversation. You will identify intents where you may want to hand over a conversation to a human agent and enhance them by adding one output context to each.

Google Dialogflow also supports custom business logic. If needed, you can also set up a fulfillment provider for custom business logic using Dialogflow standard practices. For example, see [Create fulfillment using webhook](https://cloud.google.com/dialogflow/es/docs/tutorials/sequences/create-fulfillment-using-webhook "").
### Creating the Google Dialogflow virtual agent
* Access the Google Dialogflow console at https://dialogflow.cloud.google.com/
* Log in using your generic Google account.
* Click **Create new agent** on the left bar.
* Enter an **Agent name** as a string with no spaces.
* Click **Create**.
Once your first virtual agent has been created, you can see all the Dialogflow console functions enabled. The primary configuration you'll need to perform will be configuring the Intents that help handle a conversation.
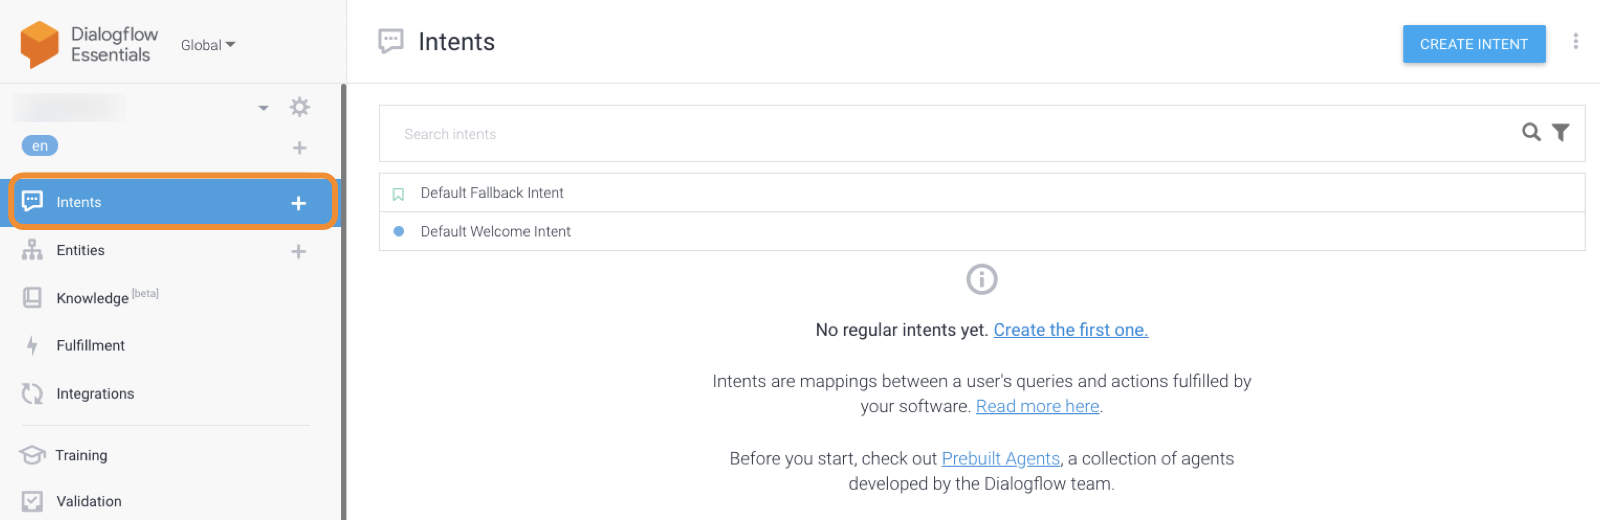
### Configuring Google Dialogflow intents
* Identify an intent where you want to hand over a conversation to a human agent.
* Click **Create intent**.
* Enter a descriptive Intent name.
* Expand the **Contexts** menu.
* Click **Add context**.
* Add an input context to the intent, if desired.
* Add an output context to the intent using any name.
* Click on the small circle near the output context's label and set a **Lifespan** of *1*.
* Click **Save**.
* Repeat steps 7-9 to add more output contexts to an intent as needed.
After defining the settings, you can use the console at the far right to test your contexts.
### Configuration settings for Google Dialogflow intents
* **Intent name**: A name used to identify the intent.
* **Add input context**: If you configure an input context, enter the value here.
* **Add output context**: An output context that will be mapped to an Engage Digital handover trigger.
* **Lifespan** : The number of conversational turns for which the context remains active. Must be set to *1*.
Getting Client ID and secret credentials from Google Console
------------------------------------------------------------
### Configuring OAuth 2.0
* Access the Google Cloud console at .
* Accept terms \& conditions.
* Click **Continue**.
* Click **Create Project** , give it a name, then click **Select Project.**
* Enter a **name** for the project.
### Configuring OAuth consent screen
* Click**OAuth consent screen** on the left navigation
* Select **Internal**.
* Click **Create**.
* Fill in the appropriate fields, with app name, user support email and authorized domain.
* In the next **Scopes** screen, click A**dd or remove scopes** , the click **Google API Library** link at the top to open the API list.
* Search for Dialogflow API, select it and click **Enable**.
* Back to the previous screen, search for Dialogflow API, select it and click **update**.
### Getting OAuth credentials
* Click **Credentials** on the left navigation.
* Click**Create Credentials** on the top bar.
* Click **OAuth client ID**.
* Select **Web application** from the Application type dropdown.
* Enter a **name** for the application.
* In the Authorized redirect URIs section, click **Add URI** and fill in with your Engage Digital instance information.
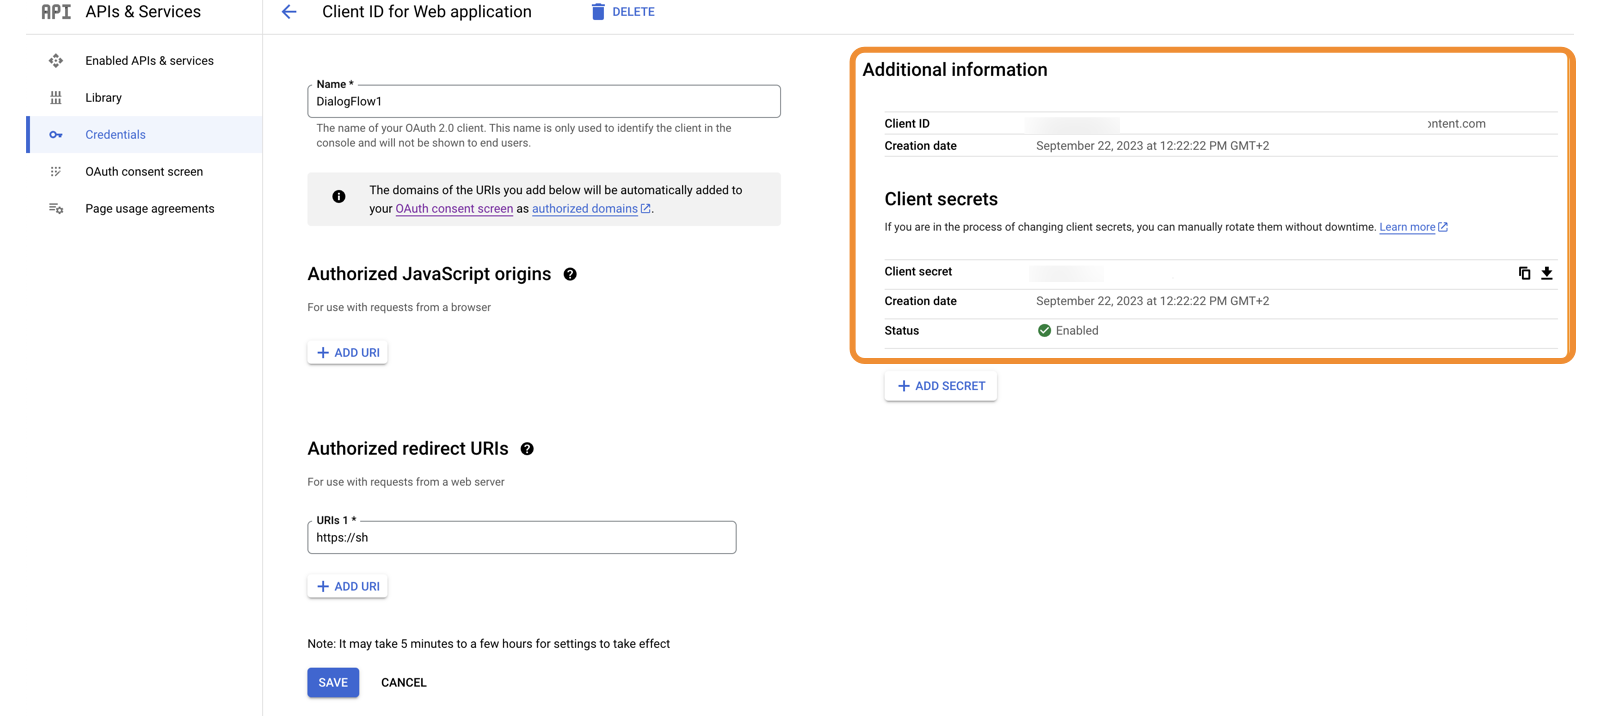
* Click **Create**.
Once completed, copy the Client ID and the Client secret from the Additional information section on the right.
Connecting Engage Digital and Google Dialogflow
-----------------------------------------------
* Sign in to your Engage Digital account.
* Click **Admin**.
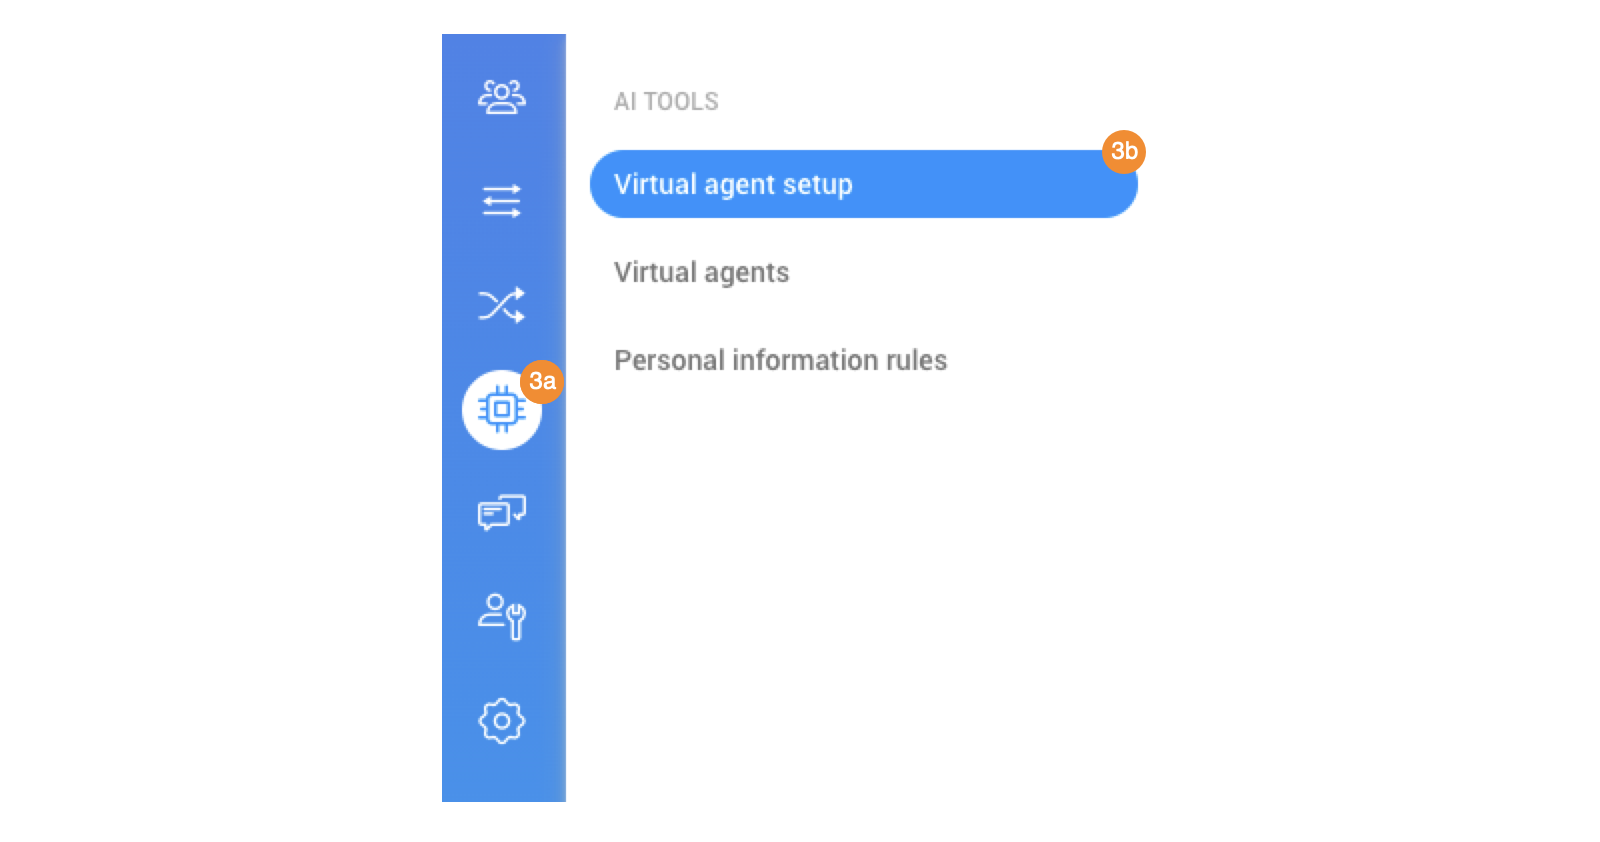
* Hover over the left navigation, then click **AI tools** (a) \> **Virtual agent setup** (b).
* Click **New account**.
* Complete the configuration:
* **Active**: Check the box to enable the virtual agent.
* **Name**: Enter a name for the account.
* **Client ID**: Paste from the Credentials tab in the Google DialogFlow Console.
* **Client Secret**: Paste from the Credentials tab in the Google DialogFlow Console.
* Click **Continue with Google** . You can click **Copy** on the Authorized redirection URL to easily copy the URL and paste it when connecting your account.
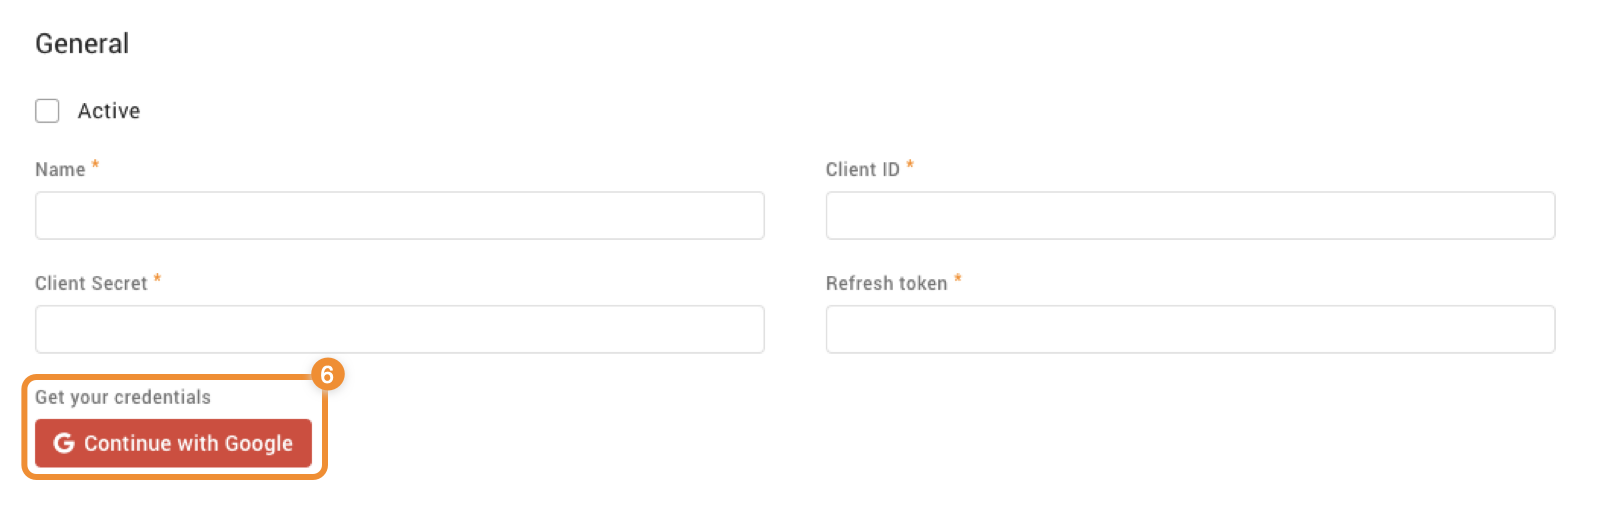
* Once you obtain the token, paste it into the **Refresh token** field.
* Click **Save**.
Setting up structured messages
------------------------------
If an Engage Digital channel supports structured messages, the adapter can convert Google Dialogflow structured messages to Engage Digital structured messages.
RingCX Messaging
is one of the channels that supports structured messages for all device types. Structured messages are supported only by Dialogflow ES.
To use structured messages in Google Dialogflow:
* Access the [Google Dialogflow console](https://console.dialogflow.com/api-client/#/login "").
* Sign in using your Google account.
* Go to the **Intents** page.
* Select an existing intent.
* Expand the **Responses** menu.
* Click the plus icon. From the dropdown, add a new messenger for integration.
* Disable the **Use responses from the DEFAULT tab as the first responses** toggle setting.
* Click **Add Responses**.
* Depending on the messaging channel, add **Quick Replies** or **Card** as a response.
* Enter the configuration information for the quick reply or card.
Structured message types
------------------------
The structured message integration supports these structured message types:
* Quick replies
* Templates
* Carousels
* Custom payload
### Quick replies
A quick reply is a suggested user response. When a user taps a quick reply, the agent receives the text as a user query. This response allows you to send a pre-configured text to Dialogflow.
The following constraints apply when using Quick replies:
* Responses of Quick reply type must contain a title and text.
* Only one Quick reply should be configured for each intent.
### Cards (Templates)
A Card may contain several elements, such as image, title, subtitle, and clickable button. The adapter will convert a Card type response to a Template if there is only one card in the intent.
The following constraints apply when implementing a template:
* A Card type response must contain a title and at least one button. All other fields are optional.
* The adapter will upload an image to Engage Digital.
* Any buttons with empty **URL** or **text postback** fields will be converted to buttons with empty payloads.
* A button with text postback will be converted to a button with a payload. The payload will be filled with the text postback, which can send an event to your postback webhook. This is useful when you want to invoke an action in your bot.
* A button with a URL will be converted to a link.
### Cards (Carousels)
A Carousel is an array of Template types. The adapter will convert a response to a Carousel if the response contains several cards. Each card will be one member of the Carousel.
Note: The above constraints on Cards (Templates) also apply to Carousels.
### Custom payload
Using a custom payload allows overriding the Dialogflow limitation for the number of characters in structured messages for Dialogflow ES version and provides support for structured messages in Dialogflow CX. You can set up a custom payload on any response tab, as long as you abide by the limitations detailed in Intent Response Logic.
#### Quick reply as a custom payload
|-----------------------------|------------------------------------|---------------------------------------------------------------------------------------------------------------------------------------------------------------------|
| **Field in custom payload** | **Description** | **Example** |
| title | The select structured message body | *{* "quickReplies": { *"title": "this is the body of the quick replies",* *"quickReplies": \[* *"option1",* "option2", "option3", *"option4",* "option5" *\]* } *}* |
| quickReplies | Payload of the structured message | *{* "quickReplies": { *"title": "this is the body of the quick replies",* *"quickReplies": \[* *"option1",* "option2", "option3", *"option4",* "option5" *\]* } *}* |
#### Template/card
|-----------------------------|-----------------------------------------------------------------------|--------------------------------------------------------------------------------------------------------------------------------------------------------------------------------------------------------------------------------------------------------------------------------------------------------------------------------------------------------------------------------------------------------------------|
| **Field in custom payload** | **Description** | **Example** |
| title | Title of the template | *{* *"card": {* *"imageUri": "https://www.planetware.com/wpimages/2020/01/india-in-pictures-beautiful-places-to-photograph-taj-mahal.jpg",* *"buttons": \[* *{* *"text": "button1"* *},* *{* *"text": "button2"* *},* *{* *"postback": "http://ringcentral.com/",* *"text": "button3"* *},* *{* *"text": "button4"* *}* *\],* *"title": "Title of the template",* *"subtitle": "Subtitle of the template"* *}* *}* |
| subtitle | Subtitle of the template | *{* *"card": {* *"imageUri": "https://www.planetware.com/wpimages/2020/01/india-in-pictures-beautiful-places-to-photograph-taj-mahal.jpg",* *"buttons": \[* *{* *"text": "button1"* *},* *{* *"text": "button2"* *},* *{* *"postback": "http://ringcentral.com/",* *"text": "button3"* *},* *{* *"text": "button4"* *}* *\],* *"title": "Title of the template",* *"subtitle": "Subtitle of the template"* *}* *}* |
| imageUri | The URL to the attachment used to decorate the template with an image | *{* *"card": {* *"imageUri": "https://www.planetware.com/wpimages/2020/01/india-in-pictures-beautiful-places-to-photograph-taj-mahal.jpg",* *"buttons": \[* *{* *"text": "button1"* *},* *{* *"text": "button2"* *},* *{* *"postback": "http://ringcentral.com/",* *"text": "button3"* *},* *{* *"text": "button4"* *}* *\],* *"title": "Title of the template",* *"subtitle": "Subtitle of the template"* *}* *}* |
| buttons.text | The title of the item (button) | *{* *"card": {* *"imageUri": "https://www.planetware.com/wpimages/2020/01/india-in-pictures-beautiful-places-to-photograph-taj-mahal.jpg",* *"buttons": \[* *{* *"text": "button1"* *},* *{* *"text": "button2"* *},* *{* *"postback": "http://ringcentral.com/",* *"text": "button3"* *},* *{* *"text": "button4"* *}* *\],* *"title": "Title of the template",* *"subtitle": "Subtitle of the template"* *}* *}* |
| buttons.postback | URL (if you want a button-click to open a specific website) | *{* *"card": {* *"imageUri": "https://www.planetware.com/wpimages/2020/01/india-in-pictures-beautiful-places-to-photograph-taj-mahal.jpg",* *"buttons": \[* *{* *"text": "button1"* *},* *{* *"text": "button2"* *},* *{* *"postback": "http://ringcentral.com/",* *"text": "button3"* *},* *{* *"text": "button4"* *}* *\],* *"title": "Title of the template",* *"subtitle": "Subtitle of the template"* *}* *}* |
#### Carousel as a custom payload
Several cards are considered as a carousel on the Engage Digital side. The structure of the payload is the same as for the template.
The limitations for each field are described on [developers.ringcentral.com](https://developers.ringcentral.com/engage/digital/guide/interactions/structured-messages "") in the corresponding sections.
#### Webview
The webview is a convenient way of opening a custom-made webpage. You can choose it by setting the optional target parameter to **webview** when sending a structured message that contains a link element, such as a Template or a Carousel.
Note: The webview feature is intended to be customizable, so it won't work "out of the box." No default picker or page has been provided. Neither does the webview feature include any pre-selected response that customers will see after completing their actions on the page.
|----------------|------------------------------------------|-----------------------------------------------------------------------------------------------------------------------------------------------------------------------------------------------------------------------------------------------------------------------------------------------------------------------------------------------------------------------------------------------------------------------------------------------------------------------------------------------------------------------|
| **Field** | **Description** | **Example** |
| target | Possible options: webview, current, open | *{"card":* *{* *"imageUri": "https://www.planetware.com/wpimages/2020/01/india-in-pictures-beautiful-places-to-photograph-taj-mahal.jpg",* *"buttons": \[* *{* *"postback": "https://context.reverso.net/translation/",* *"text": "button1",* *"target": "webview",* *"webview_height": "full"* *},* *{* *"text": "button2"* *},* *{* *"postback": "http://ringcentral.com/",* *"text": "button3"* *}\],* *"title": "Title of the template",* *"subtitle": "Subtitle of the template",* *"target": "webview"* *}* *}* |
| webview_height | Possible options: full, tall, compact | *{"card":* *{* *"imageUri": "https://www.planetware.com/wpimages/2020/01/india-in-pictures-beautiful-places-to-photograph-taj-mahal.jpg",* *"buttons": \[* *{* *"postback": "https://context.reverso.net/translation/",* *"text": "button1",* *"target": "webview",* *"webview_height": "full"* *},* *{* *"text": "button2"* *},* *{* *"postback": "http://ringcentral.com/",* *"text": "button3"* *}\],* *"title": "Title of the template",* *"subtitle": "Subtitle of the template",* *"target": "webview"* *}* *}* |
Passing customer images to Google Dialogflow
--------------------------------------------
When a customer sends an image, you can pass the image to Google Dialogflow so it can be processed by third-party APIs, such as [Google Vision](https://cloud.google.com/vision ""). Passing images is available only for
RingCX Messaging
and Engage Chat channels. For other channels, the integration will execute fallback rules.
This feature only supports images. This logic won't process videos, documents, or other files.
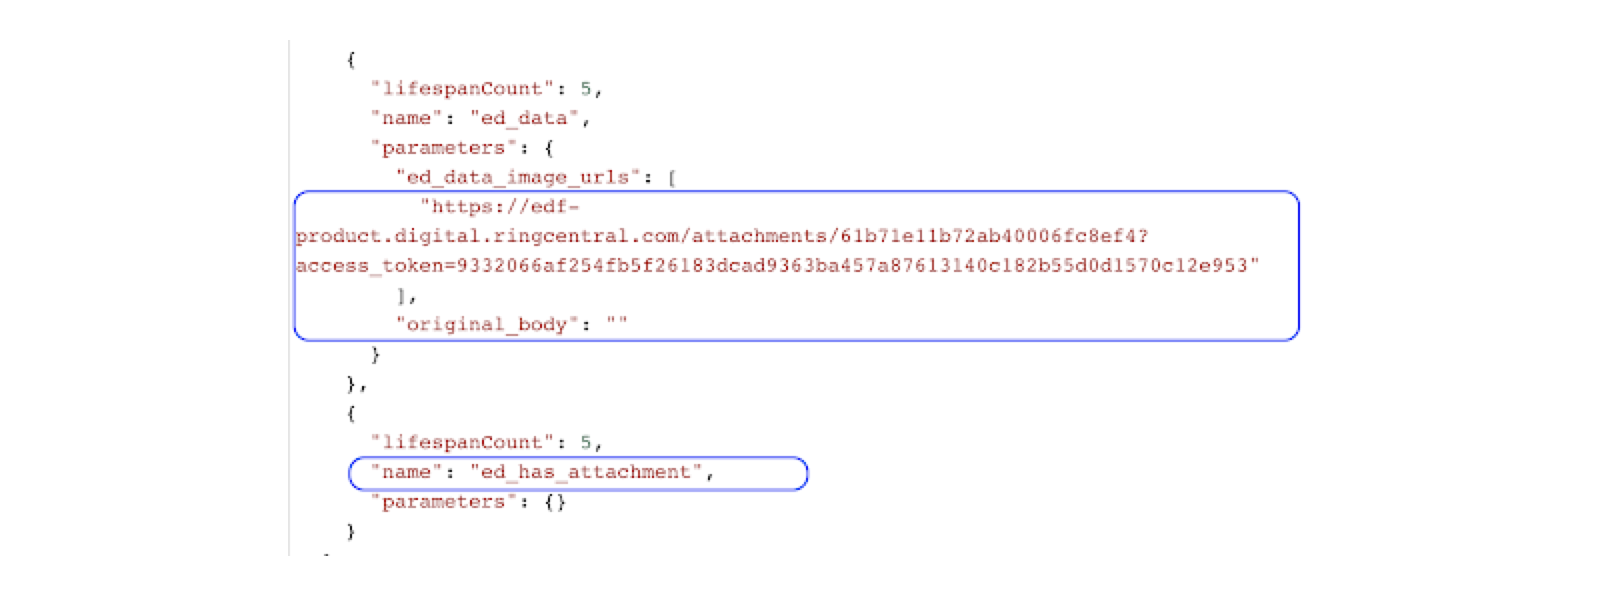
To pass images to Google Dialogflow, use the following parameters:
* **ed_data_image_urls**: An array of image URLs.
* **ed_has_attachment**: Context passed to explicitly match to intents that can process images. (Dialogflow ES only)
* **original_body**: Text message, if the end-user message contains both text and image.
Any text sent along with images will contain only **ed_image_attached**. For this reason, the intent that will process the image should use this phrase as training data.