Building workflows in
RingCX
==============================================================================================
When building a workflow or IVR, you'll spend most of your time designing and setting up your workflows in Workflow Studio. Workflow Studio contains a drag-and-drop interface and allows you to build a visual representation of the potential actions you want to provide for your callers.
Before you can build a workflow or IVR in Workflow Studio, you must [create a workflow](https://support.ringcentral.com/article-v2/Creating-an-IVR-in-RingCX.html?brand=RingCentral&product=RingCX&language=en_US "").
To access Workflow Studio:
* In the [
Admin Portal
](https://service.ringcentral.com ""), click **Contact Center** , then select *Admin*. Sign in to [
RingCX
](https://ringcx.ringcentral.com/ "") and click the **Admin** tile.
* In the left navigation bar, click the **Categorization** icon (A), then click **Workflows** (B).

* Expand the workflow group, then click the **Workflow** you want to build.
* In the left navigation, click **Workflow Studio**.
Navigating Workflow Studio
--------------------------
The first thing you'll see when you go to Workflow Studio is a blank background with a [**Start** trigger](#start-trigger "") you can use to build different pathways for your workflow.
In the left panel, you can:
* Search for workflow elements
* Use a palette containing the nodes to create your workflows

Workflow Studio provides the following tools:
* Annotate: Add annotations to the palette
* Undo or redo changes
* Zoom in or out
* Revert all changes, import or export a workflow, or auto arrange the layout

Using nodes in Workflow Studio
------------------------------
Workflows are built using **nodes** that represent each of the [triggers](https://support.ringcentral.com/article-v2/Intro-to-workflow-triggers-in-RingCX.html?brand=RingCentral&product=RingCX&language=en_US "") and actions you can include in your workflows. Triggers are called by specific events like when an agent connects or disconnects from a call. Triggers are followed by actions such as playing a recording or routing a call to a specific destination. When nodes are connected, they form a chain of potential actions. For more information, go to [What nodes can do in RingCX Workflow Studio](https://support.ringcentral.com/article-v2/What-nodes-can-do-in-RingCX-IVR-Studio-.html?brand=RingCentral&product=RingCX&language=en_US "").
### Start trigger
The Start node is commonly used as the initial trigger in many workflows. It activates the workflow on incoming interactions, such as an incoming call or a new chat session. When creating a new workflow, the Start trigger is automatically placed on the canvas.
For voice interactions, the Start node functions like an IVR, triggering a series of actions when a call comes in.
When transitioning from IVR Studio scripts to workflows, the existing IVR scripts are converted into workflows that start with the Start trigger. This ensures that the current IVRs continue to function as before, without requiring any modifications.
### Adding and connecting nodes
To start building your workflow, drag and drop nodes from the palette onto the background. Then, you can start connecting them.
To connect your nodes, click the **plus** icon in the upper right-hand corner of the node, then drag and release the arrow anywhere inside the node you want to activate next in the workflow.

### Disconnecting nodes
To disconnect two nodes, delete the connector arrow.
* Click the connector arrow, and then hit **Delete** on your keyboard.
* Click **OK** to confirm.
This method works for arrows that connect to different nodes and for looping arrows that connect to the same node.
You can also hover your cursor over where the arrow connects to the node, click and drag the arrow out of the node it is connected to, and release it. The arrow immediately disappears and you will not be asked to confirm your decision.
### Editing node and connection properties
To enter a node's configuration properties, hover over the node, then click **Edit**. Not all nodes have configuration properties. If there are no configuration properties, the option to edit will not appear.

As you start connecting nodes, you'll notice that a question mark inside a circle appears on some arrows. This indicates that you have connection properties available to set up. To open those connection properties, double-click anywhere on the circle.

### Removing nodes
To remove a node from the workflow:
* Hover over the node, then click **Remove** . You can also select the node and hit **Delete** on your keyboard.
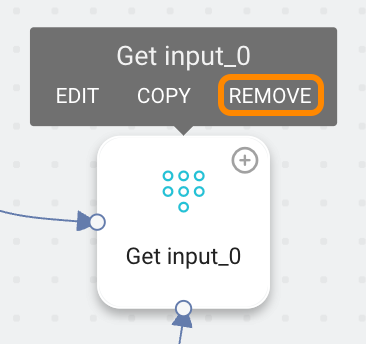
* Click **OK** to confirm.
Branching in Workflow Studio
----------------------------
Workflow Studio allows you to create multiple pathways to ensure the customer reaches the correct destination. This is called branching and occurs when multiple arrows extend from a single node and create alternate pathways for the workflow. The workflow is then directed along a specific pathway depending on the logic and conditions you set up.
For example, to let incoming callers select a department during their call, create branching nodes extending from a Get Input node, with each branch representing a department. When a caller presses a number on their phone, the workflow directs them to the corresponding department.

**Additional resources**
[Creating a workflow in RingCX](https://support.ringcentral.com/article-v2/Creating-an-IVR-in-RingCX.html?brand=RingCentral&product=RingCX&language=en_US "")
[What nodes can do in Workflow Studio](https://support.ringcentral.com/article-v2/What-nodes-can-do-in-RingCX-IVR-Studio-.html?brand=RingCentral&product=RingCX&language=en_US "")
[Intro to workflows in RingCX](https://support.ringcentral.com/article-v2/Intro-to-IVR-Designer-in-RingCX.html?brand=RingCentral&product=RingCX&language=en_US "")