Adding a company greeting to a single-level IVR
Last updated on February 25, 2022
When you have a single-level IVR set up for your company phone number, you can add a recorded greeting before allowing your callers to select a menu option. You can use a default greeting, record a customized greeting, and add a greeting to your company’s call handling settings.
To add a company greeting, make sure you have full phone admin permissions.
Note: This article discusses adding a company greeting to a single-level IVR. If your company uses a multi-level IVR, you'll need to use the Visual IVR Editor to add a company greeting.
Desktop & web
Mobile
Admin Portal
- Open the RingCentral app on your desktop or web browser. Sign in as an admin.
- Go to Company settings > Phone in the left navigation bar.
- Select Edit at the far right of Company call handling.

- Select either Business hours or Closed hours.
Note: If your company hours are set to 24 hours, 7 days a week, you only need to set a company greeting for Business hours.
- From the Send call dropdown, select To company greeting.

- Under Automated response menu enabled, select how you want the call to connect if a menu option isn’t selected.
- Connect to operator: Connects the caller to your company’s phone operator. You will need to assign an extension as an operator for this option to work.
- Disconnect automatically: Disconnects the call.
- Select Default greeting or Custom greeting. If you select Custom greeting, click Record and choose how you want to record your greeting.
- Phone: We will call you to record your greeting over the phone.
- Microphone: Record your greeting using your computer’s microphone.
- Importing: Upload an MP3 or WAV file.
- Click Save.
Note: If you set a specific schedule for your company, make sure you complete these steps for both Business hours and Closed hours.
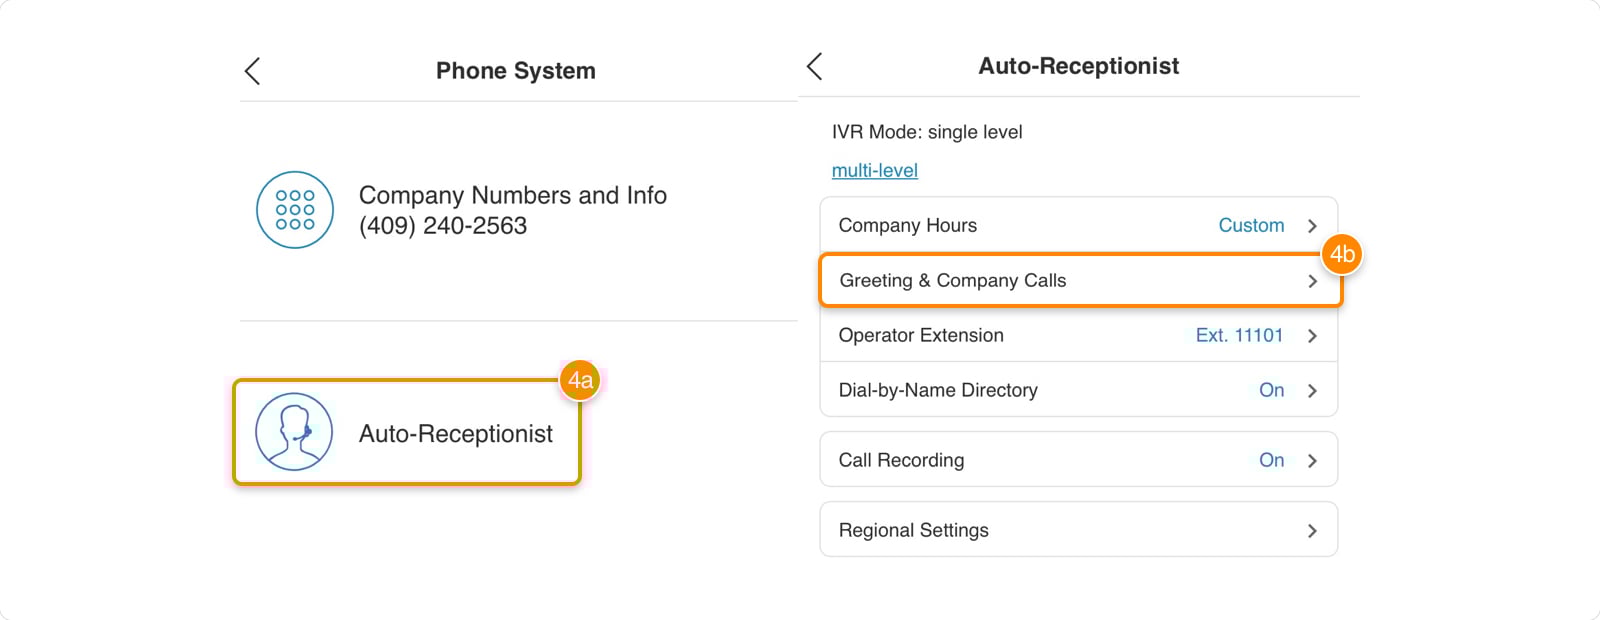
- Open the RingCentral mobile app. Sign in as an admin.
- Tap More > Admin from the bottom menu.

- Tap Phone system.

- Tap Auto-Receptionist > Greeting & Company Calls.
- Choose either Com. Hours (company hours) or After Hours.
Note: If your company hours are set to 24 hours, 7 days a week, you only need to set a company greeting for Company Hours.
- Tap Play company greeting.
- Tap Greeting.

- Select Default or Custom. If you select Custom, tap Record to begin recording your custom greeting. Learn how

- Tap Done in the Company Greeting window.
- Under If Caller Enters no Action, select how you want the call to connect if a menu option isn’t selected.
- Connect to operator: Connects the caller to your company phone operator. You will need to assign an extension as an operator for this option to work.
- Disconnect: Disconnects the call.

- Tap Save.
Note: If you set a specific schedule for your company, make sure you complete these steps for both Comp. Hours and After Hours.
- Sign in to the Admin Portal as an admin.
- Select Phone System from the top menu.
- Go to Auto-Receptionist > General Settings.
- Expand IVR Settings.

- Choose either Business Hours or After Hours.
Note: If your company hours are set to 24 hours, 7 days a week, you only need to set a company greeting for After Hours.
- Select Company Greeting under Incoming calls will be routed to.

- Click Edit under Play company greeting.
- From the Set Greeting dropdown, select Default or Custom. If you select Custom, choose how you want to record your greeting.
- Phone: We will call your phone to record your greeting.
- Computer Microphone: Record your greeting using your computer’s microphone.
- Importing: Upload an MP3 or WAV file.
- Under If Caller Enters no Action, choose how you want the call to connect if a menu option isn’t selected.
- Connect to operator: Connects the caller to your company’s phone operator. You'll need to assign an extension as an operator for this option to work.
- Disconnect: Disconnects the call.

- Click Done.
- Click Save.
Note: If you set a specific schedule for your company, make sure you complete these steps for both Business Hours and After Hours.
© 1999-2022 RingCentral, Inc. All rights reserved.