Purchasing and managing Live Reports licenses
| RingEX
Last updated on March 6, 2023
You can purchase and modify Live Reports licenses on the Admin Portal. Individual licenses are required for:
- Every Live Reports user
- Every manager who will have Live Reports viewer access
- Every agent who will require monitoring.
Read Intro to Analytics Live Reports to learn more about enabling licenses using Roles and Permissions.
Purchasing Live Reports licenses
- Sign in to the Admin Portal.
- In the top menu, select Billing.
- From the left navigation bar, click Purchase.
- Click the Live Reports tile at the lower left.

- In the lower right corner, you will see pricing and an option to add. Click the plus sign.
- Click Add to Cart.
- In the pop-up window, click Check Out.
- In the Review Items and Checkout window displays, you can review and modify your selection. Click Next to confirm.
- In the upper right of the Assign Cost Center window displays, click the Select Cost Center dropdown to choose a cost center, or select New to create a new one.
- You will have the option to Assign to Selected or Assign to All.
- To Assign to Selected, check the box to the left of the Product Name entry and choose Assign to Selected from the dropdown on the righthand side of the window.
- To assign every new license in the list to the same cost center, choose Assign to All from the dropdown on the righthand side of the window.
- Click the Cost Center dropdown to show a list of cost centers.You can use the Cost Center field in the Assigned Cost Center column in the table entry to modify the cost center. Use the search field to find a specific cost center.
- To split multiple licenses among cost centers, click Split in the Actions column. Follow the prompts to assign licenses to different cost centers.

- Confirm your order and its pricing on the Review Order page. Click the check box at the bottom of the page to acknowledge that you have read and understood the information and itemized charges, then click Next.
- Review the information in the View Statement window, and click Print to print a copy of your order. Click Done to complete the transaction.
You can confirm your billing details, including your next billing cycle date, by clicking Service Billing Details in the left navigation bar.
Assigning Live Reports licenses
Users must be assignes licenses to access Live Reports.
- Sign in to the Admin Portal.
- In the top menu, select Billing.
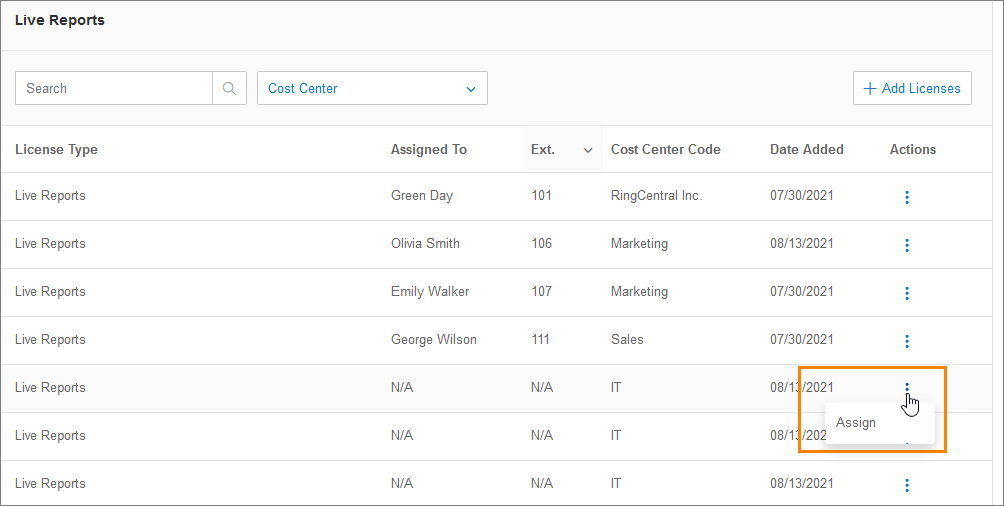
- From the left navigation bar, click Live Reports. On the Live Reports page opens, with a list of purchased Live Reports licenses. Here you can see License Type, Assigned To, Ext, Cost Center Code, Date Added, and Actions.
- Enter criteria in the Search field to find a specific license.
- Use the Cost Center dropdown to filter for a particular cost center.
- Click +Add Licenses to make additional purchases.
- Under the Actions column, click the three-dot More icon for any licenses that show N/A in their Assigned To columns. Click Assign to bring up a list of users.
- Select the desired user, then click Assign.
The user list will refresh to show the updates to your license assignments.
Filtering Live Reports licenses
Filter options lets you find specific users or licenses.
- Sign in to the Admin Portal.
- In the top menu, select Billing.
- From the left navigation bar, click on the Live Reports tab. On the Live Reports page, you’ll see a list of your purchased Live Reports licenses. Here you can see License Type, Assigned To, Ext, Date Added, and Actions.
- To locate a particular user or license, enter criteria in the Search field.
- Use the Cost Center dropdown to bring up a list of cost centers. Choose one or more cost center by checking the boxes to the left of each entry, or locate a cost center by using the Search field. The list will refresh with the results of your search.

The list repopulates with entries for your search criteria.
Unassigning a Live Reports license
To unassign a license, go to the Actions column in the row of the user whose license you want to unassign. Click the three-dot More icon. Then click Unassign. A pop-up window will inform you that the license will be unassigned and placed back into your account for future use. Click Confirm to unassign.
