Contact us
Recommended
Save time by chatting, available online 24/7.
Submit a case
The most direct way to match you to the right expert on your issue. Responses within 48 hours.
Contact us
FOR SALES
1 (888) 898-4591
FOR SUPPORT
1 (888) 898-4591
Submit a case
Contact us
FOR SALES
FOR SUPPORT
Welcome to MyRingCentral
Hi, ${extension.contact.firstName}!
Welcome to MyRingCentral
Hi, ${extension.contact.firstName}!
Manual provisioning for Poly deskphones
This article explains how to set up your Poly deskphone using manual provisioning, a process that allows your deskphone to communicate with RingCentral’s Voice over Internet Protocol (VoIP) servers.
If you have a Poly deskphone that’s not on the list of certified and supported deskphones, you’ll need to set up your deskphone using this type of provisioning.
- RingCentral doesn’t provide additional support for phones purchased from third-party vendors. For support with Poly deskphones that weren’t purchased from RingCentral, contact Poly Customer Support.
- Depending on the model, a manually provisioned deskphone may not be compatible with some RingCentral features. Some manually provisioned deskphones:
Before you provision your Poly deskphone
- Confirm that your deskphone meets RingCentral’s network requirements.
- Make sure your deskphone is unlocked. If you’re unsure, contact Poly Customer Support.
- Perform a factory reset of your deskphone. We recommend that you delete all of its existing configurations before connecting it to your RingCentral account.
- Make sure you’re a RingCentral admin with permission to make changes to Phones & Devices.
Manually provisioning your Poly deskphone
Follow these steps to provision your Poly deskphone manually.
Note: You’ll need an ethernet cable and access to your internet router.
- Add a local number to your RingCentral account, then assign it to your existing Poly deskphone. Note: You’ll need admin access to perform this step.
- Find your deskphone’s Session Initiation Protocol (SIP) settings. These settings allow your deskphone to make and receive calls.
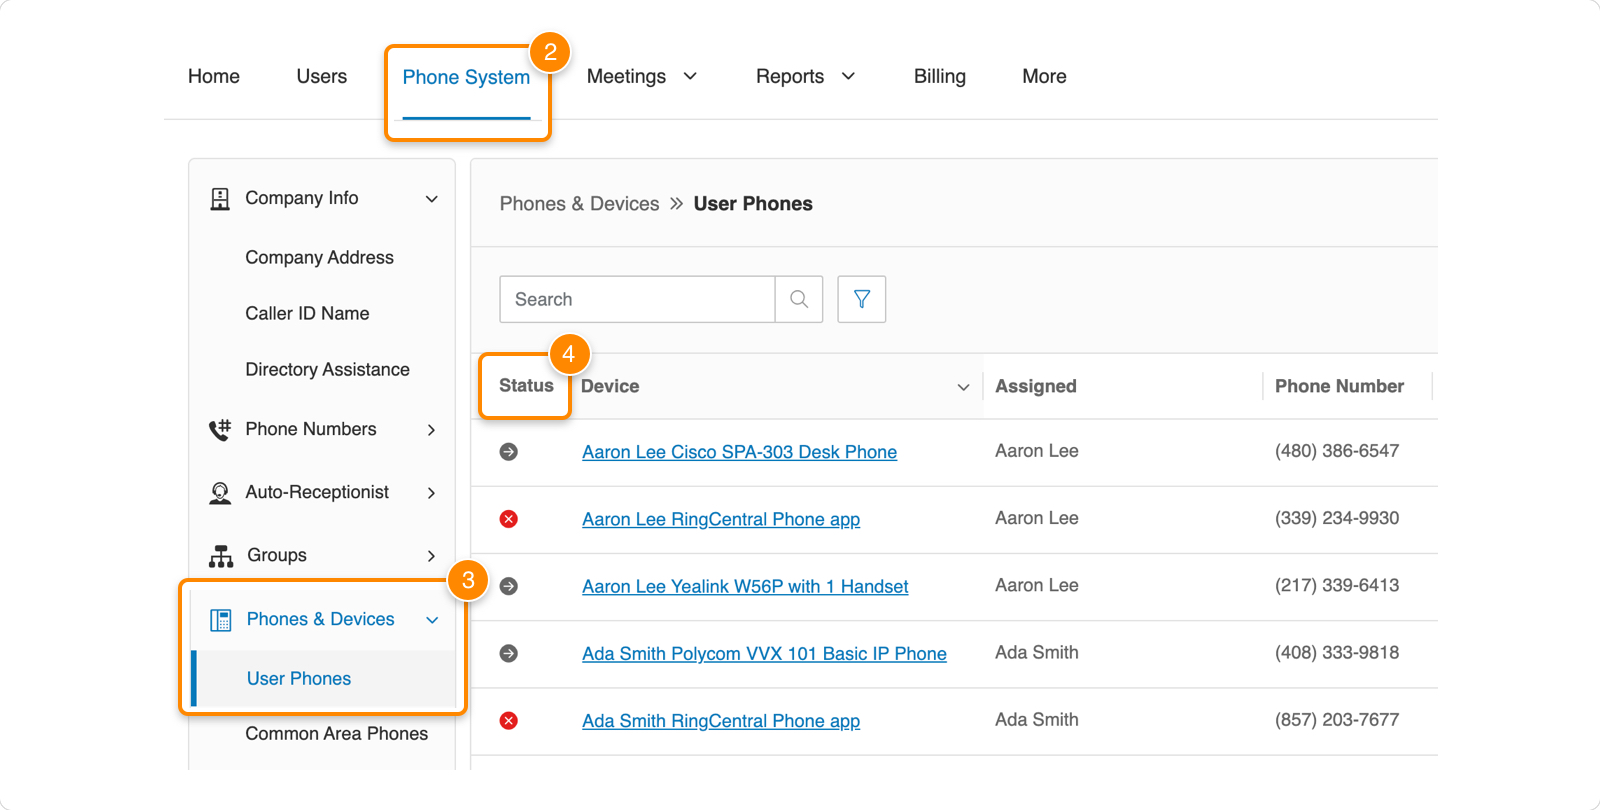
- Go to the Admin Portal and sign in.
- Select Phone System in the top menu.
- Go to Phones & Devices > User Phones.
- In the Device column, click an Existing Phone link.
If your User Phones list doesn’t include an Existing Phone entry, you’ll need to add one. Follow the steps to add a new deskphone, then return to step 2e. - Click Set Up and Provision.
- In the Select Device window, click Set up manually using SIP.
- For Step 1: Will you be using secure voice transport on this device?, select No.
- ▪ If you do wish to use secure voice transport, you’ll need to contact Customer Support to make sure this option is turned on at the account level. Learn more about setting up secure voice transport
- For Step 2: Configure SIP information, click the Outbound Proxy dropdown. Select a SIP outbound proxy server according to your deskphone’s location.
- Click Copy at the top right to copy your selected Outbound Proxy address, then click Done.
- Paste what you’ve copied into a document in your word processor or notes app. You’ll need this information in step 6.


- You’ll be returned to the Existing Phone window. Confirm your account information and make any necessary changes. Click Save.
- Find your deskphone’s IP address.
- Connect your deskphone to a power source.
- Using an ethernet cable, connect the deskphone to your internet router.
- Turn your deskphone on.
- Press Menu.
- Select Status, or press 2.
- Select Network, or press 2.
- Select TCP/IP Parameters, or press 1.
- Take note of the IP address displayed on your deskphone’s screen.
Note: On some Poly deskphone models, you may need to go to Settings > Status > Platform > Phone on the deskphone. If you’ve tried both of these options and still can’t find your deskphone’s IP address, refer to the deskphone’s manual, or contact Poly Customer Support.
- Enter your deskphone’s IP address into the address bar of a web browser.
- Open the document that you created in step 2j to save your deskphone’s SIP data.
- When prompted, copy the following information from your document, then enter it into the appropriate fields:
- Outbound Proxy information
- User Name
- Password: If your copied password doesn’t work, try a default password: 456 for admins, or 123 for standard users.
Once you’ve entered the required information, the manual provisioning process will be complete.
Note: If your deskphone doesn’t connect to RingCentral’s servers after you follow the steps above, contact Poly Customer Support.
Checking your deskphone’s provisioning status
To confirm that you’ve successfully provisioned your deskphone:
- Go to the Admin Portal and log in.
- Select Phone System in the top menu.
- Go to Phones & Devices > User Phones.
- In the Status column, you should see a green check to the left of your deskphone’s name. The check indicates that your deskphone has been provisioned. If you see a red X next to your deskphone’s name, you may need to contact Poly Customer Support.
Adding a deskphone for manual provisioning
If Existing Phone doesn’t appear in the Device column of your list of User Phones, follow these steps to add a new deskphone so you can manually provision it.
When you’re done adding a new deskphone, return to step 2d in Manually provisioning your Poly deskphone.
- Go to the Admin Portal and sign in.
- Select Phone System in the top menu.
- Go to Phones & Devices > User Phones.
- Click Add Device at the upper right.

- In the Select Location window, click Domestic.
Note: To add an international deskphone, follow the steps to Add a Global RingEX user with a phone. - In the Select User window, select the user you’d like to assign the phone to, then click Next.
- In the Select Devices window, select the Other Phones tab, then click Existing Phone.

- Select the number of devices you want to add, click Add, then click Next. You won’t be charged for adding an existing phone.
- In the Select Numbers window, click the Number Inventory or New Number tab.
- Click Number Inventory if you want to assign an existing account number to the deskphone you’re adding.
- Click New Number if you don’t have existing numbers, or if you want to use new numbers from RingCentral.
- Select the State/Province and Area Code that you want to assign to your new deskphone.
- Check the box next to the name of your new deskphone, then click Assign to Selected. You may also click the down arrow to Assign to All, which assigns a single number to multiple deskphones. (RingCentral doesn’t recommend this option.)
- If you make a mistake or change your mind, click Unassign Number to restart this part of the process.
- Click Next.
- In the Add Emergency Response Location window, select your emergency response location, check the box next to your new deskphone’s name, and click Assign to Selected.
- Click Next.
- In the Add Shipping Info window, fill out your shipping information and your Cost Center and Cost Center Code information (if relevant), then click Next.
Note: Shipping info is for billing purposes only. Since you’re using an existing device, nothing will be shipped to you. - In the Confirm window, review the assigned fees, then check the acknowledgement box to authorize the transaction.
- Click Next.
- In the next window, click Done to confirm your transaction.
When you’ve completed these steps, resume the manual provisioning process starting at step 2e.