Manual setup for Poly deskphones
================================
When automatic (one-touch) setup and [assisted setup](https://support.ringcentral.com/article-v2/Assisted-setup-for-deskphones.html?brand=RingCentral&product=RingEX&language=en_US "") aren't available, you can manually configure your Poly deskphone to connect to
RingCentral
.
If you have a Poly deskphone that's not on the list of [certified and supported deskphones](https://support.ringcentral.com/article-v2/certified-supported-deskphones-ringcentral.html?brand=RingCentral&product=RingEX&language=en_US&pills-nav=poly ""), you'll need to set up your deskphone manually.
Note
Depending on the model, a manually provisioned deskphone may not be compatible with some
RingCentral
features. Some manually provisioned deskphones:
* Can't receive updates from
RingCentral
's servers.
* Can't download the firmware required for certain
RingCentral
features.
* Can't use
RingCentral
's [Presence](https://support.ringcentral.com/article-v2/Presence-Overview.html?brand=RC_US&product=RingEX&language=en_US "") feature.
* Can't use advanced features or encryption.
* Don't have softkeys for the [Paging](https://support.ringcentral.com/article-v2/Paging-Overview.html?brand=RingCentral&product=RingEX&language=en_US "") or [Intercom](https://support.ringcentral.com/article-v2/4603.html?brand=RingCentral&product=RingEX&language=en_US "") features.
For support with Poly deskphones that weren't purchased from
RingCentral
, contact [Poly Customer Support](https://support.hp.com/us-en/poly "").
Before you set up your Poly deskphone
-------------------------------------
* Confirm that your deskphone meets
RingCentral
's network requirements. Refer to the IP phone section of [
RingCentral
network requirements](https://support.ringcentral.com/article-v2/Network-requirements.html?brand=RingCentral&product=RingEX&language=en_US#GUID-ca51f68b-4f1d-41a2-b488-07015145113a "").
* Make sure you're a
RingCentral
admin with permission to make changes to *Phones \& Devices*.
* Make sure your deskphone has been added to your account and assigned a phone number or DigitalLine. To learn more, visit [Assigning a phone number or DigitalLine to your existing device](https://support.ringcentral.com/article-v2/10815-Deskphones-Add-a-Digital-Line-for-your-3rd-Party-BYOD-phone.html?brand=RC_US&product=RingEX&language=en_US "").
* Make sure your deskphone is unlocked. If you're unsure, contact [Poly Customer Support](https://support.hp.com/us-en/poly "").
* [Perform a factory reset of your deskphone](https://support.ringcentral.com/article-v2/Factory-Reset-Polycom-Phone.html?brand=RC_US&product=RingEX&language=en_US ""). This process will fully erase all settings and customizations.
Configuring your Poly deskphone with manual setup
-------------------------------------------------
To provision your Poly deskphone manually, first locate your SIP settings in the Admin Portal, then configure your phone using Web GUI.
### Finding your SIP settings in the Admin Portal
The Session Initiation Protocol (SIP) settings allow third-party IP phones to be manually provisioned and connected to
RingCentral
.
For step-by-step instructions on finding your SIP settings, visit [Getting the SIP settings for manual provisioning](https://support.ringcentral.com/article-v2/Manual-Provisioning-How-get-SIP-Settings.html?brand=RC_US&product=RingEX&language=en_US "").
### Setting up your Poly phone using the Web GUI
* Check that the Ethernet cable is connected.
* If you don't know your phone's IP address:
* Connect your deskphone to a power source.
* Using an Ethernet cable, connect the deskphone to your internet router.
* Turn on your deskphone.
* Press the **Menu** (home) button.
* Depending on your phone, choose one of these options:
* Select **Status** or press **2**.
* Select **Settings** or press **9** . Then select **Status** or press **4**.
* Select **Network** or press **3**.
* Select **TCP/IP Parameters** or press **1**.
* Note the IP address displayed on your deskphone's screen.
**Note** : On some Poly deskphone models, you may need to go to **Settings \> Status \> Platform \> Phone**. If you've tried both options and still can't find the IP address, refer to your deskphone's manual or contact Poly Customer Support.
* Open a web browser, and enter your device's IP address into the address bar. If you get a warning or error message about SSL Certificates or Security, this can be ignored.
* Select **Admin** at the login screen. Then enter your device's username and password, and click **Submit** .
Note
Following a factory reset, your deskphone's default password is **456** . If your phone shows your name on the screen, the password will be **789**.
* Go to **Settings** in the top menu, then click **Lines** . Expand the **Identification** section.
* Enter the setup information you copied from the Admin Portal into the relevant fields. Field names may vary depending on your deskphone model.
* **SIP Label Name** : In the SIP Label Name field, enter the user name you copied from the Admin Portal, then press **OK** .
* Your User Name is usually your direct line number.
* **Display Name** : In the Display Name field, enter your first and last name, then press **OK**.
* **Register Name** : In the Register Name field, enter your Authorization ID, then press **OK** .
Example: 805552938485
* **User Name** : Enter the user name you copied from the Admin Portal, then press **OK** .
* Your User Name is usually your direct line number.
Example: 17185558355

* **Password**: Enter your SIP password.
* Click **OK**.
* Enter the SIP settings you copied from the Admin Portal.
* **SIP Server** : In the SIP Server field, enter your SIP domain.
* Example: sip.ringcentral.co.uk
* **SIP Server Port** : In the SIP Server Port field, enter your Remote SIP port.
* Example: 5060

* **Transport** : Select *TCP* or *TLS* .
* Choose TCP or TLS based on the selection you made in the Admin Portal.
* **Outbound Proxy Address** : Enter your Outbound Proxy.
* Example: sip20.ringcentral.com
* **Port** : Enter your Outbound Proxy Port.
* Example: 5090
* **Account Active** : Set to *Enabled*.
Once you've entered the required information, the manual setup process will be complete.
Checking your deskphone's provisioning status
---------------------------------------------
To confirm that you've successfully set up your deskphone:
* Sign in to the [
Admin Portal
](https://service.ringcentral.com "").
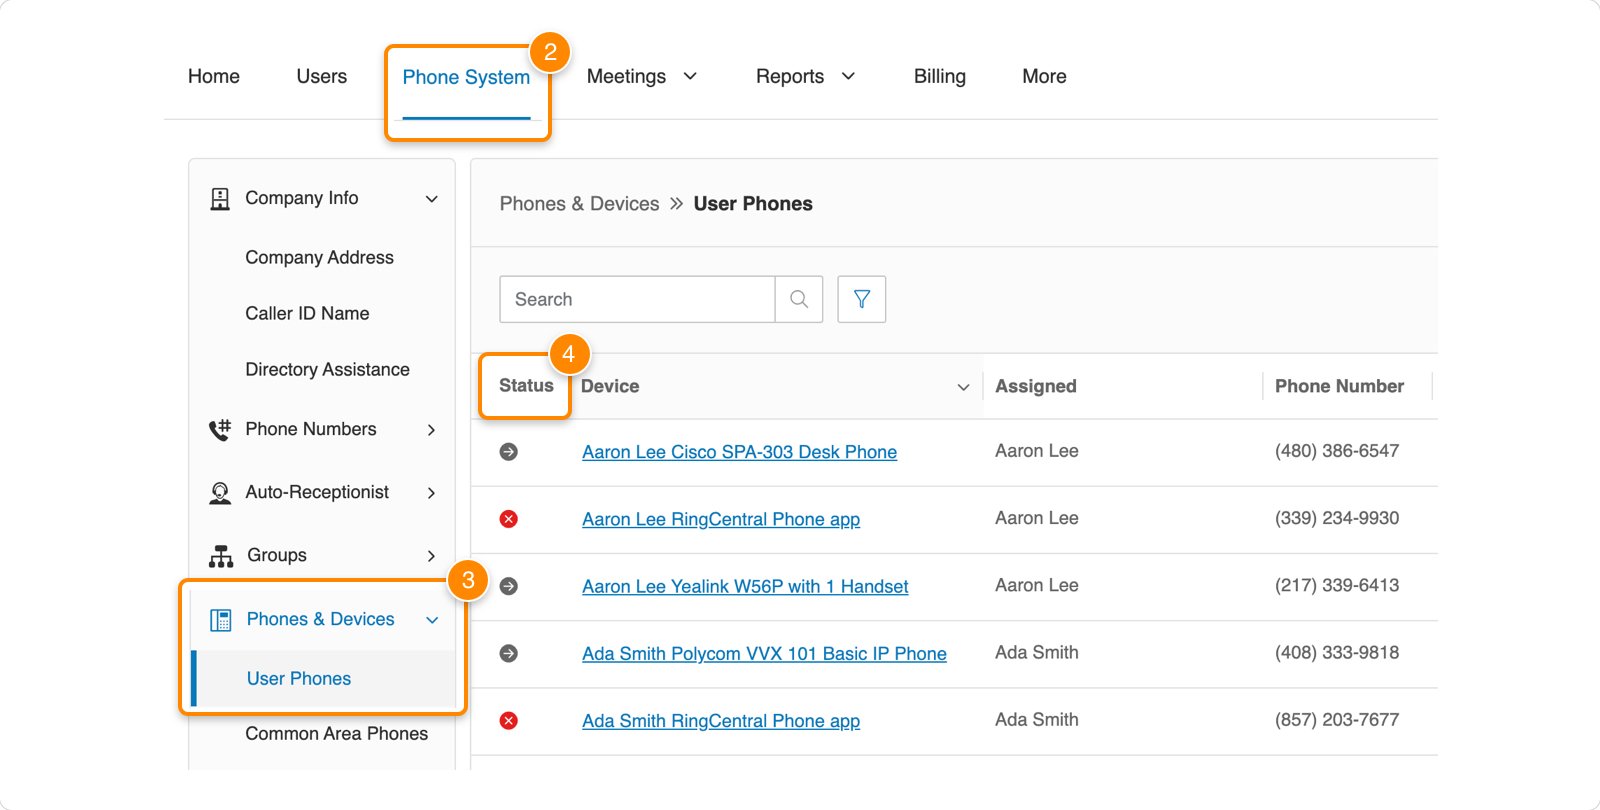
* Select **Phone System** in the top menu.
* Click **Phones \& Devices \> User Phones**.
* In the **Status** column, you should see a green check to the left of your deskphone's name. The check indicates that your deskphone has been set up. If you see a red X next to your deskphone's name, you may need to contact [Poly Customer Support](https://support.hp.com/us-en/poly "").
Adding a deskphone for manual setup
-----------------------------------
If no phone is listed in the **Device** column under **User Phones**, you can add one manually.
To learn more, visit [Assigning a phone number or DigitalLine to your existing device](https://support.ringcentral.com/article-v2/10815-Deskphones-Add-a-Digital-Line-for-your-3rd-Party-BYOD-phone.html?brand=RC_US&product=RingEX&language=en_US "").