Setting up emergency address automatic location updates on your
RingEX
company account
========================================================================================================================================================
RingEX
supports emergency address automatic location updates for specific devices and apps. The app or device location is sent to the appropriate emergency service agency when an emergency call is placed from the app or device. To automatically update the app or device location, your app or device interacts with nearby network elements (e.g., WiFi access points, IP address ranges, and/or Ethernet switch MAC addresses).
Compatible devices include:
**Apps**
*
RingCentral
app (desktop version only)
*
RingCentral
Phone app
**Phones**
* Avaya J189
* Avaya J159
* Avaya J189A
* Avaya J179
* Avaya J139
* Avaya J169
* Poly CCX400 Business Media Phone
* Poly CCX500 Business Media Phone
* Poly CCX600 Business Media Phone
* Poly CCX700 Business Media Phone
* Poly Edge E100 IP Phone
* Poly Edge E220 IP Phone
* Poly Edge E300 IP Phone
* Poly Edge E320 IP Phone
* Poly Edge E350 IP Phone
* Poly Edge E450 IP Phone
* Poly Edge E550 IP Phone
* Poly Edge E500 IP Phone
* Poly VVX101
* Poly VVX150
* Poly VVX201
* Poly VVX250
* Poly VVX301
* Poly VVX311
* Poly VVX350
* Poly VVX401
* Poly VVX411
* Poly VVX450
* Poly VVX501
* Poly VVX601
* Yealink CP935W-Base Conference Phone
* Yealink T21P
* Yealink T31P Entry-level IP Phone
* Yealink T33G
* Yealink T42S
* Yealink T46S
* Yealink CP925 - Touch-Sensitive IP Conference Phone
* Yealink T48S
* Yealink CP930W
* Yealink CP965 - Touch-Sensitive IP Conference Phone
* Yealink T43U Ultra-elegant Gigabit IP Phone
* Yealink T46U Ultra-elegant Gigabit IP Phone
* Yealink T48U Ultra-elegant Gigabit IP Phone
* Yealink T53W
* Yealink T54W
* Yealink T58W Pro Smart Business Phone
* Yealink VP59 Premium Deskphone for Executives
* Yealink T57W
* Yealink W60P Cordless Phone
* Yealink W69P Cordless Phone
* Yealink W76P Cordless Phone
* Yealink W79P Cordless Phone
Setting up company emergency response locations
-----------------------------------------------
[Company Emergency Response locations (ERLs)](https://support.ringcentral.com/article-v2/managing-company-emergency-response-locations.html?brand=RingCentral&product=RingEX&language=en_US "") represent the business locations where employees use their
RingCentral
service to make phone calls. The scope of an ERL depends on physical and geographic coverage needs. The more granular the scope, the easier it is for emergency responders to arrive at the right location in a reasonable amount of time.
Admins and users can select their company ERL when prompted to confirm their location.
Typical examples include:
* **SOHO customer** : *Single* ERL referring to a single address.
* **SMB customer** : *Single* ERL referring to a single address and possibly a suite in an office building.
* **Enterprise customer** : *Multiple* ERLs referring to buildings on campus, buildings in different geographic locations, and possibly one ERL per floor in a multi-story office park.
Setting up the network infrastructure with known locations
----------------------------------------------------------
To automatically update the app or device location, your app or device interacts with nearby network elements (e.g., WiFi access points, IP address ranges, and/or Ethernet switch MAC addresses).
Note: Contact your RingCentral account manager to enable your account's **Automatic Location Updates** feature.
### Adding a Wireless Access Point
To add a Wireless Access Point Map:
* Sign in to the [
Admin Portal
](https://service.ringcentral.com "").
* Click the **Phone System** tab.
* Click **Emergency Calling** (a), then click **Automatic Location Updates** (b).
* Click the **Wireless Access Point Map** tab (a), then click **Access Point** (b). You can also **Add Access Points in Bulk** .
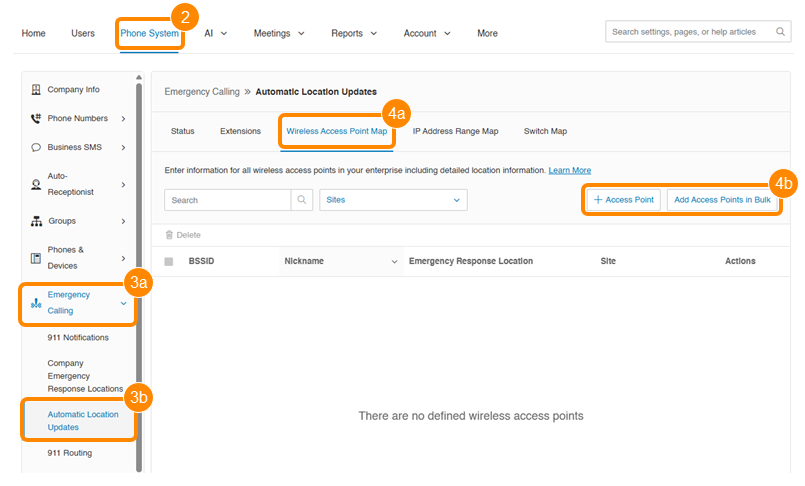
* Enter the **BSSID** (Mac address of the wireless access point) and **Nickname** of the Wireless Access Point.
Note: BSSID is not the same as the SSID of the access point.
* Select an**Emergency Response Location** and **Site** , then click **Save**.
### Adding an IP address range
To add an IP Address Range Map:
* Sign in to the [
Admin Portal
](https://service.ringcentral.com "").
* Click the **Phone System** tab.
* Click **Emergency Calling** (a), then click **Automatic Location Updates** (b).
* Click the**IP Address Range Map** tab (a), then click **Add Network** (b). You can also **Add Networks in Bulk** .

* Enter the **Network Name** and select the **Site**.
* Click **Add** in the Public IP Address(es) section.
* Select **Single** or **Range** , then enter the IP address or IP address range, and click **Save**.
* Click **Add** in the Private IP Addresses section.
* Select **Single** or **Range**, then enter the IP address or IP address range.
* Enter a **Nickname** and select an **Emergency Response Location** , then click **Save**.
* Click **Save**.
Note: You need to specify IP address ranges using both public IP addresses and private IP ranges. For example, if your devices are in a private network range such as 192.168.10.0--192.168.10.255, and you have two public IP addresses, define the network by adding the network, the two public IP addresses, and the private IP address range.
### Adding an Ethernet switch
To add a Switch Map:
* Sign in to the [
Admin Portal
](https://service.ringcentral.com "").
* Click the **Phone System** tab.
* Click **Emergency Calling** (a), then click **Automatic Location Updates** (b).
* Click the**Switch Map** tab (a), then click **Add Switch** (b).

* Enter the**Chassis ID** , **Port** , and **Nickname** of the Ethernet switch. In many cases, the Chassis ID will be the MAC address of the switch.
* Select an**Emergency Response Location** and **Site** , then click **Save**.
Turning on automatic location updates for compatible devices
------------------------------------------------------------
After setting up a network element, automatic location updates can be turned on so users with compatible deskphones won't have to manually enter the device's location. If users move between work and off-site locations, the location of the deskphone will be determined automatically.
To turn on automatic location updates:
* Sign in to the [
Admin Portal
](https://service.ringcentral.com "").
* Click the **Phone System** tab.
* Click **Emergency Calling** , then click **Automatic Location Updates**.
* Under the **Status** tab, click the **Enable Automatic Location Updates for Compatible Desk Phone** s toggle on.
