app and Admin Portal
================================================================================================================================
Admins can add user extensions in the
RingCentral
desktop and web app or the [
Admin Portal
](https://service.ringcentral.com "").
When adding users, you'll need to select a user type. The types available to you depend on your
RingCentral
plan. Sign in to your [Billing Portal](https://support.ringcentral.com/article-v2/Frequently-Asked-Questions-Billing.html?brand=RC_US&product=RingEX&language=en_US "") to check your plan level:
* **
RingEX
** : Users with a
RingEX
license have full access to chat, video, and phone capabilities.
* [**Video Pro**](https://support.ringcentral.com/article-v2/Intro-to-RingCentral-Video-Pro-and-Pro.html?brand=RingCentral&product=RingEX&language=en_US ""): Video Pro users are free and don't have a license. They can access chat messages and limited video capabilities, but can't make or receive direct calls.
* [**Video Pro+**](https://support.ringcentral.com/article-v2/Intro-to-RingCentral-Video-Pro-and-Pro.html?brand=RingCentral&product=RingEX&language=en_US ""): Video Pro+ users have a meeting license. They have access to chat and video capabilities, but can't make or receive direct calls.
* **Mobile** : Mobile users are free and don't have a license. They have access to chat and video capabilities, but can't make or receive direct calls.
Free users can only receive calls through the company's [Auto-receptionist](https://support.ringcentral.com/article-v2/Configuring-company-call-handling.html?brand=RingCentral&product=RingEX&language=en_US "") and make calls using [RingOut](https://support.ringcentral.com/article-v2/Intro-to-RingOut.html?brand=RingCentral&product=RingEX&language=en_US ""). If they make or receive more than 10 calls in a billing cycle, the account will be charged the cost of an additional user that month.
Tip
If you're an admin with purchasing permissions, you can add new user licenses and buy deskphones and phone numbers. If you don't have these permissions, you'll need to contact your company billing admin. You can still assign users to your organization's existing inventory of licenses, phone numbers, and deskphones.
Where would you like to add user extensions?
## Admin Portal
Adding user extensions in the Admin Portal
------------------------------------------
\\\Your browser does not support the iframe element.\
* Sign in to the [
Admin Portal
](https://service.ringcentral.com "").
* Click the **Users** tab.
* Click **Users with Extensions**.
* Click **Add User** .

* Select your user type. The remaining steps will depend on the type of user selected because some types won't require a phone or phone number.
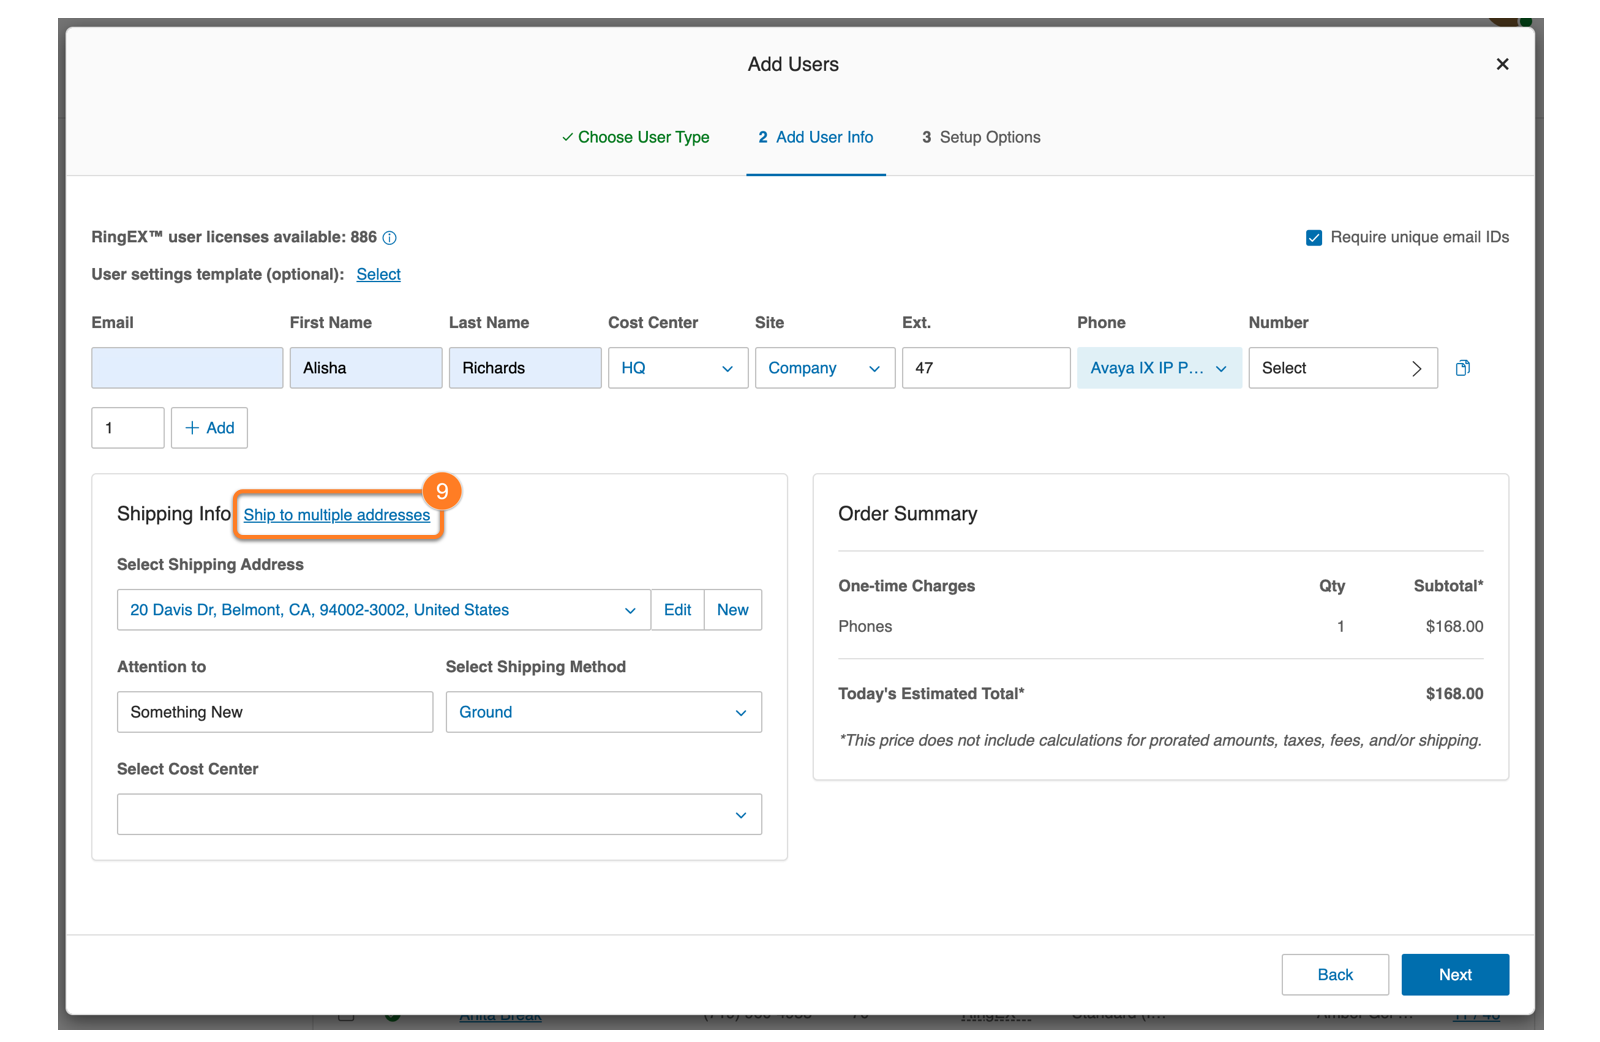
* Enter the user's email, name, cost center, and site (cost center and site will only be available on multi-site accounts). The extension number will fill in automatically.
* **Require unique email IDs** is checked by default. If this isn't selected, you can't invite users by email, and you'll need to select **Activate by assigning credentials** or **Activate later**.
* If you want to add multiple user extensions simultaneously, enter the number to the left of the **Add** button, then click **Add** . You can add up to 25 users at a time. You can also click the **Duplicate** icon at the far right of an entry to create a new entry with the same information except for first name, last name, and email.
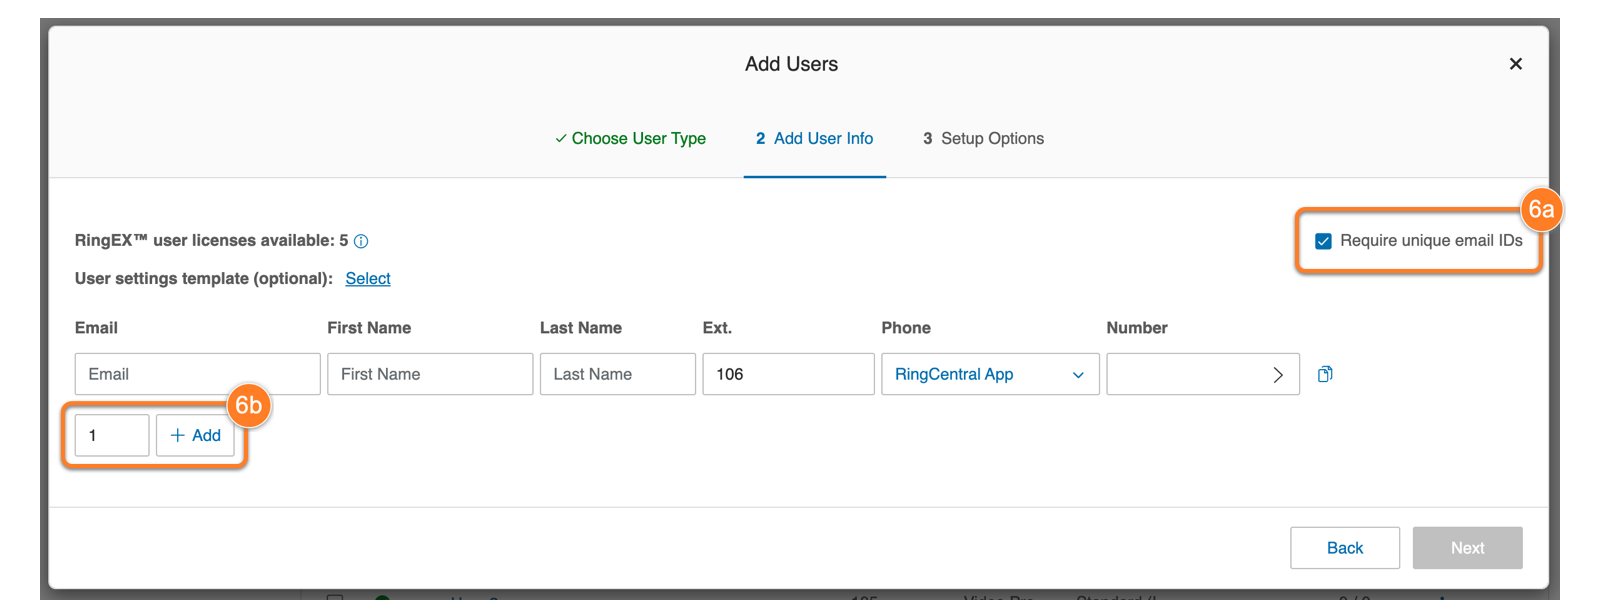
* For Mobile or Video Pro users, skip to step 10. If necessary for your user type, select an option in the **Phone** dropdown. If you're adding more than one user, you can select a different option for each user.
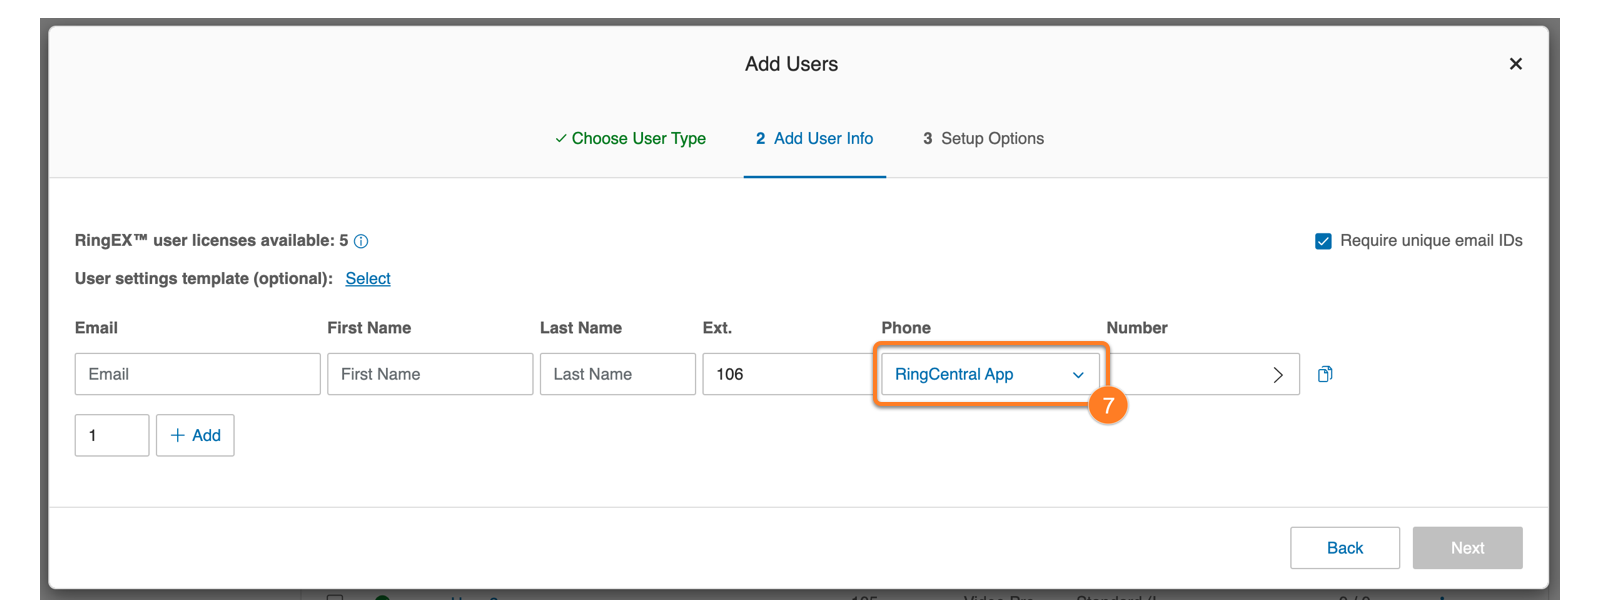
* **
RingCentral
app** : The user won't have a deskphone. They can make and receive calls with the
RingCentral
app.
* **Inventory phone**: Select the deskphone you'd like to assign to the user.
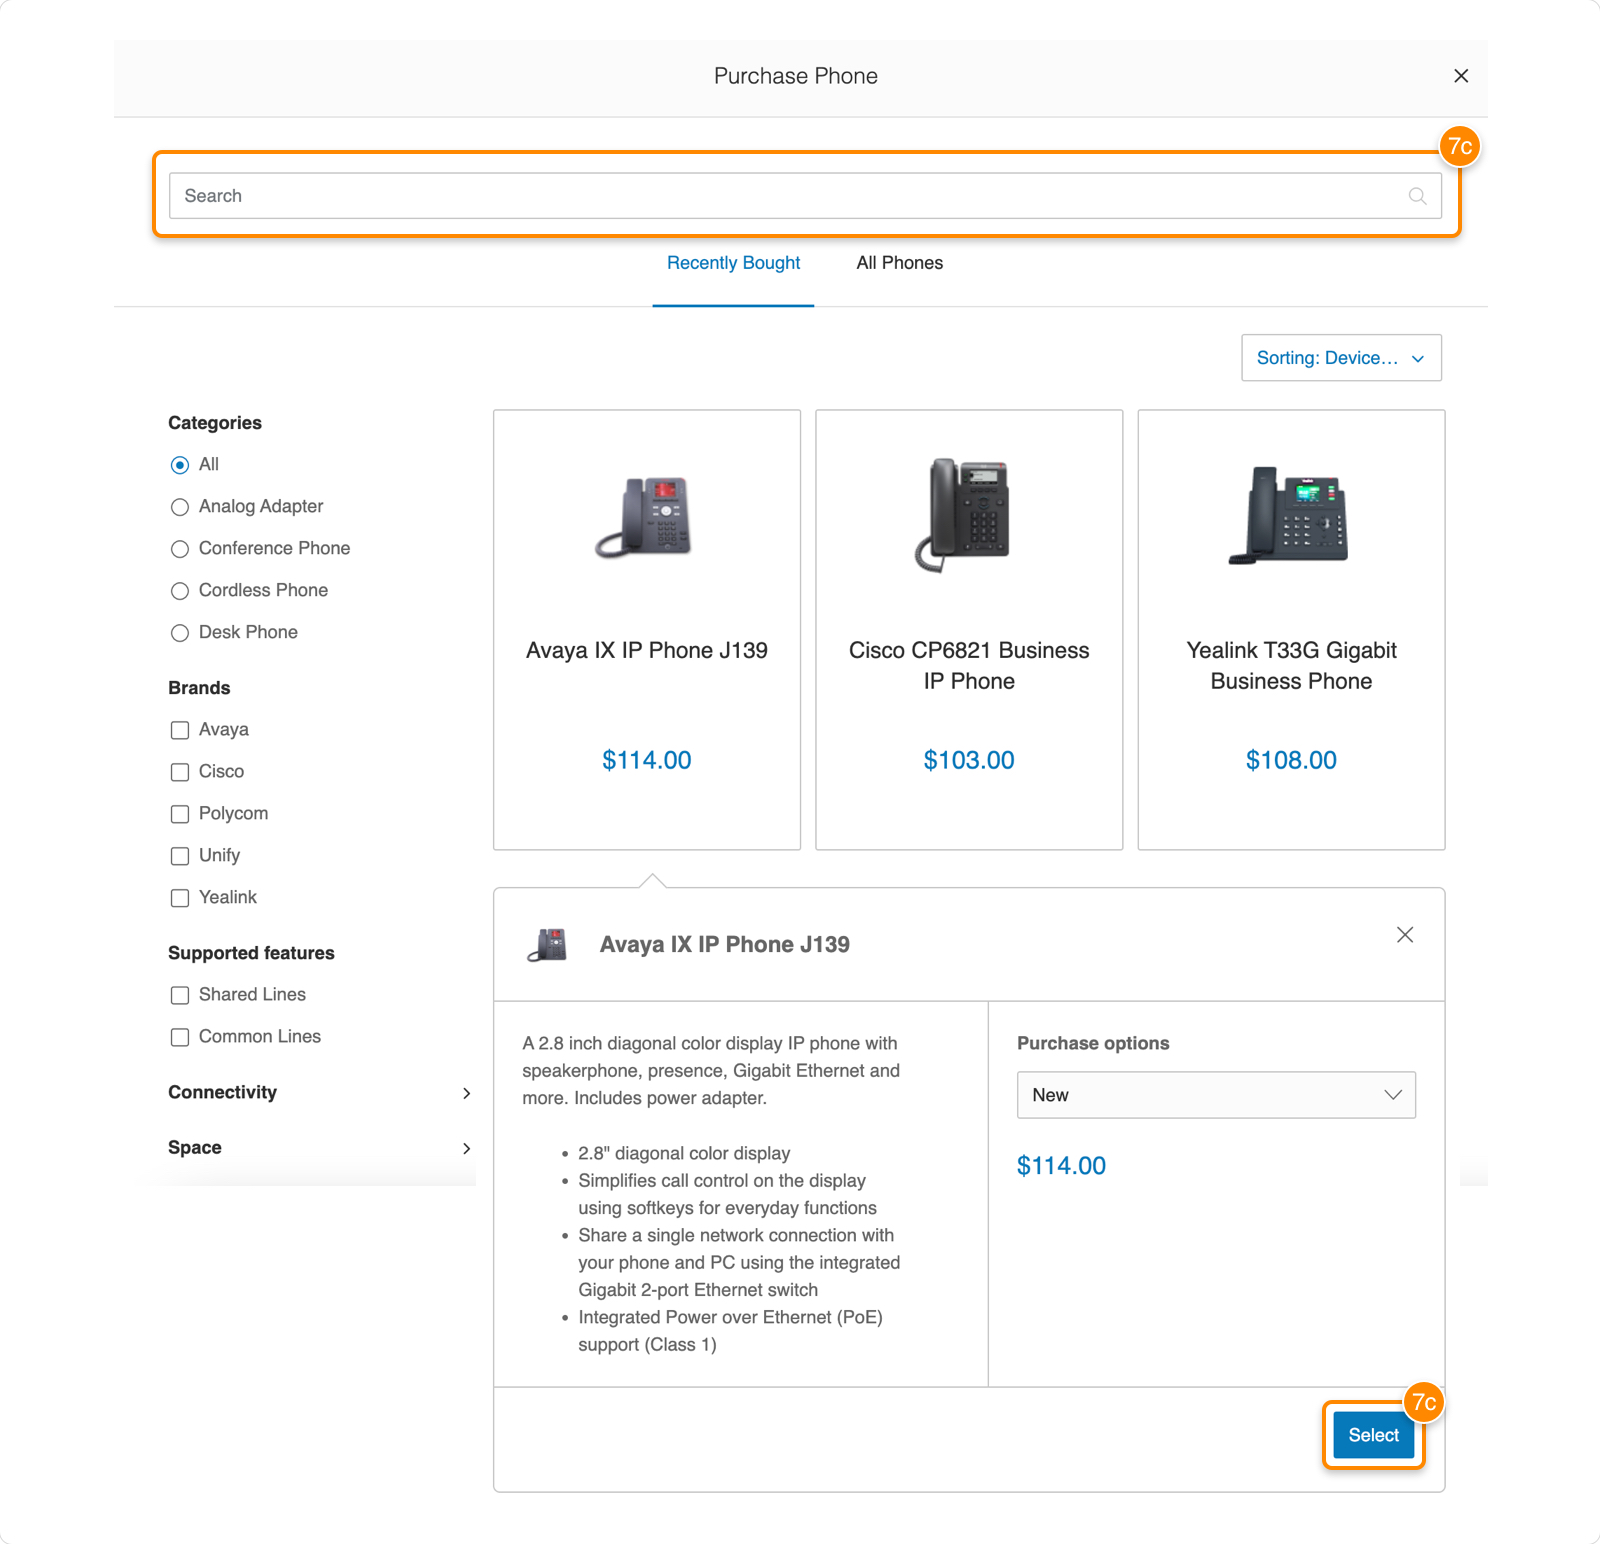
* **Purchase phone** : Select the device you'd like to purchase.
* You can use the search bar (c) or set filters to see devices based on your requirements. Click an image for more details, and click **Select** when you've selected a device to purchase.
* If you're purchasing for more than one user, you can select different models in this step, then add multiple shipping addresses.
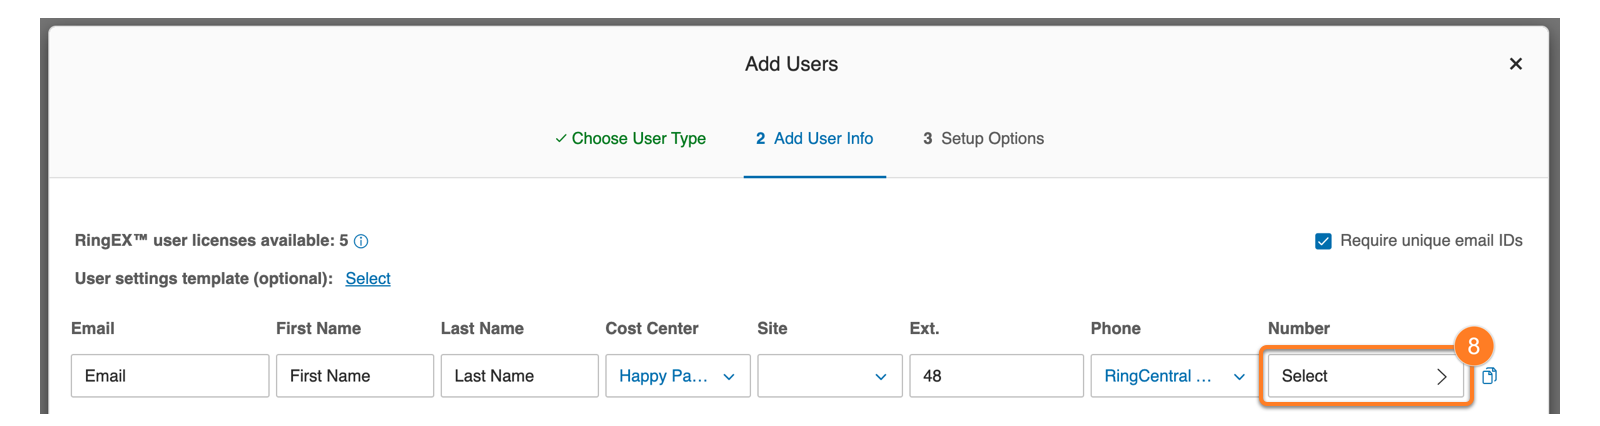
* If necessary for your user, under **Number,** click **Select** . If you have an available number for the user's location, you can assign it under **Number Inventory** . To purchase and assign a new number, click **New Numbers** . Select the state or province, area code, and number. Click **Done** .
* Select, edit, or add a shipping address if you're purchasing a phone. You can ship devices to a single address or multiple addresses. If you need to send them to different addresses, click **Ship to multiple addresses** .
* Click each device individually, then select a shipping address.
* Click **Edit** to edit an address, or click **New** to add a new address.
* Click **Assign to Selected**.
* When you've added all necessary addresses, click **Done**.
* Click **Next**.
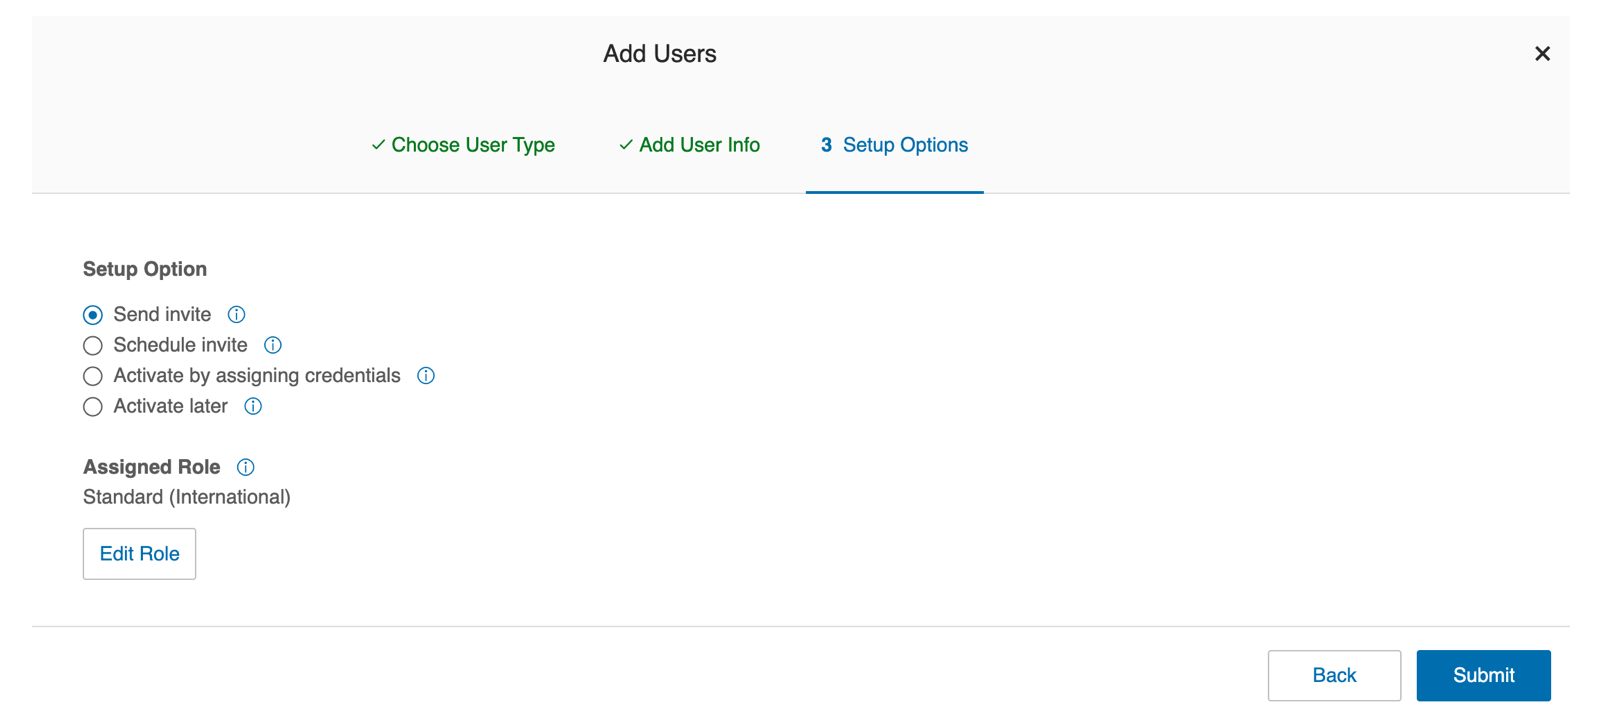
* You have the following setup options for each new user:
* **Send invite**: Set up a user by immediately sending a welcome email with an activation link.
* **Schedule invite**: Choose a specific date and time to send a welcome email, giving users more time before activating their account.
* **Activate by assigning credentials**: Set up and activate a user now by assigning credentials. No welcome email will be sent.
* **Activate later** : Set up a user now but activate later. No welcome email will be sent. If you choose this option, you can activate the user later by going to **Users \> User List \> Unassigned Extensions**. Click the extension to continue activation.
Setup options
-------------
### Send invite
* Select **Send invite** under Setup Option.
* Click **Edit Role** under **Assigned Role** if you want to change the user's permissions. You'll see roles and their permissions. Select a role, and click **Save** .
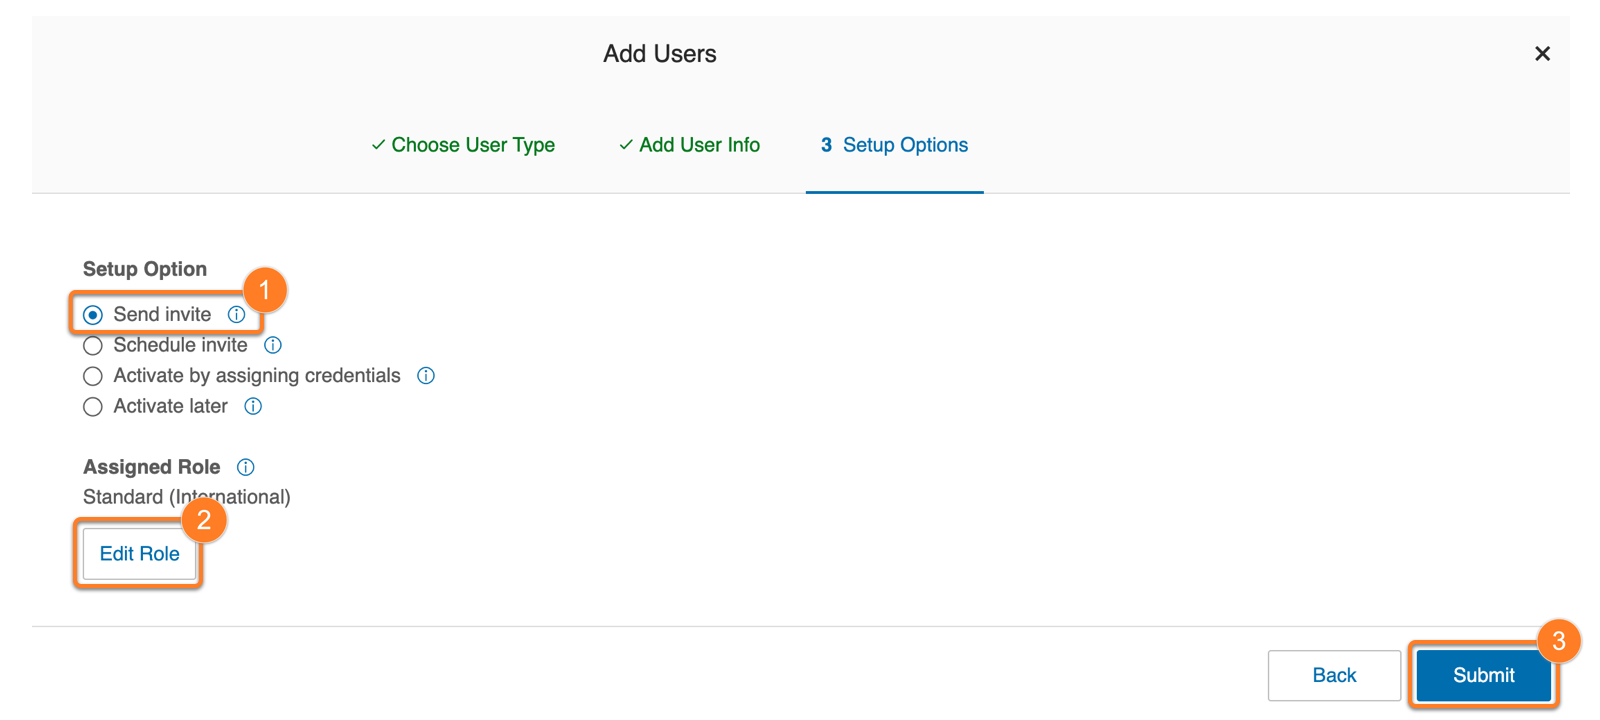
* If you didn't purchase any licenses, phone numbers, or devices, click **Submit** to send the invite. If you're making a purchase:
* After clicking **Submit**, the Add Users - Confirm window will open.
* Review the charges and check the acknowledgment box at the bottom.
* Click **Next.**
* Click **Submit**.
### Schedule invite
Choose a specific date and time to send the welcome email. The scheduled email will be sent in your time zone. This gives you the flexibility to add users at your convenience and ensure they're available to activate their account before the link expires.
* Select **Schedule invite** under Setup Option.
* Click the **Calendar** icon, then select the date and time for the welcome email to be sent.
* Click **Edit Role** under Assigned Role if you want to change the user's permissions. You'll see roles and their permissions. Select a role, and click **Save** .
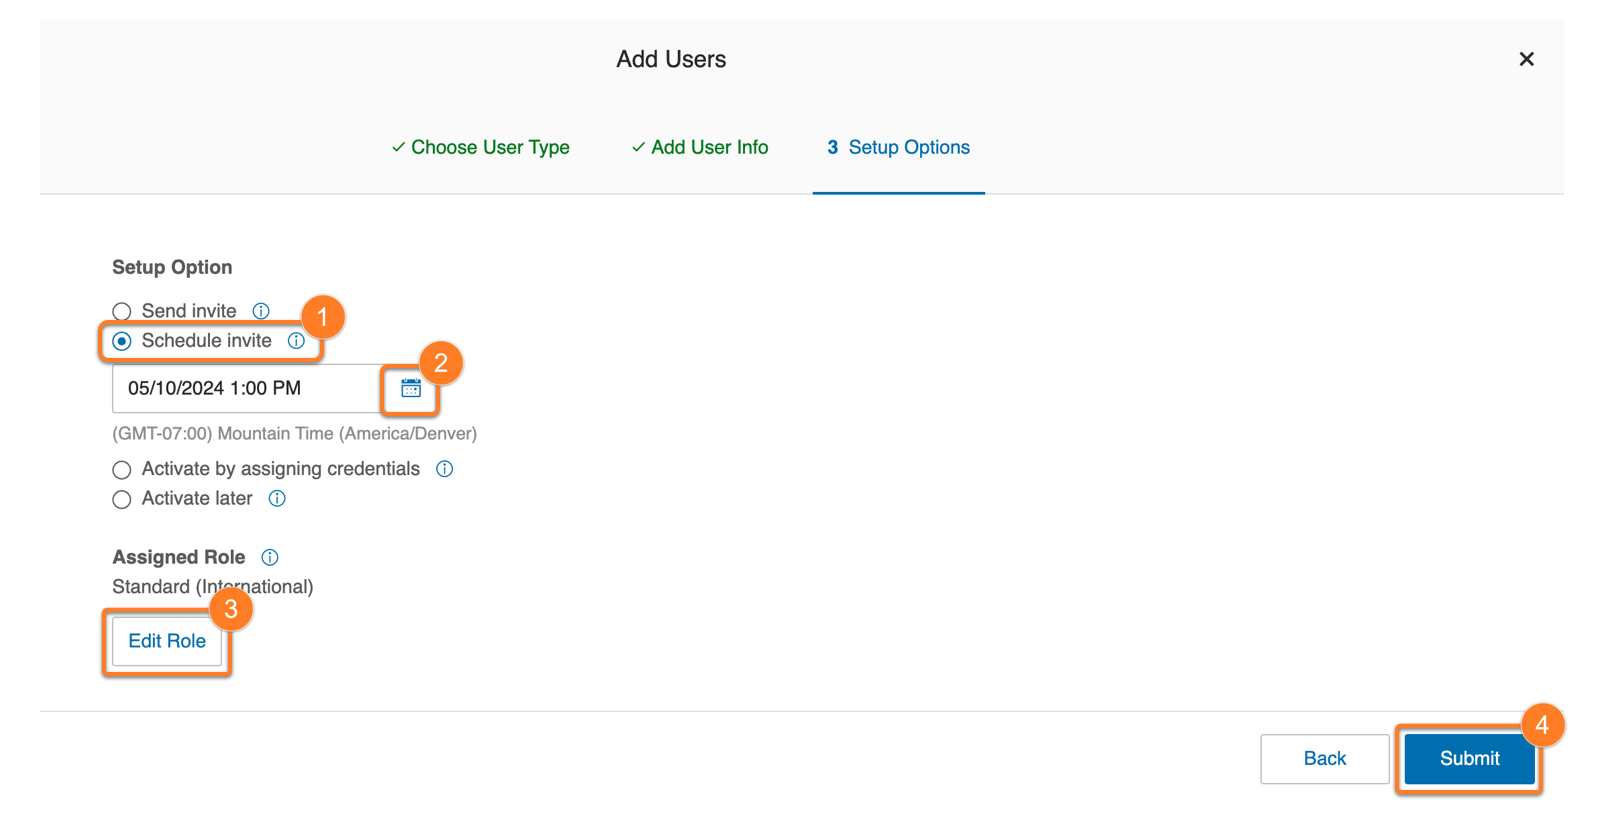
* If you didn't purchase any licenses, phone numbers, or devices, click **Submit** to complete the process. If you're making a purchase:
* After clicking **Submit**, the Add Users - Confirm window will open.
* Review the charges and check the acknowledgment box at the bottom.
* Click **Next**.
* Click **Submit**.
### Activate by assigning credentials
* Select **Activate by assigning credentials** under Setup Option.
* Fill in the required fields under **Credential** :
* Password
* The **Temporary Password** box is checked by default to prompt users to reset their password when they sign in for the first time. Uncheck if you don't want this option.
* Reenter Password
* PIN
* Reenter PIN
* Security Question
* Answer
* Under Emergency Response Location, click **Add** next to the user's name.
* Click the **Select Emergency Response Location** dropdown to search for or select an existing address, or click **New** to add a new address.
* If you're adding a new address:
* Enter a nickname for the location (for example, the user's name) and select the site from the dropdown (site is available on multi-site accounts only).
* Click **Edit** under **Emergency Address**.
* Fill in all necessary fields, then click **Done**.
* Click **Add**.
* Click **Done** to add the address as the user's emergency response location.
Note: An emergency response location is required before users can make or receive calls. If you don't add one, users will be prompted to add their address when signing in for the first time.
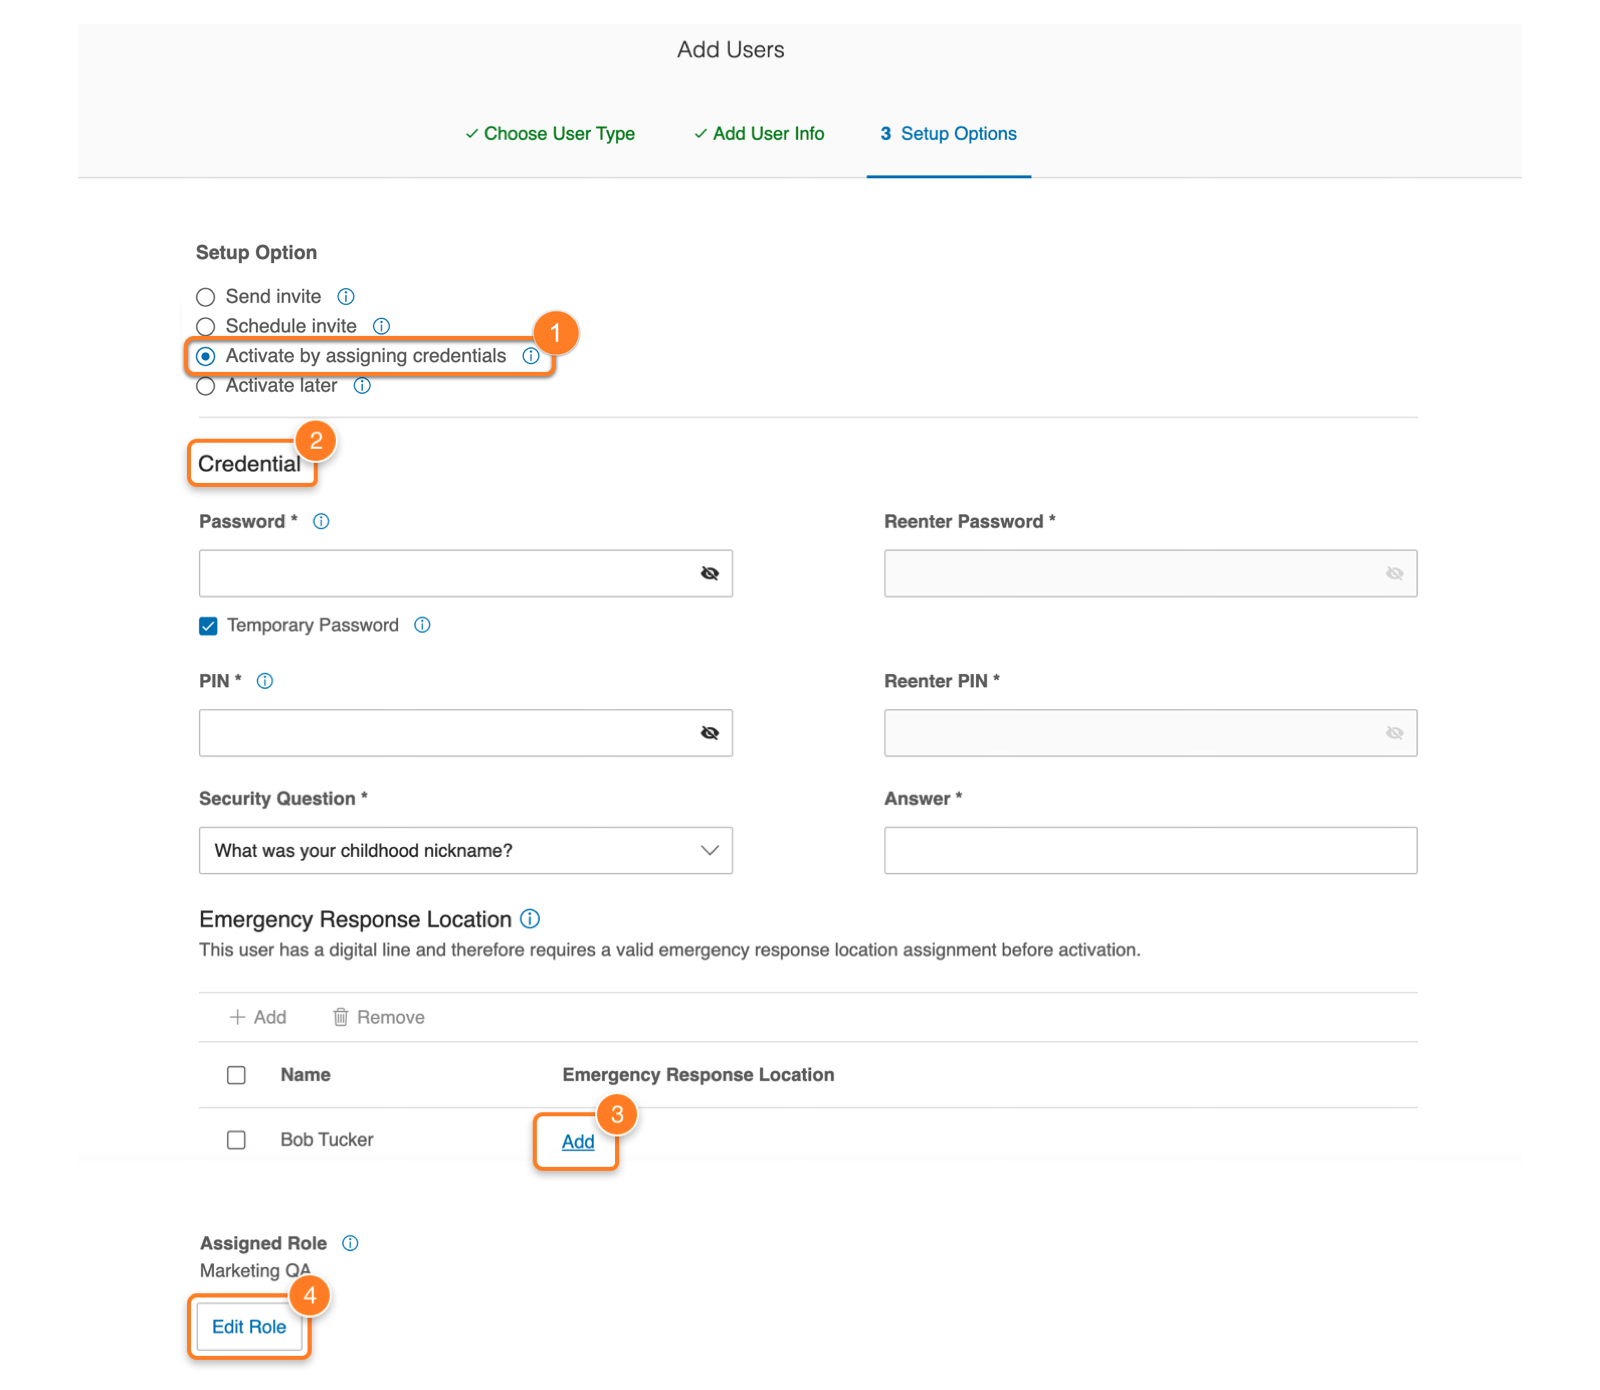
* Click **Edit Role** under Assigned Role if you want to change the user's permissions. You'll see roles and their permissions. Select a role, and click **Save**.
* Click **Submit** . If you didn't add an emergency address, you'll see a *Missing Emergency Address* prompt. Click **Back** to add an emergency address, or **Yes** to continue without one.
* If you didn't purchase any licenses, phone numbers, or devices, clicking Submit will complete the process. If you're making a purchase:
* After clicking **Submit**, the Add Users - Confirm window will open.
* Review the charges and check the acknowledgment box at the bottom.
* Click **Next**.
* Click **Submit**.
### Activate later
With this option, you can add the user without notifying them, then activate them later by assigning credentials or sending a welcome email.
* Select **Activate later** under Setup Option.
* Click **Edit Role** under Assigned Role if you want to change the user's permissions. You'll see roles and their permissions. Select a role, and click **Save** .
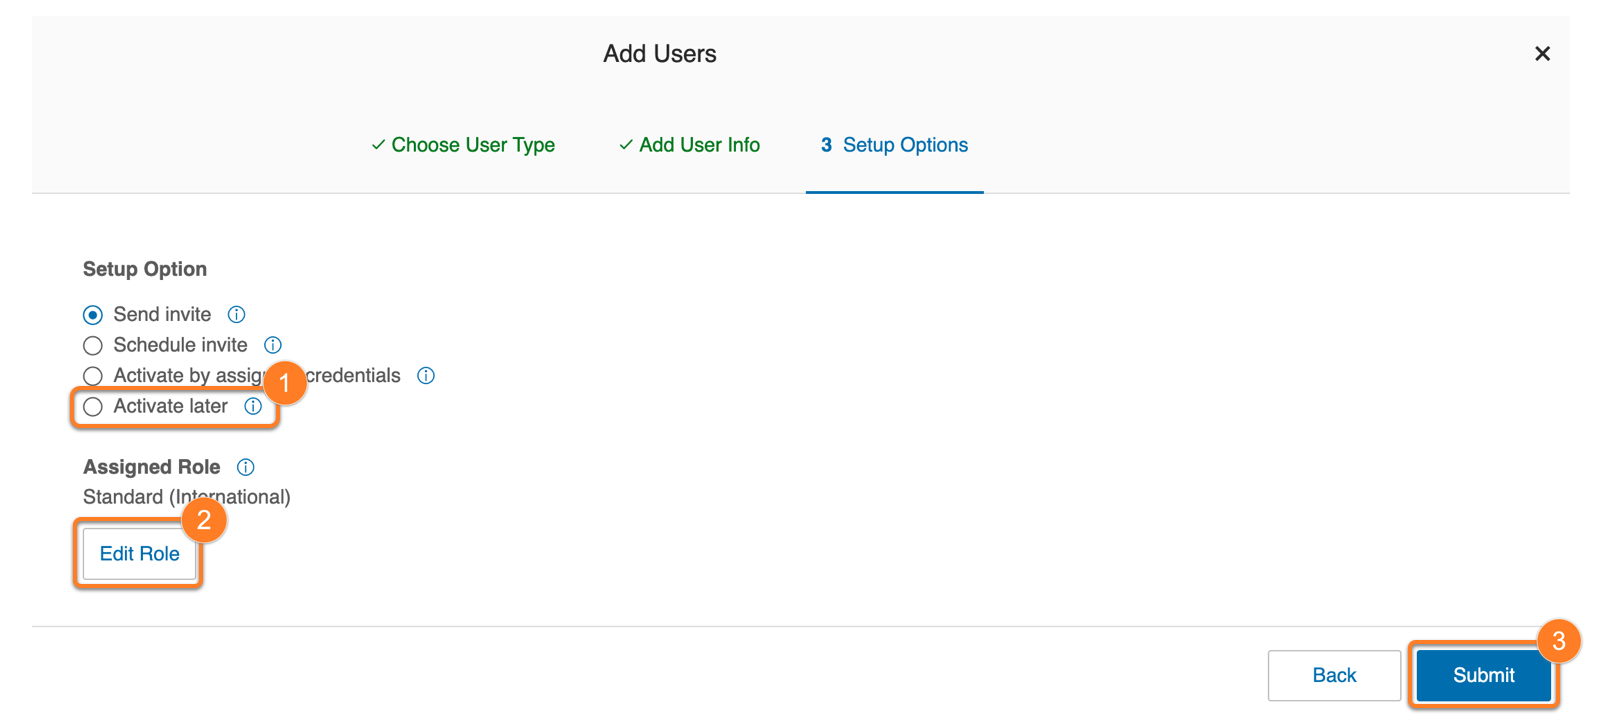
* If you didn't purchase any licenses, phone numbers, or devices, click **Submit** to complete the process. If you're making a purchase:
* After clicking **Submit**, the Add Users - Confirm window will open.
* Review the charges and check the acknowledgment box at the bottom.
* Click **Next**.
* Click **Submit**.
**Additional resources**
[Editing user information](https://support.ringcentral.com/article-v2/Editing-user-information-in-the-RingCentral-app-and-Admin-Portal.html?brand=RingCentral&product=RingEX&language=en_US&pills-nav=admin_portal "")
[Managing user licenses](https://support.ringcentral.com/article-v2/viewing-and-managing-user-licenses.html?brand=RingCentral&product=RingEX&language=en_US "")
[Resending user activation emails in the Admin Portal](https://support.ringcentral.com/article-v2/9711-Getting-Started-RingCentral-Resend-Welcome-Email.html?brand=RC_US&product=RingEX&language=en_US "")
## Desktop & web
Adding user extensions in the desktop and web app
-------------------------------------------------
You can add users in the RingCentral desktop and web app and choose how to activate them, their user type, and their license details.
* In the navigation bar, click **Company settings**.
* Click **User management**.
* Click **Add user** at the upper right.

* Enter the user's name, email, and department. The extension number fills in automatically.
* Select the user's role from the **Role** dropdown. If your account has multi-site turned on, you can manage the user's role only in the [Admin Portal](https://service.ringcentral.com/ "").
* Select a site from the **Site** dropdown, if applicable.
* Select a user activation option:
* **Send invite**: Send a welcome email with an activation link immediately.
* **Schedule invite**: Choose a specific date and time to send an activation email.
* Click **Edit** to change the user type. If the account has available RingEX licenses, the user defaults to **RingEX** with a phone number, and the RingCentral app is assigned automatically. If no RingEX licenses are available, the user defaults to **Video Pro**.
* If you selected a RingEX license, click **Edit** to set up the phone details.
* **Location**
* **Phone** : *RingCentral App* , *Preconfigured phone line* , *Inventory phone*. The preconfigured phone line option only appears if your account has unassigned extensions.
* **Phone number**
* To the right of Add-on licenses, click **Add**to assign or purchase licenses for the user.
* Click **Save and invite** to complete the setup. To add another user without closing the window, click **Invite and add another**.

**Additional resources**
[Editing user information](https://support.ringcentral.com/article-v2/Editing-user-information-in-the-RingCentral-app-and-Admin-Portal.html?brand=RingCentral&product=RingEX&language=en_US&pills-nav=desktop_%26_web "")
[Managing user licenses](https://support.ringcentral.com/article-v2/viewing-and-managing-user-licenses.html?brand=RingCentral&product=RingEX&language=en_US&pills-nav=desktop_%26_web "")