Problems with calls going straight to voicemail
===============================================
You may notice you've been missing calls if:
* Your phones aren't ringing.
* You receive voicemails but not calls.
* People tell you they've called and were sent directly to voicemail.
Here's how to troubleshoot the issue of calls going straight to voicemail.
Check presence status
---------------------
If your presence is set to *Do not disturb* (DND), incoming calls will be silenced and sent to voicemail.
### Checking your presence status in the
RingCentral
desktop or web app
* Click your profile picture.
* Click **Do not disturb** , then select **Available**.
### Checking your presence status in the
RingCentral
mobile app
* Tap your profile picture at the top left.
* Tap **Do not disturb** , then select **Available**.
### Checking your presence status in the Admin Portal
* Go to the [
Admin Portal
](https://service.ringcentral.com "") and sign in.
* Click your profile picture at the top right.
* Click **Do not disturb** , then select **Available**.
Note: Setting DND on your phone itself won't sync your presence with your desktop and mobile apps. Check to see whether DND is turned off on your phone.
Depending on your service plan, your presence may display automatically as *DND* when you're in a meeting or on a call.
Check your settings
-------------------
### Check your work hours
If your work hours or time zone are incorrect, your calls may go straight to voicemail.
To check your work hours and time zone:
* Go to the[
Admin Portal
](https://service.ringcentral.com "") and sign in.
Note: If you're an admin, click **Admin Portal \> My Extension** at the top right.
* Click **Settings** in the top menu.
* Click **Phone \> Call rules and voicemail**.
* Under *My work day* , click **Incoming calls** .
Note: If you've already set your schedule, click either **Work hours** or **After hours**.
* Make sure your hours match your actual schedule.
* Scroll down to the **If no one answers** section. Make sure the selection in the dropdown is **Send to voicemail**.
* Click **Save**.
### Make sure your phones, numbers, and apps are turned on
If all of your phones, numbers, and apps are turned off in your call handling settings, your calls may go straight to voicemail. To make sure your phones, numbers, and apps are turned on:
* Go to the [
Admin Portal
](https://service.ringcentral.com "") and sign in.
Note: If you're an admin, click **Admin Portal \> My Extension** at the top right.
* Click **Settings** in the top menu.
* Click **Phone \> Call rules and voicemail**.
* In the **My work day** section, click **Incoming calls** .
Note: If you've already set your schedule, click either **Work hours** or **After hours**.
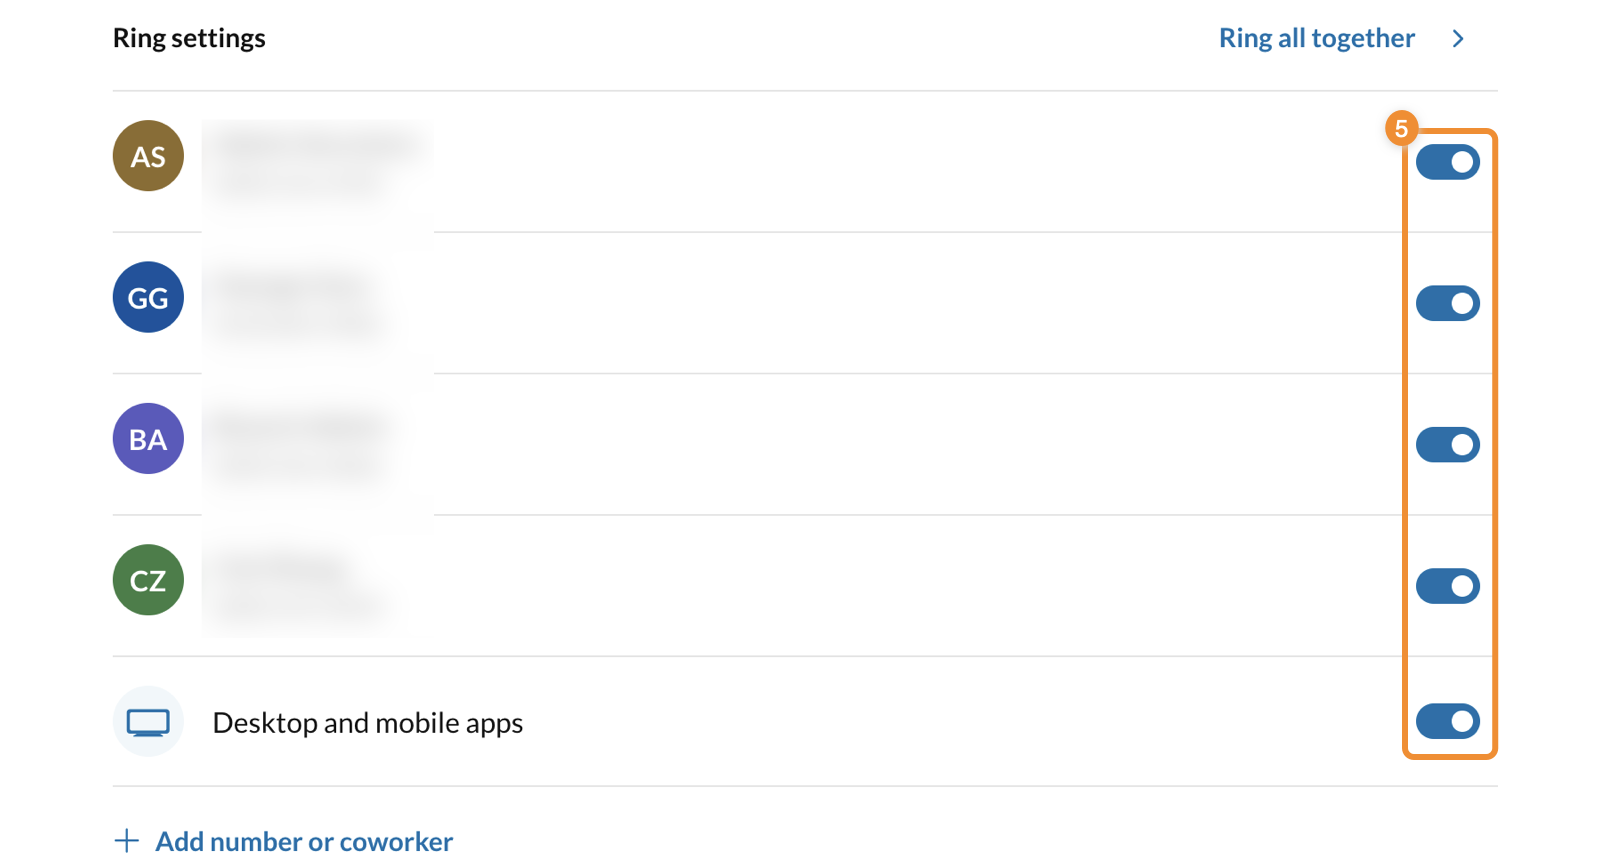
* Scroll down to the **Ring settings** section. Make sure all your phone numbers and devices are listed, and that each toggle is set to *On* . You can add devices to your list or edit your list, as needed .
### Check your incoming call ring duration
If your phones or apps ring for too little time, calls may get routed to voicemail before you can answer them.
* Go to the [
Admin Portal
](https://service.ringcentral.com "") and sign in.
Note: If you're an admin, click **Admin Portal \> My Extension** at the top right.
* Click **Settings** in the top menu.
* Click **Phone \> Call rules and voicemail**.
* Scroll down to the **My work day** section, then click **Incoming calls** .
Note: If you've already set your schedule, click either **Work hours** or **After hours**.
* Scroll down to the **Ring settings** section, then click either **Ring all together** or **Ring in order** at the right.
* Click the dropdown next to each entry to select how long you want your device(s) to ring.
* Select *Always Ring* if you want your apps to ring at the same time as your other listed devices and numbers.
* If you don't select *Always Ring*, you can select any number of rings from 2 (10 seconds) to 15 (75 seconds).
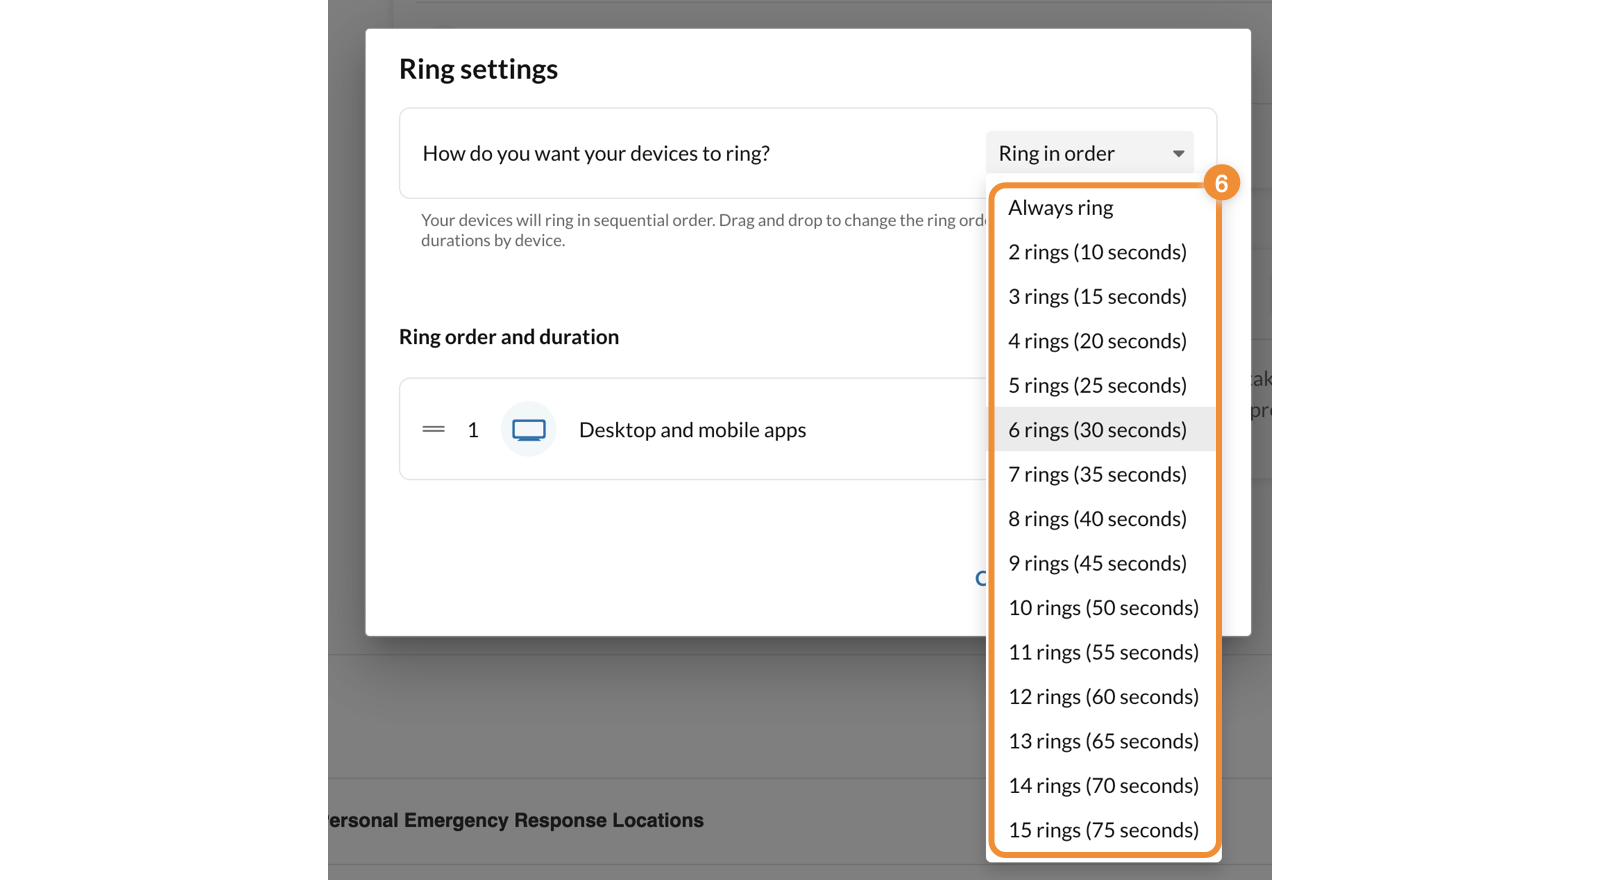
* Click **Done**.
Note: To set up a custom combination of apps and devices that ring together, you may want to [create a ring group](https://support.ringcentral.com/article-v2/Creating-Call-Monitoring-Groups.html?brand=RingCentral&product=RingEX&language=en_US "").
### Make sure custom call forwarding rules don't conflict with your regular call handling settings
If yourcustom answering rules conflict with your regular call handling settings, your calls may go straight to voicemail.
* Go to the [
Admin Portal
](https://service.ringcentral.com "") and sign in.
Note: If you're an admin, click **Admin Portal \> My Extension** at the top right.
* Click **Settings** in the top menu.
* Click **Phone \> Call rules and voicemail** , then scroll to check if you have a **Custom rules** section. (If you don't, then you don't have any custom call forwarding rules.) The toggle to the right of the rule will be off (grayed out) or on (blue).

* Click each rule to check for:
* Calls going to voicemail during times that conflict with your regular hours.
* Missing call forwarding numbers.
* Edit, delete, or turn off custom rules as needed.
### Make sure your phones, numbers, and apps are valid and working
If a phone, number, or app is invalid or not working correctly, your calls may go straight to voicemail. To learn whether a forwarding number or device is causing an issue, you'll need to test each one.
* Go to the [
Admin Portal
](https://service.ringcentral.com "") and sign in.
Note: If you're an admin, click **Admin Portal \> My Extension** at the top right.
* Click **Settings** in the top menu.
* Click **Phone \> Call rules and voicemail**.
* In the **My work day** section, click **Incoming calls**.
* Scroll down to the **Ring settings** section, then turn off the toggles for all but one of the listed numbers.
* Call that number to see if it rings.
* If the number rings, repeat steps 5-6.
* If the number doesn't ring:
* Click that number in the **Ring Settings** list, then click **Delete** .

* Test whether your calls still go straight to voicemail. If they don't, you've resolved the issue.
* If the problem persists:
* For issues with a
RingCentral
number, contact [
Support
](https://support.ringcentral.com/contact-support.html "")
* For issues with a third-party number, contact your phone carrier.
Make sure only one device is logged into each extension
-------------------------------------------------------
If multiple users can log into the same extension to make and receive calls, one user won't receive calls if the other is logged in. This situation most commonly occurs when employees work in shifts on the same extension.
Make sure the inactive user logs out of the extension on their softphone. Once they log out, calls will route to the current worker's softphone at the same extension.
Check mobile or desktop app login credentials
---------------------------------------------
To make sure your extension is working correctly, log in to the
RingCentral
app on your desktop or mobile phone. Check that you can receive calls by asking someone to dial your number. If you can't receive a call on either of these apps, contact [
Support
](https://support.ringcentral.com/contact-support.html "").
Check your internet connection
------------------------------
If calls continue going straight to voicemail, check your internet connection. Try turning your Wi-Fi connection off, then on again. You can also try powering down your router or modem, then turning it back on.
Check app version
-----------------
Calls may be going directly to voicemail because your
RingCentral
app is out of date.
* [Check for updates to the desktop and web app](https://support.ringcentral.com/article-v2/Updating-the-RingCentral-app-for-desktop-and-web.html?brand=RingCentral&product=RingEX&language=en_US "").
* To update your
RingCentral
mobile app, search Google Play (Android) or the App Store (iOS) for the most recent version.