Managing messaging notifications in the Admin Portal
====================================================
Admins and users can set up email and text notifications for when a new voicemail, fax, missed call, or text message has been received. If your account has the [AI Assistant](https://support.ringcentral.com/article-v2/Intro-to-the-RingCentral-AI-Assistant.html?brand=RingCentral&product=RingEX&language=en_US "") turned on, you can also set up email notifications to receive automatically generated call notes. Messaging notifications can be sent to multiple recipients at once.
Accessing notification settings
-------------------------------
You can manage your own notifications or update them for another user if you're an admin.
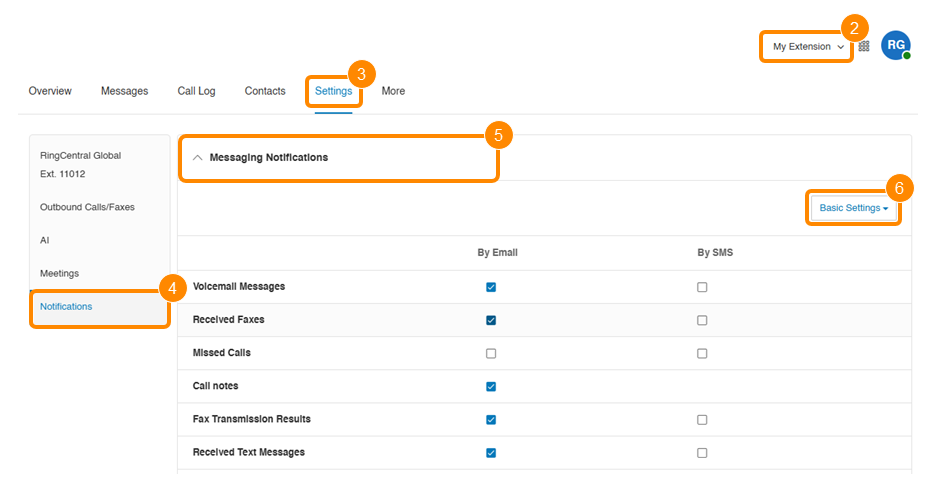
### Managing your own notifications
* Sign in to the [
Admin Portal
](https://service.ringcentral.com "").
* At the top right, select **My Extension** from the dropdown.
* Click the **Settings** tab.
* In the left panel, click **Notifications**.
* Click to open the **Messaging Notifications** section.
* Select *[Basic Settings](#manage-basic-settings "")* or *[Advanced Settings](#manage-advanced-settings "")* from the dropdown in the upper right.
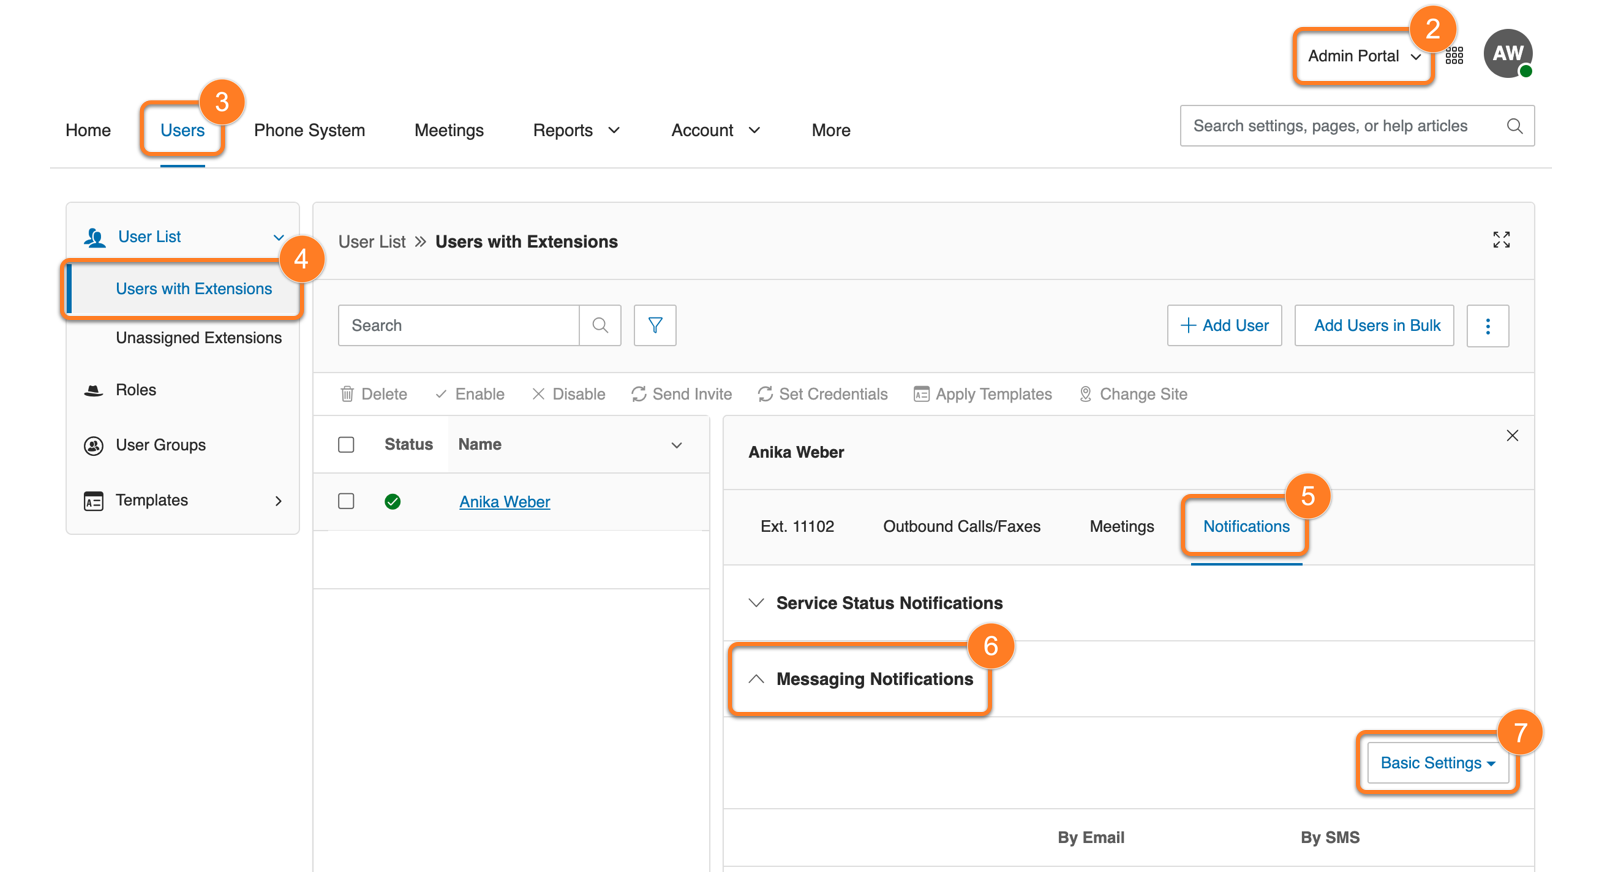
### Managing another user's notifications
* Sign in to the [
Admin Portal
](https://service.ringcentral.com "").
* At the top right, select**Admin Portal**from the dropdown.
* Click the **Users** tab.
* Select a user from the **Users with extensions** list.
* Click the **Notifications** tab.
* Click to open the **Messaging Notifications** section.
* Select *[Basic Settings](#manage-basic-settings "")* or *[Advanced Settings](#manage-advanced-settings "")* from the dropdown.
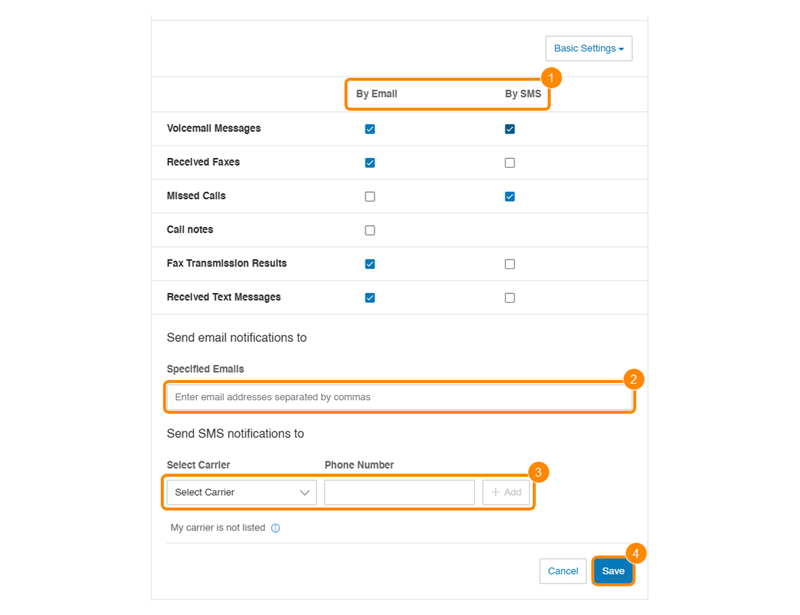
Managing the basic messaging notifications settings
---------------------------------------------------
* Check the boxes to specify the types of notifications you want to receive.
* For email notifications:
* Enter the email addresses under **Send notifications to**, separated by commas.
* For text message notifications:
* Select a carrier from the **Select Carrier**dropdown.
* Enter the phone number without any dashes, then click **Add**. Repeat this process to add more phone numbers.
* To delete a number, click **Delete** in the **Actions** column.
**Note**
If you don't see your carrier in the list, reach out to them to get the email address used for receiving text messages, then enter that address in the Phone number field (e.g., yournumber@yourcarrier.com).
* Click **Save** .
Managing the advanced messaging notifications settings
------------------------------------------------------
The **Advanced Settings** view lets you send notifications for each feature to a different email address or phone number.
* Check the boxes to specify the types of notifications you want to receive.
* Click **Customize Notifications** for each row you've selected.
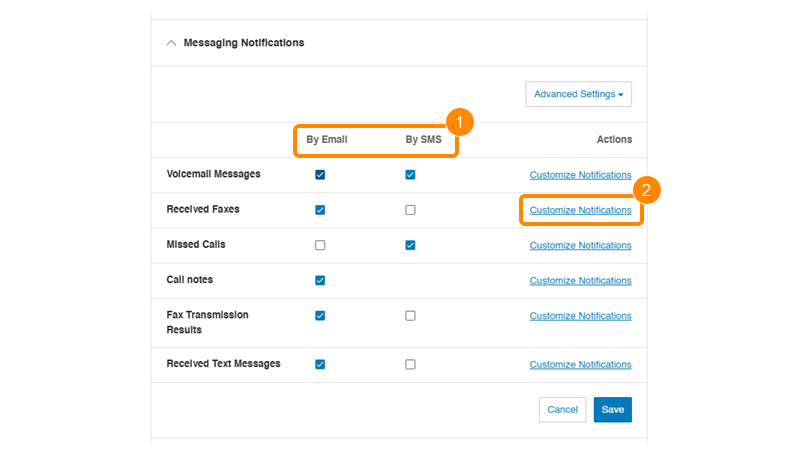
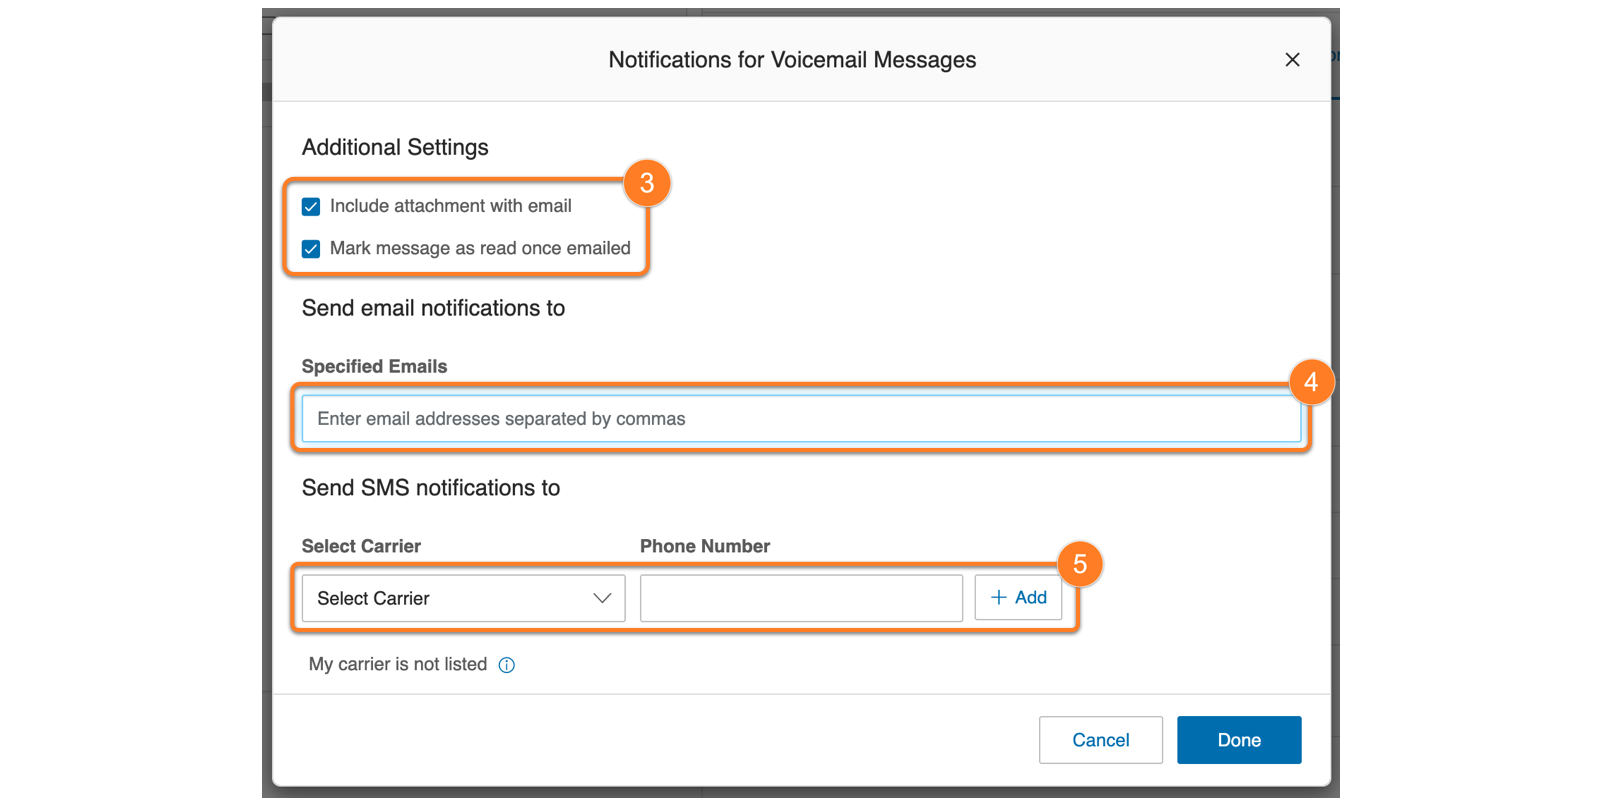
* Under **Customize Notifications** for **Voicemail Messages** and **Received Faxes** , you can check:
* **Include attachment with email**: Attach the MP3 voicemail audio file and/or the fax in PDF format.
* **Mark message as read once emailed**: Voicemails and/or faxes will automatically be marked as read in your call history.
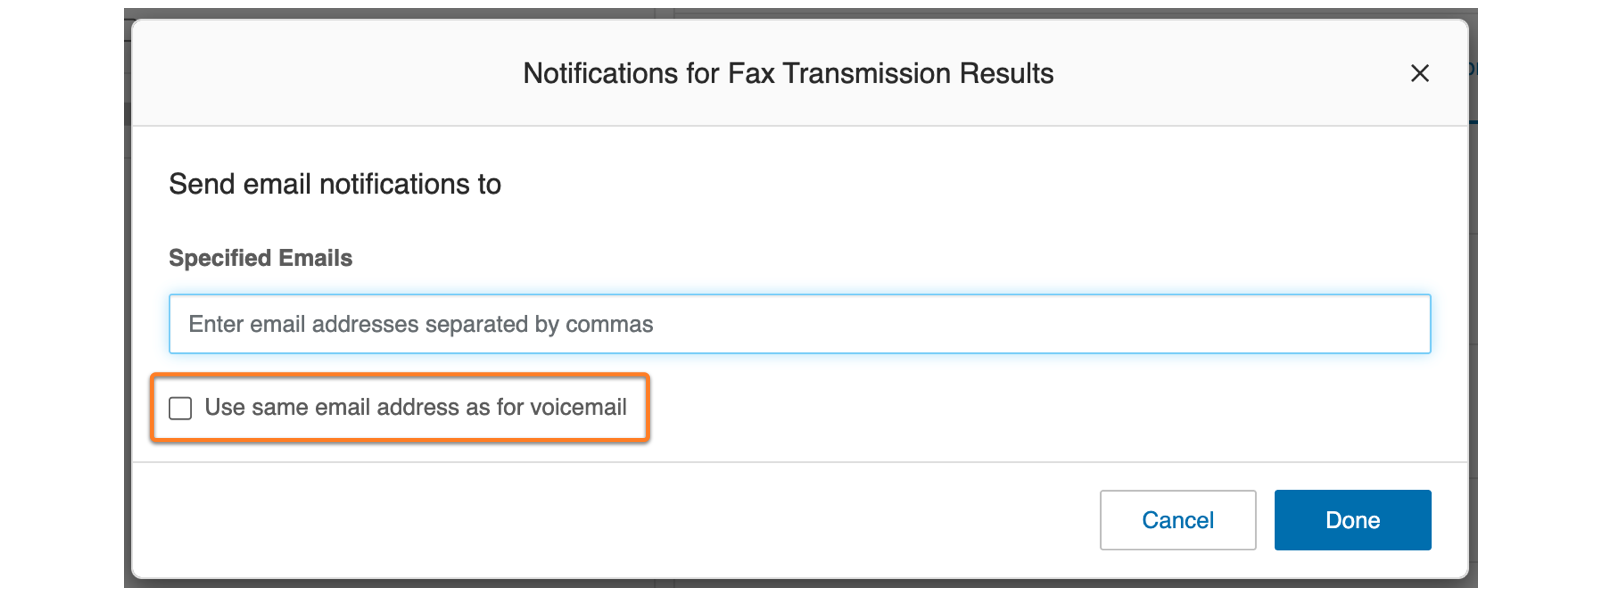
* For email notifications:
* Enter the email addresses under **Send notifications to**, separated by commas.
* For text message notifications:
* Select a carrier from the **Select Carrier**dropdown.
* Enter the phone number without any dashes, then click **Add**. Repeat this process to add more phone numbers.
* To delete a number, click **Delete** in the **Actions** column.
**Note**
If you don't see your carrier in the list, reach out to them to get the email address used for receiving text messages, then enter that address in the Phone number field (e.g., yournumber@yourcarrier.com).
* If you want to customize a different set of email addresses or phone numbers across features, uncheck the box and enter the new contact information. Based on your**Voicemail Messages** settings, you will see one of these options:
* *Use same email address as for voicemail*
* *Use same text address as for voicemail*
* *Use same email and text address as for voicemail*
* Click **Done**.
* Click **Save**.
**Additional resources**
[Updating the email address in your
RingCentral
account](https://support.ringcentral.com/article-v2/How-to-Update-User-Own-Email-Address.html?brand=RC_US&product=RingEX&language=en_US "")
[Setting message notification preferences in the
RingCentral
app](https://support.ringcentral.com/article-v2/Setting-message-notification-preferences-in-the-RingCentral-app.html?brand=RingCentral&product=RingEX&language=en_US "")
[Managing notifications and sounds in the
RingCentral
app](https://support.ringcentral.com/article-v2/Managing-notifications-and-sounds-in-the-RingCentral-app.html?brand=RingCentral&product=RingEX&language=en_US&pills-nav=desktop_%26_web "")