
Engage Voice | Configuring IVR reports
Once you’ve created an IVR group and an IVR, you have the option of configuring IVR reporting. The IVR Reporting tab takes you to a configuration page where you can assign specific fields for reporting data related to your IVR.
You can choose from a list of standard or custom fields. The fields you choose to assign when you configure IVR reporting determine what data you will see if you download or schedule an IVR report via Scheduled Reports.
You can access the Ivr Detail report by navigating to Analytics > Scheduled Reports. Once there, you can find the Ivr Detail report by selecting Realtime Reports.

If you want to learn how to download a report, you can read Downloading reports. If you want to learn how to schedule a report, read Scheduling reports.
Keep in mind that you can also view real-time data related to your IVRs by using the widgets in Real Time dashboards. To learn more about Real Time reporting, read Intro to Real Time reporting.
How to configure IVR reports
When you are ready to set up reporting, follow these steps:
1. Navigate to IVR > IVR Designer via the left-hand navigation bar
2. Select the IVR for which you’d like to configure your IVR reports
3. Click the Reporting tab in the configuration panel
4. Drag and drop each field you wish to assign from the two sections on the left to the Assigned Columns section on the right
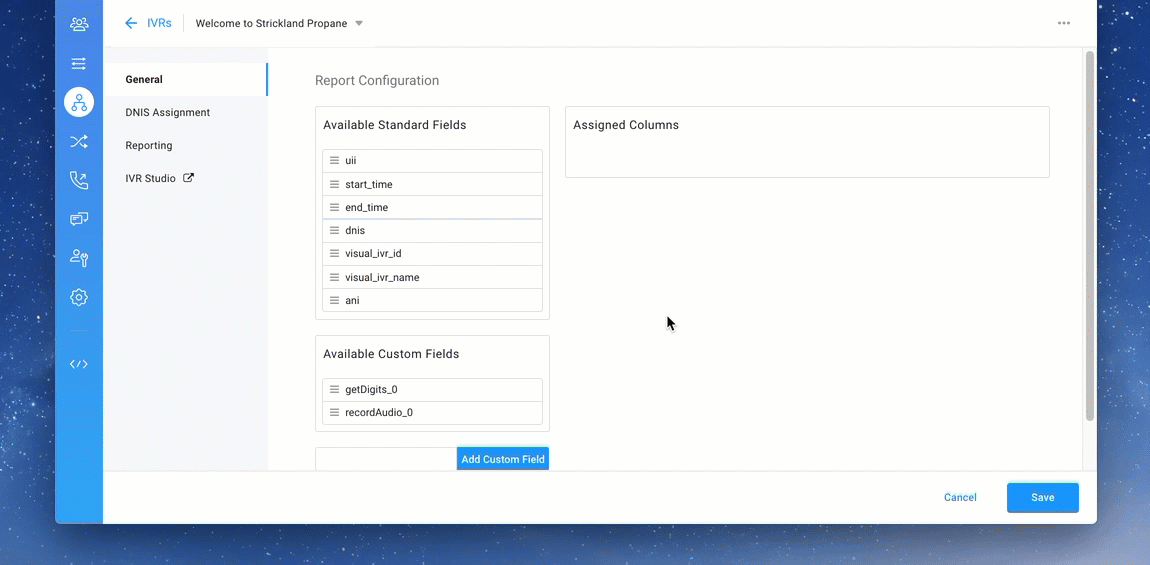
5. Add a description for each field in the Custom Header field at far right (optional)
6. Click the Save button in the lower right-hand corner of your screen
If you decide you want to remove some of the reporting fields, all you have to do is drag and drop them back into the tables on left and click Save again.
Standard fields
If you do not assign any standard fields when configuring IVR reporting, all of them will appear in the IVR report. So if you want to report on all of them, you don’t need to assign any fields. However, if you assign some standard fields and then download or schedule a report, only the standard fields you assigned will be reported on.
Also keep in mind that if you decide to customize which standard fields you want to appear in your reports, your choices will only be reflected in the reports if you download or schedule reports for individual IVRs. Anytime you download or schedule a report for more than one IVR, you will see all the standard fields.
Here are the standard fields you’ll encounter in the Report Configuration page.
- uii: This field indicates the unique call identifier that is used to identify each call to the IVR
- start_time: This field indicates the time the call to the IVR started
- end_time: This field may produce up to two records for each call to the IVR. If you only see one end time, then it indicates the time when the IVR ended. However, if you see two, the second one indicates the entire length of the call, for example, if it was transferred out of the IVR
- dnis: This field indicates the inbound phone number the caller used to access the IVR
- visual_ivr_id: This field indicates the unique identifier associated with the IVR the call was processed in
- visual_ivr_name: This field indicates the name of the IVR
- ani: This field indicates the inbound phone number of the caller
Custom fields
Assigning custom fields allows you to report on specific information related to individual nodes. However, keep in mind that you will need some knowledge of JavaScript to use custom fields.
After you build an IVR, you may see some custom fields that are automatically generated. For example, if you used the Rec Audio node or the Get Input node in your IVR, you will see custom fields available for those nodes. The name of the custom fields will match the node ID for those nodes.
You can also create your own custom fields. If you create a custom field, the name must match the JavaScript variable used in the IVR. To generate a new custom field, enter the name to the left of the Add Custom Field button and then click that button.
The Scripting node can be particularly useful for custom reporting. To learn more about the Scripting node, read Using the Scripting node.
When you download a report via Scheduled Reports, you’ll have the option of downloading reports on individual IVRs or more than one IVR simultaneously. However, keep in mind that if you want to be able to see information related to any custom fields you’ve assigned, you’ll need to download reports based on individual IVRs. The same is true for scheduling reports.
© 1999-2022 RingCentral, Inc. Tous droits réservés.