Engage Voice | Building an IVR to support call deflection

Call deflection allows a call center to deflect certain voice calls to digital channels, such as SMS, a Facebook page, Facebook Messenger, WhatsApp, Google Business Messages, or Apple Business Chat. These digital channels can be managed through the Digital app in the Omni-channel solution, or in Engage Digital.

The case

Dan Clay owns a propane and propane accessories company in Dallas, Texas. Due to an increase in customer service calls, Dan has decided that certain callers do not require speaking to a live agent, and can be best served through an agent specializing in digital interactions. Dan, therefore, wants to deflect some of his calls to the IVR to his digital channels, so that the agents can be assigned those interactions through a digital queue. 
 
When a customer reaches the IVR, they will be given an option to wait in queue for a live agent or to receive an SMS that provides them a link so they can chat with customer support over a digital channel. For example, a Get Input node will ask the customer to enter 1 for a live agent, or 2 for an SMS. 
 
The digital channels that you can deflect calls to include:
  • A Facebook page
  • Facebook Messenger
  • WhatsApp
  • Apple Business Chat
  • Google Business Messages
  • SMS
Call deflection to a chatbot is a more advanced scenario that requires you to develop a custom agent script.

Authorization through RingCentral RingEX

Dan will configure his IVR to use RingEX as a private app to send the SMS to the customer. Dan’s method is not suitable for a partner application as Dan wants to retain control over his password flow. Dan will configure nodes in his IVR to authenticate with RingEX over HTTP Post, to receive an access code from the response body, to save that access code in the IVR, to send the SMS, and to disconnect.

Goals

Edit an existing IVR so that it can:
1. Collect input from callers to determine if they want a live agent or to receive an SMS.
2. Connect and authenticate through RingEX.
3. Prepare the format of and send an SMS message.
4. Disconnect from RingEX.

Plan

1. Edit an existing IVR to have an additional path to send an SMS that deflects a call to a
    digital channel.
2. Leverage the RingEX APIs to authenticate and send the SMS.

Lesson

Configuring call deflection to a digital channel.

Recommended reading

Preconditions

Remember that Dan will be deflecting some of the callers to digital channels. Dan needs to work with an administrator for the digital channels he will use to support customers. The administrator will provide Dan the URL or other information he needs to provide in the SMS for customers to connect to those channels.

Actions

1. Configuring the IVR node connections.
2. Configuring a Get Input node to collect caller input.
3. Configuring a WWW node to connect to RingEX.
4. Configuring a Scripting node to prepare the format of the SMS.
5. Configuring a WWW node to send the SMS.
6. Disconnect from RingEX and wrap up the call.

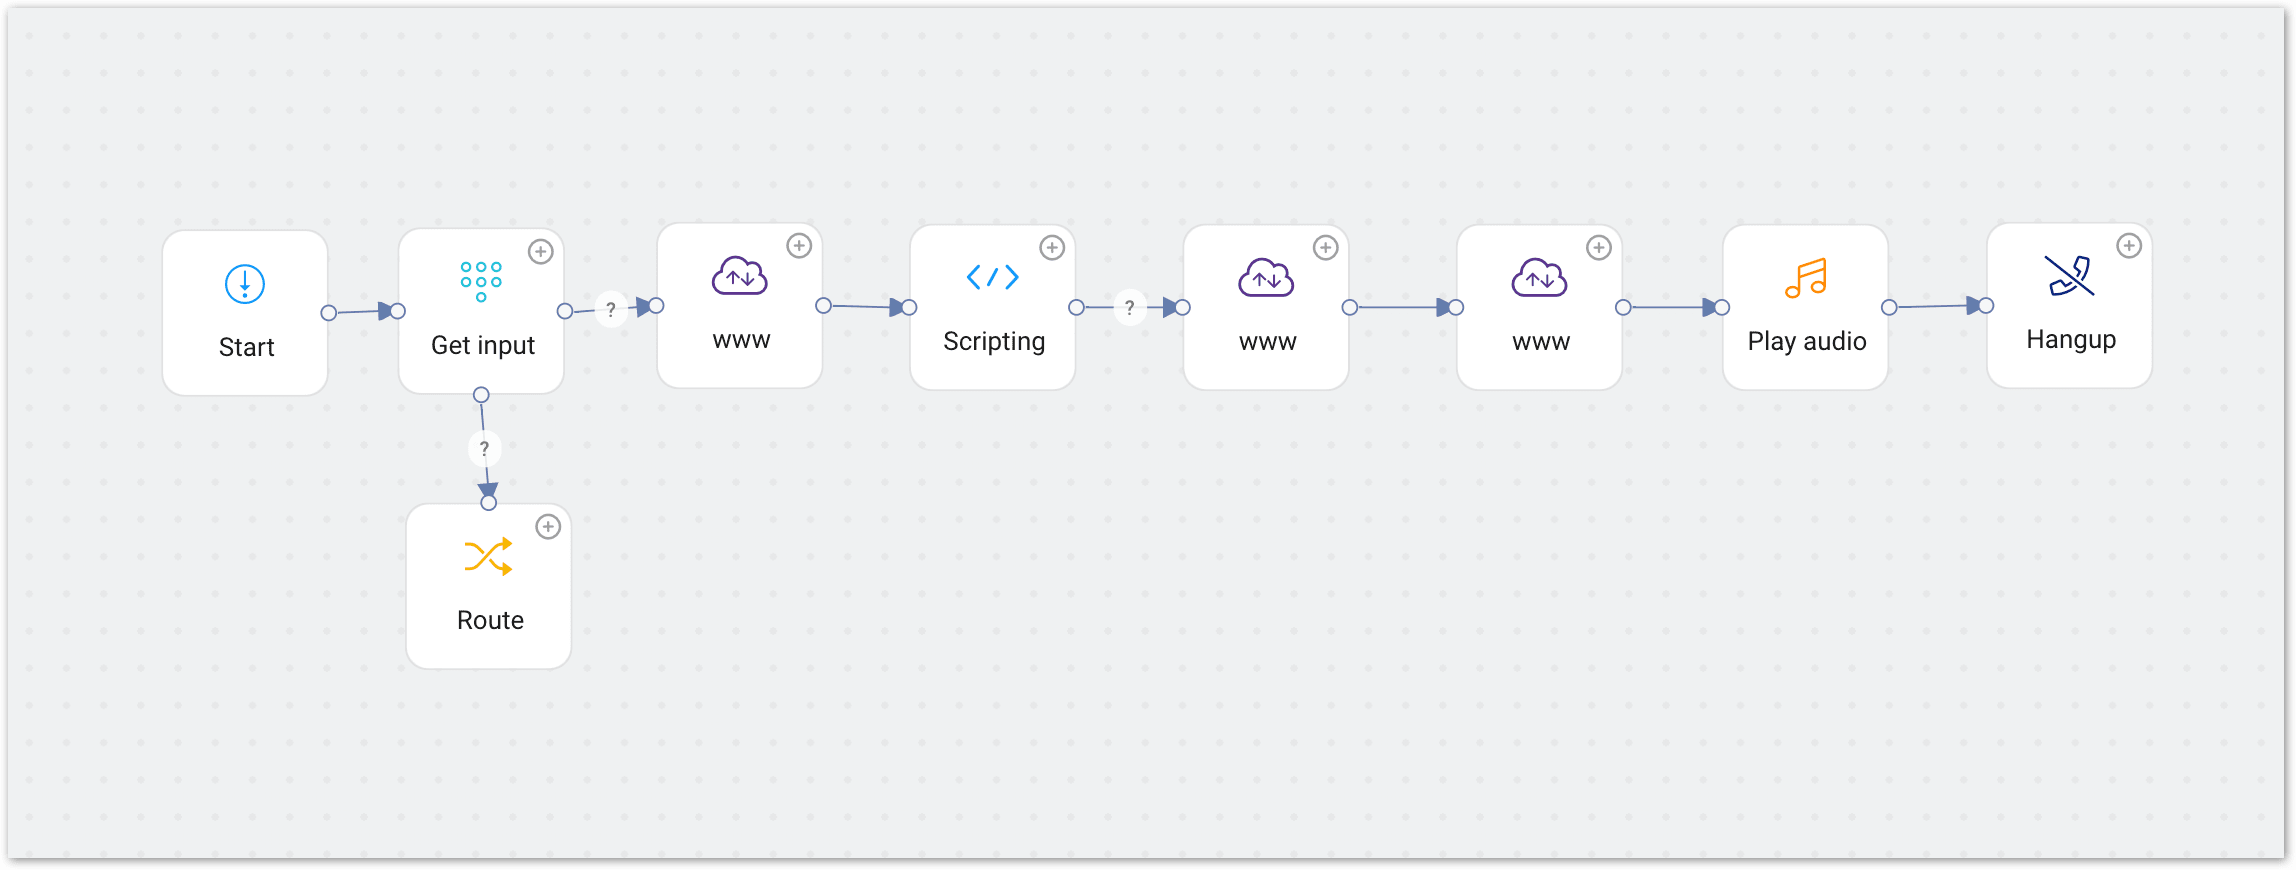
Step 1: Configuring the IVR node connections

1. In IVR Studio, drag a Get Input node onto the canvas to the right of the Start node.
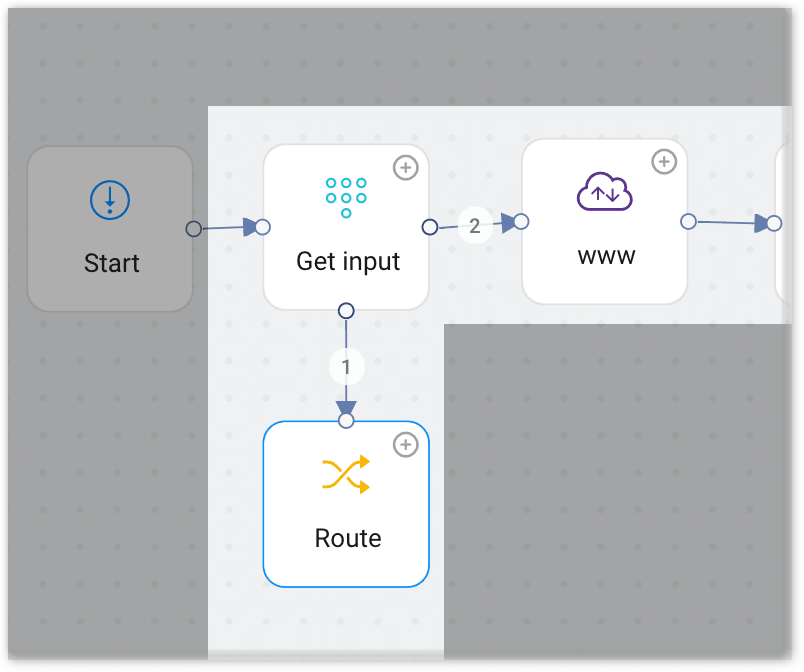
    Connect the Start node to the Get Input node.
2. Drag a Route node underneath the Get Input node. Connect the Get Input node to
    the Route node. 
3. Drag a WWW node to the right of the Get Input node. Connect the Get Input node to
    the WWW node.
4. Drag a Scripting node to the right of the WWW node, then connect the Scripting
    node to the WWW node.
5. Drag a second WWW node to the right of the Scripting node and connect them,
    Scripting node to WWW node. 
6. Drag a third WWW node to the right of the second WWW node and connect them,
    second WWW node to the third WWW node. 
7. Drag a Play audio node to the right of the third WWW node and connect them, third
    WWW node to Play audio node.
8. Drag a Hangup node to the right of the Play audio node and connect them. 
Configuring the IVR node connections

Step 2: Configuring a Get Input node to collect caller input

1. Edit the Get Input node to specify these properties:

a. Specify Type as Exact Input.

b. Specify DTMF Input by clicking Add Input, and specify an input of 1. Repeat for 2.

2. Double click the question mark on the arrow connecting the Get Input node to the
    Route node. This will open the connector arrow property settings so you can
    perform the following: 

a. Select 1 under Selection(s).

b. Click OK to close the modal window.

3. Double click the question mark on the arrow connecting the Get Input node to the
    WWW node. This will open the connector arrow property settings so you can
    perform the following: 

a. Select 2 under Selection(s).

b. Click OK to close the modal window.

Configuring a Get Input node to collect caller input

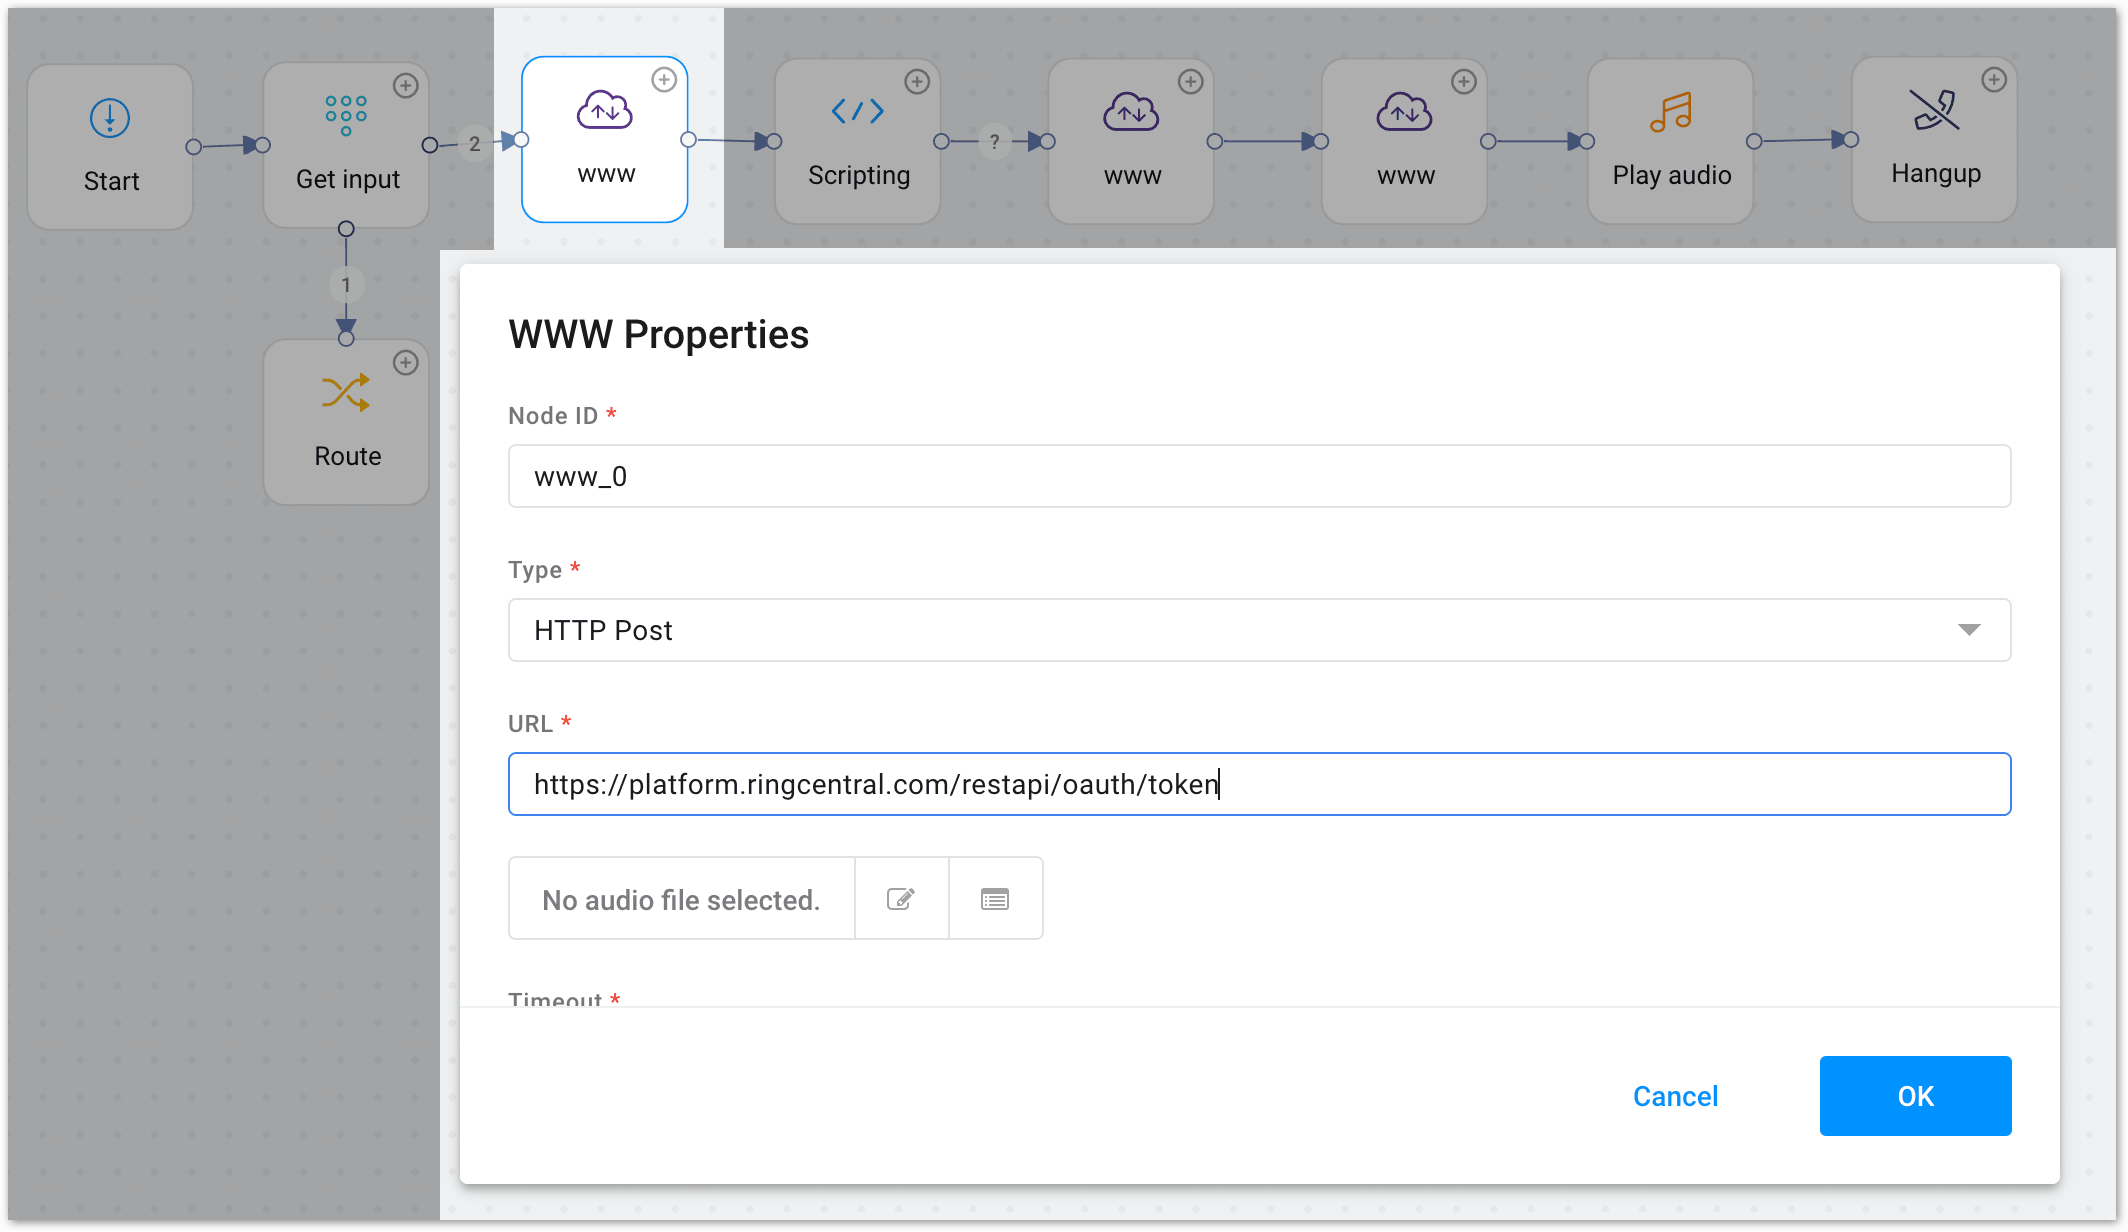
Step 3: Configuring a WWW node to connect to RingEX

You will configure a WWW node that will be used to authenticate a single user with RingEX through an OAuth 2.0 password flow. See Password Flow in the RingEX Developer Guide.
1. Double click the first WWW node to enter the node’s configuration settings.

a. Select the Type as HTTP Post.

b. Specify the URL as https://platform.ringcentral.com/restapi/oauth/token.

c. Specify a Format of Plain Text.

d. In the Body Content tab, enter body text in the form:


grant_type=password&username=%2Bnumber&password=password&extension=extension


For example: 


grant_type=password&username=%2B16505551212&password=example&extension=9000


e. In the Custom HTTP Headers tab add the following headers:

i. Name: Content-Type

   Type: Fixed Value

   Mapping: application/x-www-form-urlencoded

ii. Name: Authorization

   Type: Fixed Value

   Mapping: Basic app-ID   

f. Click OK to close the modal window.

Configuring a WWW node to connect to RingCentral Office

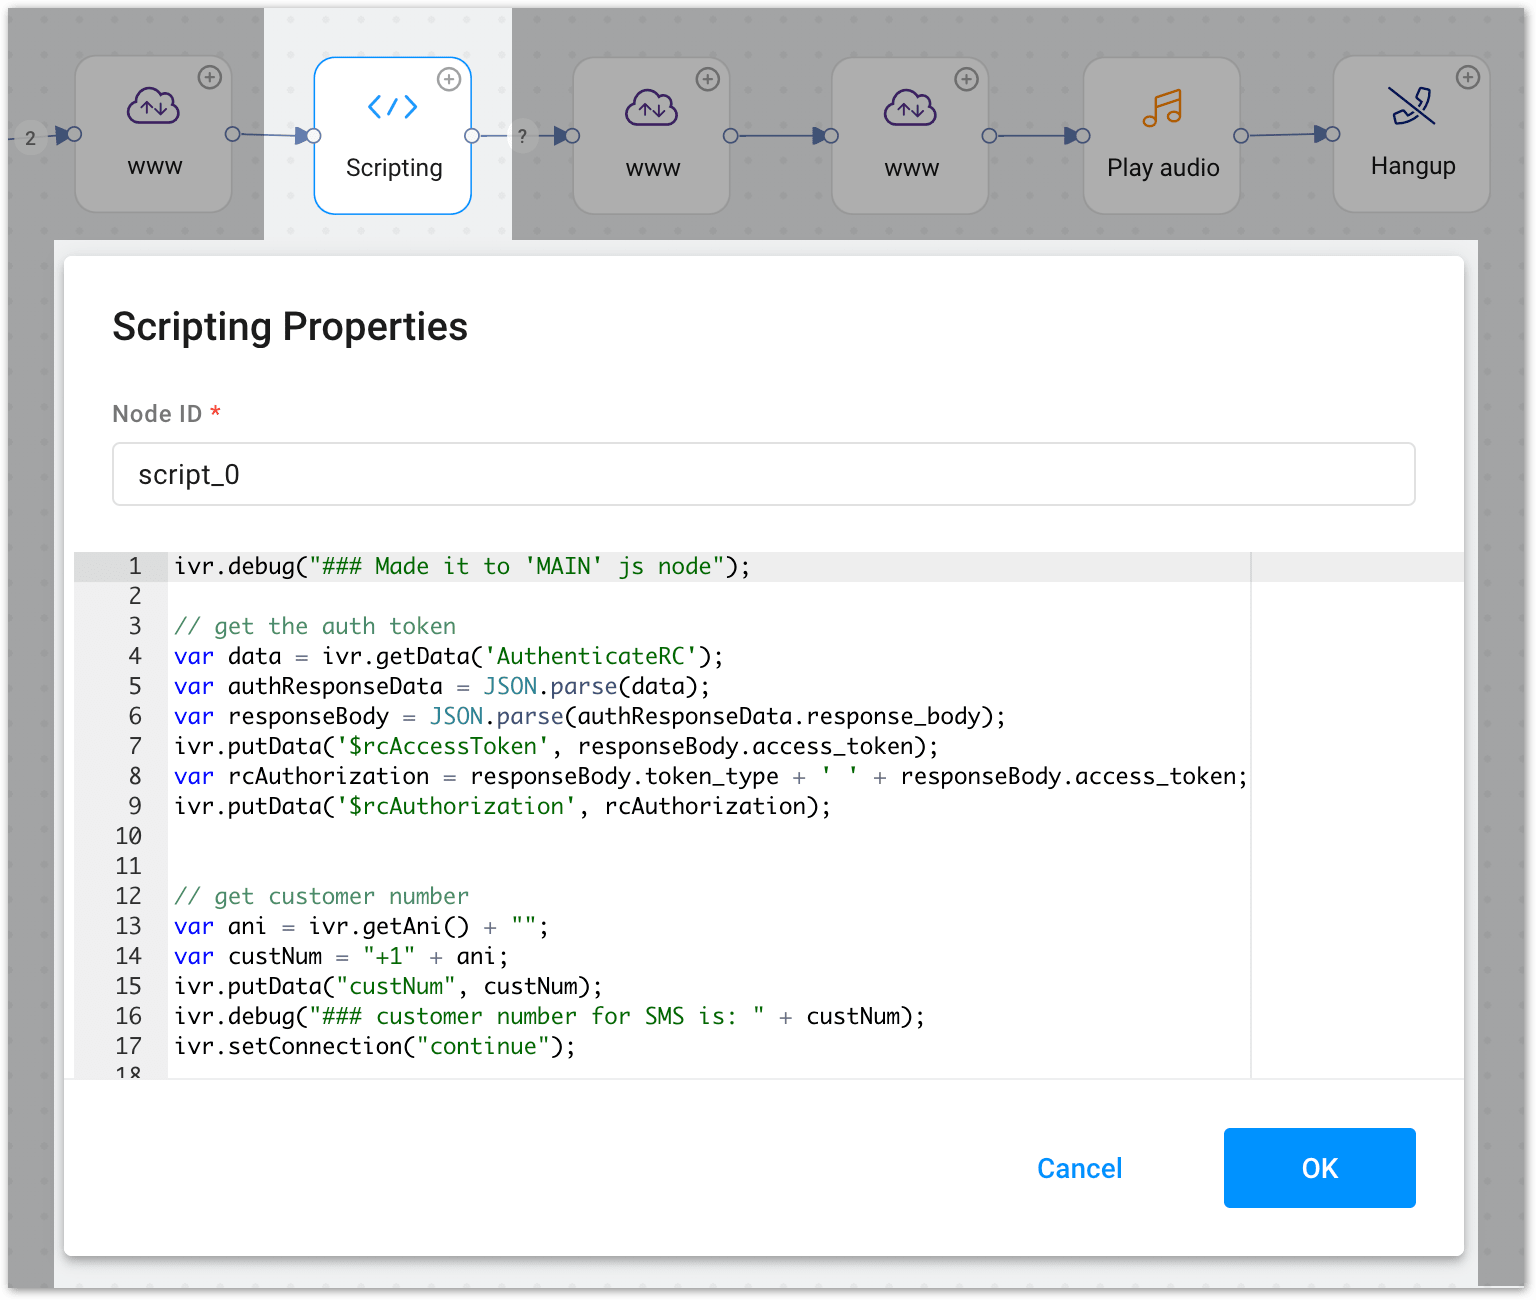
Step 4: Configuring a Scripting node to prepare the format of the SMS

1. Double click the Scripting node to enter the node’s configuration settings.

a. Enter a name in the Node Id field (optional).

b. Enter code as desired. A sample script is below.

c. Click OK to close the modal window.

Sample script

This script gets the authorization token and the customer number. This information is needed in the next node.
ivr.debug("### Made it to 'MAIN' js node");
 
// get the auth token
var data = ivr.getData('AuthenticateRC');
var authResponseData = JSON.parse(data);
var responseBody = JSON.parse(authResponseData.response_body);
ivr.putData('$rcAccessToken', responseBody.access_token);
var rcAuthorization = responseBody.token_type + ' ' + responseBody.access_token;
ivr.putData('$rcAuthorization', rcAuthorization);


// get customer number
var ani = ivr.getAni() + "";
var custNum = "+1" + ani;
ivr.putData("custNum", custNum);
ivr.debug("### customer number for SMS is: " + custNum);
ivr.setConnection("continue");
 
Configuring a Scripting node to prepare the format of the SMS

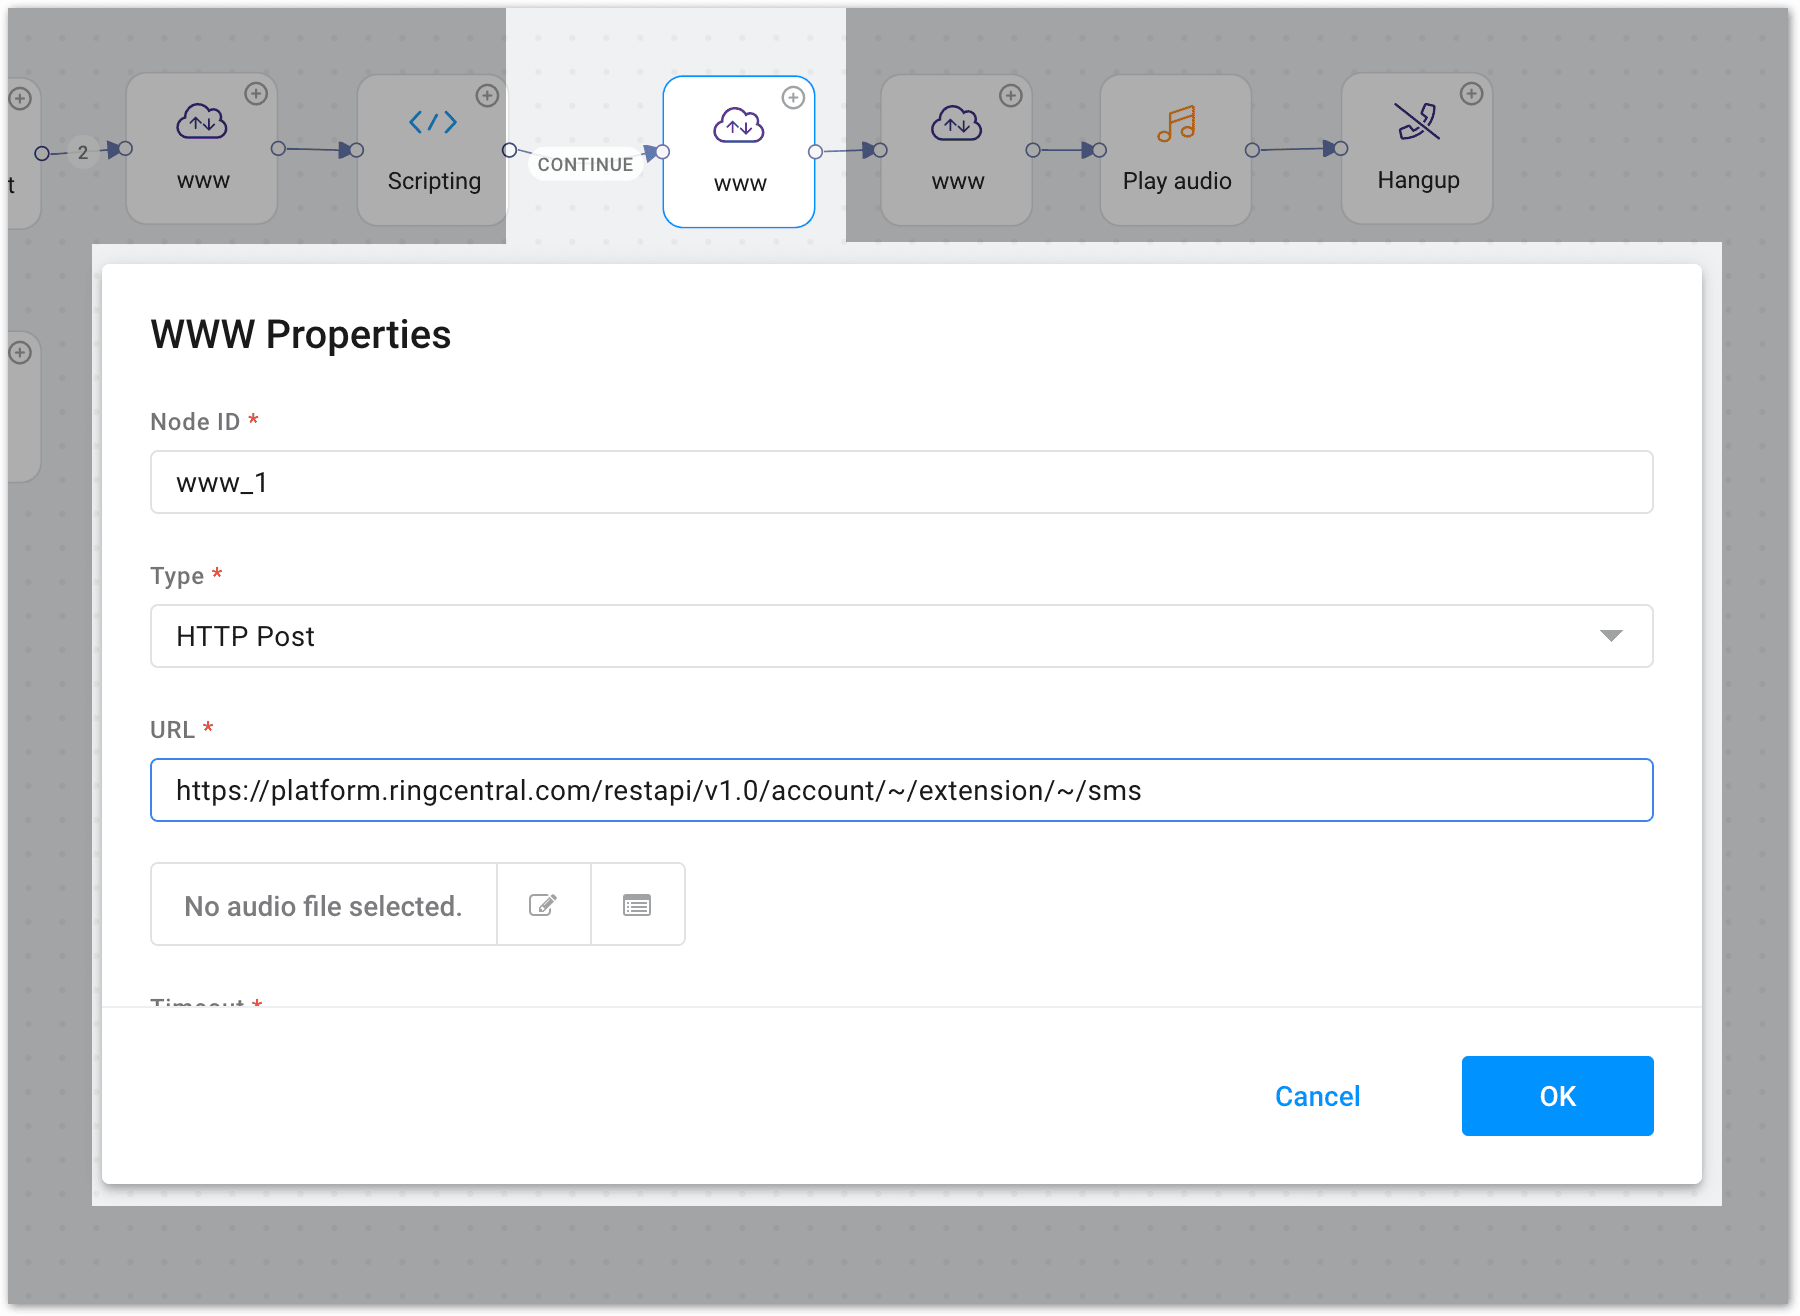
Step 5: Configuring a WWW node to send the SMS

1. Double click the question mark on the arrow connecting the Scripting node to the second WWW node. This will open the connector arrow property settings so you can perform the following: 

a. Specify a Connection Id of continue.

b. Click OK to close the modal window.

2. Double click the second WWW node to enter the node’s configuration settings

a. Select the Type as HTTP Post.

b. Specify the URL as https://platform.ringcentral.com/restapi/v1.0/account/~/extension/~/sms.

c. Specify a Format of JSON.

d. In the Body Content tab, enter the JSON content needed for SMS. 


For example: 


{

    "from": {"phoneNumber":"+16505551212"},

    "to":[

        {"phoneNumber":"$custNum"}

    ],

    "text":"Thank you for contacting us. You can reply here to chat with us through SMS, or you can contact us through WhatsApp at https://wa.me/12345678901 or Apple Business Chat at https://bcrw.apple.com/urn:biz:9c231233-d943-482a-b913-7c625ba12345.”

}


e. In the Custom HTTP Headers tab add the following header:

i. Name: Authorization, Type: IVR Variable, Mapping: $rcAuthorization

f. Click OK to close the modal window.

Configuring a WWW node to send the SMS

Helpful hint!

Work with your administrator for each of your individual digital channels to determine the URL for access.
  • A Facebook page: Log as admin to a page that you manage and capture the URL at top of page. 
  • Facebook Messenger: Open Messenger from your page, and copy the URL of the chat.
  • WhatsApp: WhatsApp click to chat URL: https://wa.me/1XXXXXXXXXX. Requires a registered number.
  • Apple Business Chat: The Apple Business Chat URL. Only works on Apple devices.
  • Google Business Messages: Log into Google My Business and copy the URL from the home page.

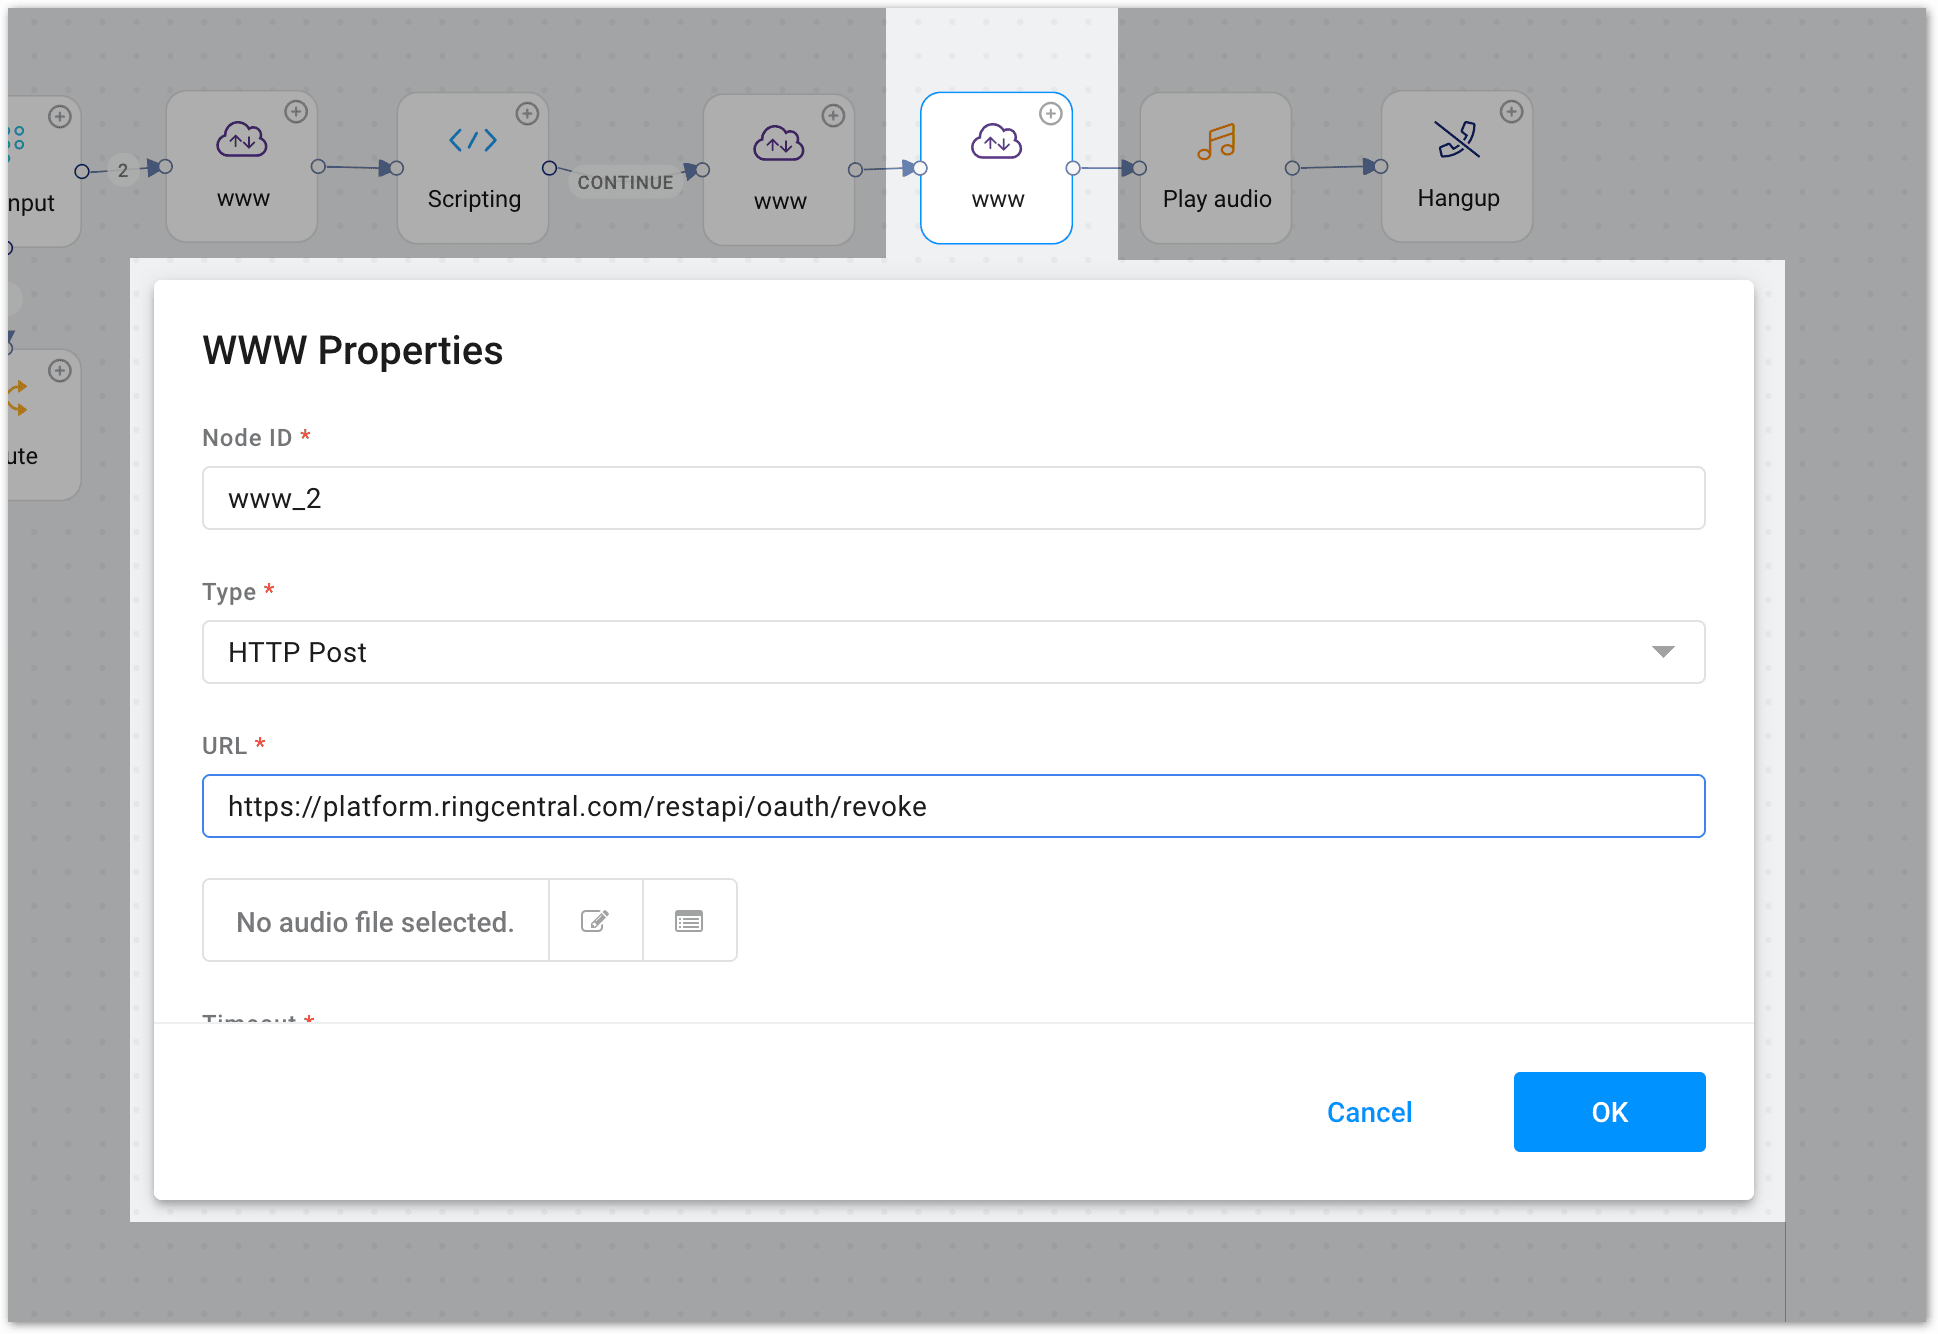
Step 6: Disconnect from RingEX and wrap up the call

1. Double click the third WWW node to enter the node’s configuration settings.

a. Select the Type as HTTP Post.

b. Specify the URL as https://platform.ringcentral.com/restapi/oauth/revoke.

c. Specify a Format of Plain Text.

d. In the Body Content tab, enter token=$rcAccessToken.

e. In the Custom HTTP Headers tab add the following headers:

i. Name: Content-Type, Type: Fixed Value, Mapping: application/x-www-
   form-urlencoded

ii. Name: Authorization, Type: Fixed Value, Mapping: Basic app-ID   

f. Click OK to close the modal window.

2. Configure the Play audio node with an audio file ending the call.
3. Save the IVR by clicking Save in the upper right-hand corner.
Disconnect from RingCentral Office and wrap up the call
When testing the IVR, Dan should call the IVR and select option 2 to receive an SMS. Dan should verify that the SMS is received, and test access to each of the URLs for the digital channels as provided in the SMS. Dan’s agents can now handle both live calls and digital interactions.
© 1999-2022 RingCentral, Inc. All rights reserved.
Thanks!
We've sent you a link, please check your phone!
Please allow a full minute between phone number submissions.
There was an issue with SMS sending. Please try again. If the issue persists, please contact support.